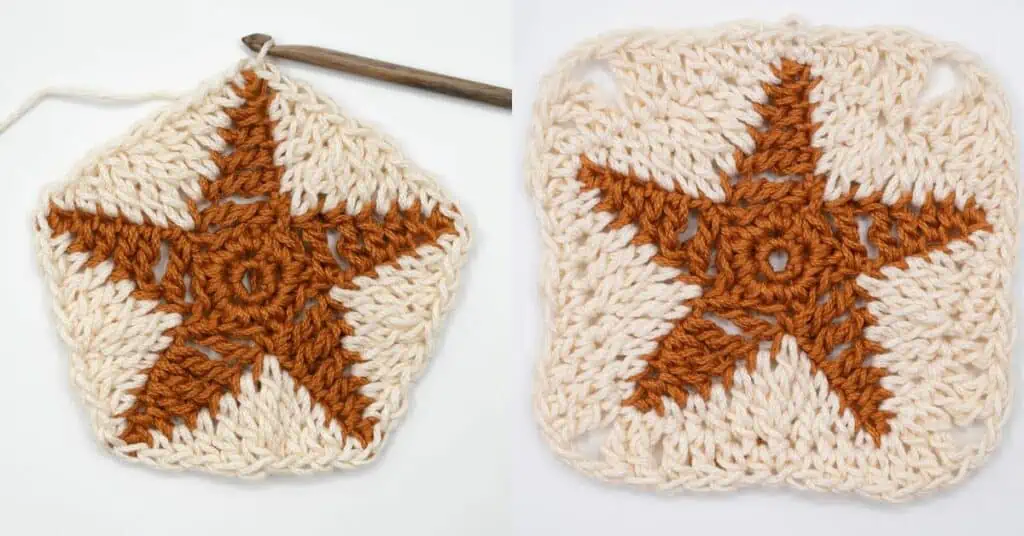
Have you been searching for a crochet star granny square? You’ve just found the right site, because here’s an amazing step-by-step star granny square tutorial.
In this crochet tutorial you will learn how to crochet a star granny square.
This star granny square is a great alternative to the classic granny square with less gaps and a star and great if you like everything related to granny squares.

Crochet A Stunning Star Granny Square
The star granny square is crocheted from the center outwards, starting with the Crochet Granny Star or Crochet Star Pattern.
The first rounds is crocheted in the first color(ms or color A) creating a star, then you change to a new color to when you’re going to turn the star into a granny square.
It’s a great crochet granny square where you can use yarn scraps to finish the free crochet pattern.
Save on Pinterest!

Ultimate Guide to Granny Squares
Like this? Get the ad-free version + 33 other crochet patterns & tutorials with the “Ultimate Guide to Granny Squares”.
Learn more about the Ultimate Guide to Granny Squares
Materials & Tools For Granny Squares
To crochet granny squares and granny square shapes, you can use any size/mm crochet hook and yarn.
You can use any yarn fiber, like cotton, wool or acrylic yarn.
However, it’s most common to use either 3 light yarn (dk weight yarn) or 4 medium weight yarn (aran or worsted weight yarn).
Here are a couple of yarns I’d recommend to crochet granny squares:
- Lion Brand – Wool Ease
- Lion Brand – 24/7 Cotton
- Red Heart – Super Saver
These two yarns come in many beautiful colors & work for a range of granny square patterns.
Next, you’ll need a crochet hook that matches the yarn weight & a granny square blocking board is helpful when you block the finished pieces.
Best Tips for Crocheting Granny Squares
There are several factors that can help you have success when crocheting granny squares.
- Count stitches: Make sure you got each round right by counting stitches after finishing one round or side of the granny square.
- Weave in yarn tails as you crochet: Don’t leave weaving in yarn tails until you finish crocheting all your granny squares. Make a habit of weaving them in before you crochet another granny square, which will make weaving in ends less overwhelming.
- Use colors that contrasts well with each other. This will give you an overall more stunning look.
- Block your granny squares: Make sure you get a professional finish by blocking your granny squares.

How To Crochet a Star Granny Square
Skill Level
Materials
- 2 colors of Yarn
Abbreviations
- ch = chain
- ch-space = open space made by chain(s)
- dc = double crochet
- hdc = half double crochet
- prev = previous
- sc = single crochet
- sk = skip(ped)
- sl st = slip stitch
- tr = treble crochet
- tr3tog = treble crochet 3 together
Instructions
Star
- With color A ch 2.Round 1: Sc 5 in 1st ch, sl in 1st sc (= 5 st).
- Round 2: Ch 1, sc 3 in each sc from prev round, sl st in 1st sc (=15 st).
- Round 3: Ch 1, sc 1 in same place as sl st (base sc), *ch 6, sl st in 2nd ch from hook, sc 1 in next ch, hdc 1 in next ch, dc 1 in next ch, tr 1 in next ch, tr 1 in side of base sc, sk 2 st from round 2, sc 1 in next sc (base sc)*, repeat from *to* 4 times, omitting last sc of last repeat, sl st in 1st st.
- Fasten off and cut yarn.
Granny Square
- With color B make slip knot. Find one of the sl st from pointy end of star.Round 4: *sl st 1 in sl st, sc 1 in next st, hdc 1 in next st, dc 1 in next st, tr 1 in next st, tr3tog into next 3 st, tr 1 in next st, dc 1 in next st, hdc 1 in next st, sc 1 in next st, sl st 1 in next st*, repeat from *to* 4 times, sl st in 1st st.
- Round 5: *sc 1 in the next 2 st, hdc 1 in next 2 st, dc 1 in next 2 st, tr 1 in next 2 st, ch 2, tr 1 in next 2 st, dc 1 in next 2 st, hdc 1 in next 2 st*, repeat from *to* 3 times, sl st in 1st st.Note: Last st of last repeat will be only 1 hdc stitch.
- Fasten off and weave in ends with a yarn needle.
Notes
- This pattern is written in US terms (learn how to change to UK terms).
- The crochet star granny square is crocheted in rounds with the right side facing at all times.
- This crochet granny square can be crocheted with any crochet hook size and yarn.
- Use it as a full project itself, or make many for a combined crochet project.
- You can swap the chains in the beginning for a magic ring/magic circle if you prefer that.
Crochet Patterns Using Granny Squares
Use the granny square you just learned in one of these crochet patterns featuring granny squares:
- Granny Square Cardigan
- Granny Square Sweater
- Granny Square Market Bag
- Granny Square Basket
- Granny Square Ottoman
- Granny Square Dishcloth
- Granny Square Dish Towel
- Ferris Wheel Granny Square Shawl
- Your Sunday Shawl
- Clover Leaf Granny Square Pillow
- Not Your Granny’s Tee
You could also join multiple to crochet a granny square blanket.
How to Join Granny Squares Together
After learning to crochet this granny square, you of course need a way to join them together. There are several great ways to join granny squares together. But I’ll share 3 of the most common with you!
Whip Stitch
- The whip stitch uses yarn and needle.
- To whip stitch granny squares together, align the stitches of two granny squares with the right side facing against each other.
- With a needle, work through each of the aligned stitches with the yarn and needle
Whip Stitch Photo & Video Tutorial
Flat Slip Stitch Join
The flat slip stitch join creates a beautiful slip stitch seam between each of the granny squares.
- Make a slip knot and place it on the crochet hook.
- Line up two granny squares with the right side facing.
- Insert hook through the back loops of corner stitches on each square and slip stitch.
- Continue repeating for each stitch along the edge of the granny squares.
Flat Slip Stitch Join Tutorial
Join Granny Squares As You Go (JAYGO)
When you join granny squares as you go you will use yarn and a crochet hook, now sewing necessary.
There are 3 great ways to JAYGO:
More Granny Square Patterns
Now that you have learned this granny square pattern, you may want to explore a few more:


