

How to Make a Slip Knot in Crocheting: A tutorial on making a slip knot in crochet that is very useful to know when learning crochet. We also have step by step photos so you can see the exact process of how to make a slip knot for crochet.
Knowing how to do a slip knot in crochet is the first step in learning how to crochet. It’s used to begin a crochet project and starting crochet chains. It is basically the foundation to begin working with the yarn, and the rest of the stitches are built around this foundation.
A slip knot, also known as a long knot, chain knot, adjustable loop or starting knot, is a basic crochet technique that every crocheter should know.

Would you like to save this?
What is a Slip Knot in Crochet?
A slip knot is one of the first techniques that you learn in crochet. It is also probably the most important because it will be used every time you start a crochet project with a crochet starter chain.
Making a crochet slip knot is easy and you will use it throughout your crocheting career.
The slip knot is also called an adjustable loop and is used to begin a crochet piece.
It is a tie that creates a small loop that you make to place on your crochet hook, then pull the yarn to tighten the loop. You will use an adjustable loop to begin every project.
Crochet Supplies You Need to Make a Slip Knot
Any crochet hook size and yarn.
For making slip knots you can use any type of yarn from acrylic yarn, wool yarn to cotton yarn.
For the slip knot itself you only need yarn, but when placing it onto the crochet hook to start crochet chains, you will need the hook.
If it is you first project, I suggest trying size:
- 3 light yarn with a 4.5 mm, 5 mm or 5.5 mm crochet hook
- 4 medium yarn with a 5.5 mm, 6 mm or 6.5 mm crochet hook
- 5 bulky yarn with a 6.5 mm, 7 mm, 8 mm or 9 mm crochet hook
In the photos the yarn used was 4 medium worsted weight yarn.
The exact sizes yarn and crochet hook doesn’t matter, but the experience for a beginner improves if you have a crochet hook and yarn that match fairly well.
If you have just one hook and yarn, use what you have!
Save to Pinterest!

How to Make a Crochet Slip Knot for Crochet
A quick written description of how to make a slip knot.
- Hold the yarn in your hands
- Cross the short yarn tail in front of the long to create a loop.
- Cross the long yarn tail over the loop
- Pull the long yarn tail through the first loop you made.
Making a slip knot for crochet – step by step photo tutorial
Learn easily how to make slip knot crochet to start working any crochet pattern with the detailed photo instructions below.
All you need is a crochet hook and yarn.
How to Make a Slip Knot in Crocheting
Skill Level
Tools

Materials
Instructions
- The first step on how to tie a crochet slip knot is to grab the yarn and hold it in your hands between your thumb and index finger.

- Cross the yarn with the short yarn tail in front, to make a loop.Take note of what your two ends of yarn, where the short and long yarn tail is.The long yarn end is the side with the yarn skein attached, while the short is the tail end of the yarn. In this example the short yarn tail is on the right hand, while the long yarn tail is on the left hand. It is recommended that the short yarn tail is at least 4 inches or 10 cm.
- Without unraveling the loop, the next step to make a slip knot for crocheting is to place it in your palm.
- Cross the long yarn tail over the loop. By crossing the long yarn tail, you will be able to adjust the long tail instead of the short yarn tail. That makes it possible to create a bigger loop and will end up being your working yarn.
- The long yarn tail you just crossed in front, grab it and pull it through the first loop you made.
- Final step, pull the long yarn tail and tighten. You have now tied a slip knot.


How to place a slip knot on a crochet hook
You learned how to make crochet slip knot, what now?
To start a crochet project, you also have to place the staring knot on your crochet hook. Below we will get you ready for the next step, starting a crochet foundation chain, by placing the slip knot on the crochet hook.
Step 1: Have your crochet hook and slip knot ready
With your finished adjustable loop ready, grab your crochet hook.

Step 2: Place the loop on the crochet hook
Grab the slip knot and place the loop around the head of the crochet hook.

Step 3: Tighten the loop on the crochet hook
Pull the long yarn tail to tighten the loop on the crochet hook. You are now ready to start crocheting. The next step is for most beginners learning crochet how to start a chain in crochet.
Make sure the working end of the yarn (the long yarn tail) is at the back, while the tail end is at the front when placing the yarn on the crochet hook.

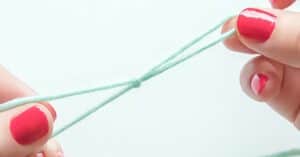
How a Crochet Slip Knot Looks Like When it is Done
On the photo below you can see how a slip knot looks when you have made it.
The slip knot itself is actually only the tie or knot, while the other part is a loop of yarn that later will become the first chain when you start to crochet.
Step By Step Video Tutorial Making A Slip Knot And Placing It Onto A Crochet Hook
Commonly Asked Questions About The Crochet Slip Knot
What is a crochet slip knot?
A crochet slip knot is also called a starting knot or adjustable loop and is used to begin a crochet project. It is a loop that you create to place on your crochet hook to start a crocheting. It is possible to pull the yarn to tighten the loop. You will use a slip knot to begin every crochet piece.
How to crochet a slip knot?
You don’t actually crochet a slip knot, you tie a slip knot with your hands before you start crocheting. There is no way to show how to crochet slip knot as it’s not crocheted.
Do you crochet into the slip knot?
No, it’s not possible to work into the slip knot itself. However you start chain stitches with the loop the slip knot create.
Does the slip knot count as a stitch?
No, the slip knot does not count as a stitch. However the chain made with the loop created by the slip knot, does count as the first chain stitch.
Is it possible to tie a slip knot with multiple strands of yarn?
Yes, hold each yarn strand together as if they are the same strand of yarn and tie a slip knot the same way as with one.
Conclusion: Mastering Slip Knots is Quite Simple and Easy.
After learning how to do a slip knot the conclusion for many is that it’s not that difficult.
It’s a few easy steps and an important building block to learn how to crochet.
Next Steps for Learning Crochet as a Beginner
After making a slip knot crochet, the next steps of the beginners guide to crochet is:
After that these basic crochet stitches are logical next steps:
- Learning the single crochet stitch
- Learning how to crochet half double crochet stitches
- Learning how to crochet double crochet stitches
- Learning how to crochet treble crochet stitches
- Learning the slip stitch
Beginner crochet patterns to try
After learning from the beginner crochet tutorials, these crochet pattern are great for beginners.

