

You’re going to love the Granny Square Crochet Ottoman Pattern.
It’s a fun crochet pouf pattern featuring the traditional granny square.
Pick your favorite yarn colors & make thiws easy crochet pattern.
Find more: 25+ Home Crochet Pattern Collection.
Would you like to save this?
How to get this crochet pattern:
Option 1: Scroll down to see the FREE Crochet Pattern ⬇️
Option 2: Purchase the printable PDF:
Option 3: Get the printable version inside the crochet pattern membership.
Option 4: Most of my crochet patterns can also be found on Ravelry, Love Crafts and Etsy.
The Yarn
To make this crochet ottoman I decided to use the amazing Wool Ease yarn from Lion Brand Yarn, a 4 medium yarn. You could also try using thicker yarn like bulky or super bulky yarn for a different finish.
It’s for sure become my favorite and these are some other patterns that uses this yarn: Your Afternoon Walk Cardigan, Your Sunrise Socks, Spikes and Stripes Pillow, Cold Day Cowl & Granny Square Bag.
So if you haven’t tried Wool Ease before, isn’t this great proof that I really LOVE this yarn?

Ultimate Guide to Granny Squares
Like this? Get the ad-free version + 33 other crochet patterns & tutorials with the “Ultimate Guide to Granny Squares”.
Learn more about the Ultimate Guide to Granny Squares
A FUN GRANNY SQUARE CROCHET PATTERN
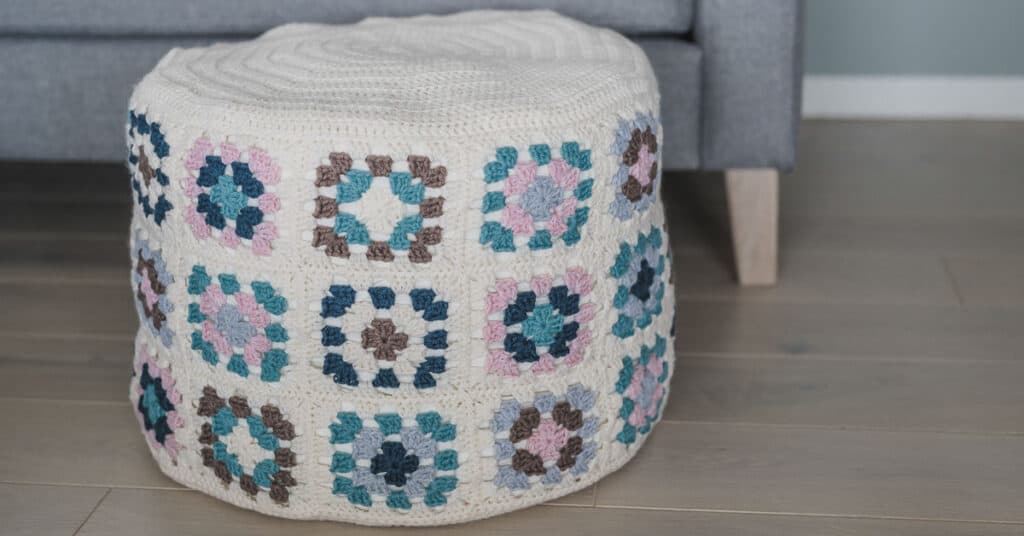
The granny square crochet ottoman is made up of multiple granny squares & a top and bottom that is crocheted separately.
In the end it’s all seamed together to create a beautiful crochet footstool.
To fill this crochet ottoman you have choices. The one pictured was filled with an old duvet that wasn’t used anymore, which made for quite a soft ottoman.
However, you can also fill it more, for a harder finish.
The whole idea is that you can find unused blankets, duvets ect. from around the house & re-purpose it. However you could also fill it with a large bean bag as well.
Since you like the Granny Square Crochet Ottoman, these might interest you too?

Love this pattern? Save on Pinterest!

How Long Does It Take To Crochet That?
How long it takes to crochet something varies depending on your skill & how fast you crochet. But that isn’t a helpful answer is it?
Well, I’ve developed a yarn calculator to help you get the answer to this question.
It will help you calculate exactly how much time you’ll spend crocheting a project.
All you need to know is how much yarn you will use on the project in either meters, yards or skeins. Then crochet your test square & time it.
Calculate how long it takes to crochet that.
Buy the Granny Square Ottoman Pattern
Get the downloadable PDF crochet pattern for this crochet pattern, or join the Crochet Everyday Bliss Membership and get access to download ALL crochet patterns and more
GRANNY SQUARE CROCHET OTTOMAN – THE FREE CROCHET PATTERN
About The Pattern
The Granny Square Crochet Ottoman is an easy crochet pattern for your home featuring the traditional granny square. Made up of multiple squares, a top and a bottom.
Pick your favorite colors & make this crocheted floor pouf for your home.

Project Level
WHAT’S YOUR CROCHET SKILL LEVEL?
Take the Quiz
Get helpful tips for your next crochet project & increase your skills!
Materials Needed
Crochet Hook
Yarn
Yarn used:
Lion Brand Yarn – Wool Ease in color Fisherman (CA), Succulent (CB), Blush Heather (CC), Denim (CD), Icicle (CE), Trush (CF).
Yarn amount used:
Color A (CA): 4 skeins
Color B (CB): 1 skein
Color C (CC): 1 skein
Color D (CD): 1 skein
Color E (CE): 1 skein
Color F (CF): 1 skein
Yarn characteristics:
- 4 Medium Yarn
- 80 % Acrylic, 20 % Wool
Other Materials Needed
- Needle, find one here (if you don’t already have one)!
- Scissors
- Stuffing, (I used unused items from around the house, such as old duvets or blankets ect.)
Gauge
Each square measure:
11.5 x 11.5 cm / 4.5 x 4.5 inches
Notes
- This crochet pattern is written in US terms.
- All measurements given are unblocked.
- Note that measurements are given as exact as possible. But crochet tension & technique might give variations in the result, that changes from person to person.
- Read pattern instructions carefully before beginning to make sure you understand everything. It might save you hours frogging your work & crocheting it again!
- Check yarn info if you want to find an alternative or test your yarn against the gauge. Learn more about substituting yarn.
- This pattern is written for 1 size.
- At the end of each round, the stitch count is given in parenthesis.
- The Granny Square Ottoman is made up of 36 squares, 1 bottom and 1 top. Which are seamed together at the end.
Size & Measurements
Circumference: 138 cm / 54 inches
Height: 34.5 cm / 13.5 inches
Diameter: approximately 44 cm / 17 inches
Abbreviations
- beg = beginning
- ch = chain (s)
- ch-2-sp = refers to chain or space previously made, with 2 ch
- dc = double crochet
- prev = previous
- rep = repeat
- sl st = slip stitch
- st = stitch (es)
We try our best to include all crochet abbreviations in the list above for the crochet pattern, but sometimes we may forget one or two.
Learn more about crochet abbreviations & find a complete list on our Crochet Abbreviations & Terms post.
Techniques You Will Need
To seam the squares together, using the whip stitch is suggested.

Granny Square Ottoman Pattern Instructions
GRANNY SQUARES LIST:
Make 36 squares total, 6 of each, in the following color combinations below or in combinations you choose.
Square 1: CA, CB, CF, CA

Square 2: CB, CD, CC, CA

Square 3: CC, CF, CE, CA

Square 4: CD, CE, CB, CA

Square 5: CE, CC, CB, CA

Square 6: CF, CA, CD, CA

GRANNY SQUARE:
Click to find a detailed tutorial on how to crochet a Granny Square.
All rounds are made with right side facing.
Round 1: Ch 3, dc 2 in 3rd ch (base ch) from hook, *ch 2, dc 3 in base ch*, rep from *to* 2 times, ch 2, sl st in top of ch from beginning of round (=20 st). Fasten off & cut yarn.
Round 2: Make slipknot, dc 3 in any corner ch-2-sp, ch 2, *dc 3 in next corner ch-2-sp, ch 2, dc 3 in same corner ch-2-sp, ch 2*, rep from *to* 2 times, dc 3 in first corner ch-2-sp, ch 2, sl st in top of 1st dc from beg of round (=40 st). Fasten off & cut yarn.
Round 3: Make slipknot, dc 3 in any corner ch-2-sp, ch 2, *dc 3 in next ch-2-sp, ch 2, dc 3 in next corner ch-2-sp, ch 2, dc 3 in same corner ch-2-sp, ch 2*, rep from *to* 2 times, dc 3 in next ch-2-sp, ch 2, dc 3 in first corner ch-2-sp, ch 2, sl st in top of 1st dc from beg of round (=60 st). Fasten off & cut yarn.
Round 4: Make slipknot, dc 3 in any corner ch-2-sp, ch 2, *[dc 3 in next ch-2-sp, ch 2] twice, dc 3 in next corner ch-2-sp, ch 2, dc 3 in same corner ch-2-sp, ch 2*, rep from *to* 2 times, [dc 3 in next ch-2-sp, ch 2] twice, dc 3 in first corner ch-2-sp, ch 2, sl st in top of 1st dc from beg of round (=80 st). Fasten off & cut yarn.
BOTTOM AND TOP:
Make 2.
Made with CA.
Ch 4 st, sl st in first ch to form a circle.
Round 1: 10 dc into the circle, sl st in 1st dc, turn (=10 st).
Round 2: Ch 1 (doesn’t count as a st), dc 2 in each st, sl st in 1st dc, turn (=20 st).
Round 3: Ch 1 (doesn’t count as a st), *dc 2 in next st, dc 1 in the next 1 st*, repeat from *to* until end of round, sl st in 1st dc, turn (=30 st).
Round 4: Ch 1 (doesn’t count as a st), *dc 2 in next st, dc 1 in the next 2 st*, repeat from *to* until end of round, sl st in 1st dc, turn (=40 st).
Round 5: Ch 1 (doesn’t count as a st), *dc 2 in next st, dc 1 in the next 3 st*, repeat from *to* until end of round, sl st in 1st dc, turn (=50 st).
Round 6: Ch 1 (doesn’t count as a st), *dc 2 in next st, dc 1 in the next 4 st*, repeat from *to* until end of round, sl st in 1st dc, turn (=60 st).
Round 7: Ch 1 (doesn’t count as a st), *dc 2 in next st, dc 1 in the next 5 st*, repeat from *to* until end of round, sl st in 1st dc, turn (=70 st).
Round 8: Ch 1 (doesn’t count as a st), *dc 2 in next st, dc 1 in the next 6 st*, repeat from *to* until end of round, sl st in 1st dc, turn (=80 st).
Round 9: Ch 1 (doesn’t count as a st), *dc 2 in next st, dc 1 in the next 7 st*, repeat from *to* until end of round, sl st in 1st dc, turn (=90 st).
Round 10: Ch 1 (doesn’t count as a st), *dc 2 in next st, dc 1 in the next 8 st*, repeat from *to* until end of round, sl st in 1st dc, turn (=100 st).
Round 11: Ch 1 (doesn’t count as a st), *dc 2 in next st, dc 1 in the next 9 st*, repeat from *to* until end of round, sl st in 1st dc, turn (=110 st).
Round 12: Ch 1 (doesn’t count as a st), *dc 2 in next st, dc 1 in the next 10 st*, repeat from *to* until end of round, sl st in 1st dc, turn (=120 st).
Round 13: Ch 1 (doesn’t count as a st), *dc 2 in next st, dc 1 in the next 11 st*, repeat from *to* until end of round, sl st in 1st dc, turn (=130 st).
Round 14: Ch 1 (doesn’t count as a st), *dc 2 in next st, dc 1 in the next 12 st*, repeat from *to* until end of round, sl st in 1st dc, turn (=140 st).
Round 15: Ch 1 (doesn’t count as a st), *dc 2 in next st, dc 1 in the next 13 st*, repeat from *to* until end of round, sl st in 1st dc, turn (=150 st).
Round 16: Ch 1 (doesn’t count as a st), *dc 2 in next st, dc 1 in the next 14 st*, repeat from *to* until end of round, sl st in 1st dc, turn (=160 st).
Round 17: Ch 1 (doesn’t count as a st), *dc 2 in next st, dc 1 in the next 15 st*, repeat from *to* until end of round, sl st in 1st dc, turn (=170 st).
Round 18: Ch 1 (doesn’t count as a st), *dc 2 in next st, dc 1 in the next 16 st*, repeat from *to* until end of round, sl st in 1st dc, turn (=180 st).
Round 19: Ch 1 (doesn’t count as a st), *dc 2 in next st, dc 1 in the next 17 st*, repeat from *to* until end of round, sl st in 1st dc, turn (=190 st).
Round 20: Ch 1 (doesn’t count as a st), *dc 2 in next st, dc 1 in the next 18 st*, repeat from *to* until end of round, sl st in 1st dc, turn (=200 st).
Fasten off & cut yarn.
ASSEMBLY:
1. Fasten threads & weave in ends.
2. Place granny squares according to the photo below, 3 x 12 squares.

3. Seam the granny squares together using the whip stitch (or other preferred method, such as flat slip stitch join).
4. Seam short sides of the assembled squares to create a cylinder.
5. Seam the bottom to the cylinder using the whip stitch.
6. Fill the ottoman with things you have laying around the house that isn’t used, such as old blankets or duvets.

7. Seam the top to the ottoman using the whip stitch.
Share & Worth Noting
Thank you for sharing my FREE patterns & tutorials. When you do, you support me & the blog, which makes it possible to continue sharing free content with you.
Not all content on this blog website is free, but the more you share, the more free content I will be able to share. Note that all premium content are ad free.
My crochet patterns can be used to sell handmade pieces. You are required to credit Joy of Motion/Janne Kleivset as the designer by linking back to My website: https://joyofmotioncrochet.com. You can not use my pictures when selling your handmade items. Finally, you can not resell, reprint or share any parts of my patterns as your own.

