
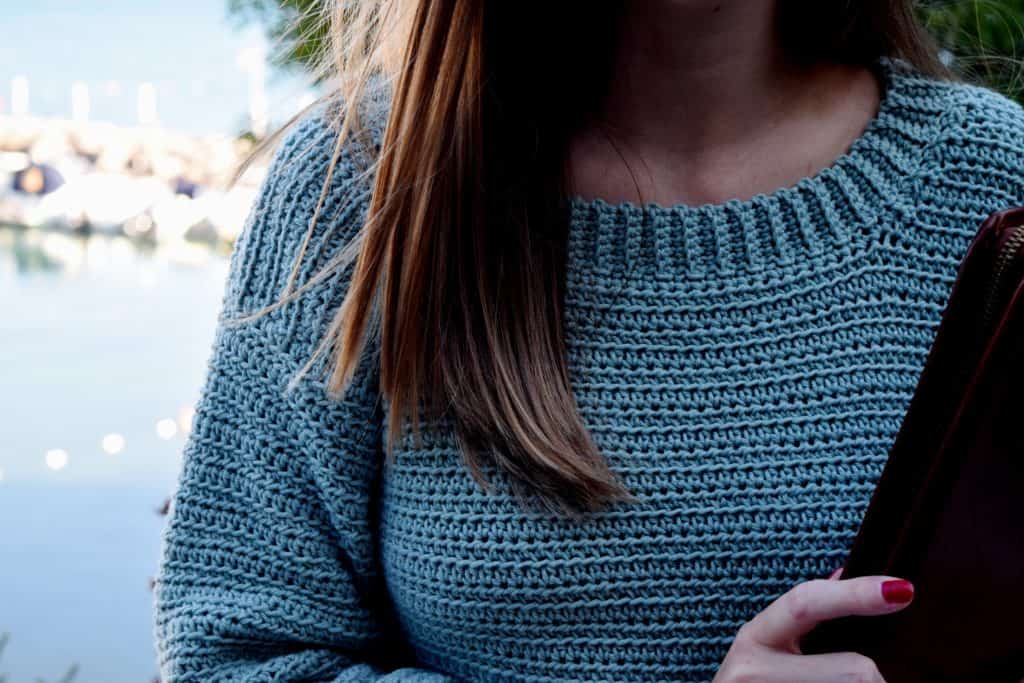
You are now viewing the Rustic Ridges Sweater by guest designer Kristina.
I’m so happy to present you the Rustic Ridges Sweater! I designed this sweater with simplicity in mind. I wanted my design to be size inclusive, beginner friendly and with a modern shape. I decided to use HDC as main stitch, in order to be as simple as possible and fast to make (because who doesn’t like quick garments to make in a weekend or so and to wear immediately after??). To give a different look at the sweater, I decided to alternate rows of HDC and HDC FLO (front loop only): this creates the lines in relief and gives the sweater a cozy and modern look.
Never Crocheted A Sweater Before? Learn how to crochet sweaters here!
Find more: Women’s Sweater FREE Crochet Patterns.

Table of Contents

How to Get This Crochet Pattern

This pattern is FREE to read right here on the blog ↓
Buy the Printable PDF
Pattern Overview

Would you like to save this?
We will email this pattern to you, so you can come back to it later.
Free, and you can unsubscribe any time.
If you like this crochet pattern, save it on Pinterest!

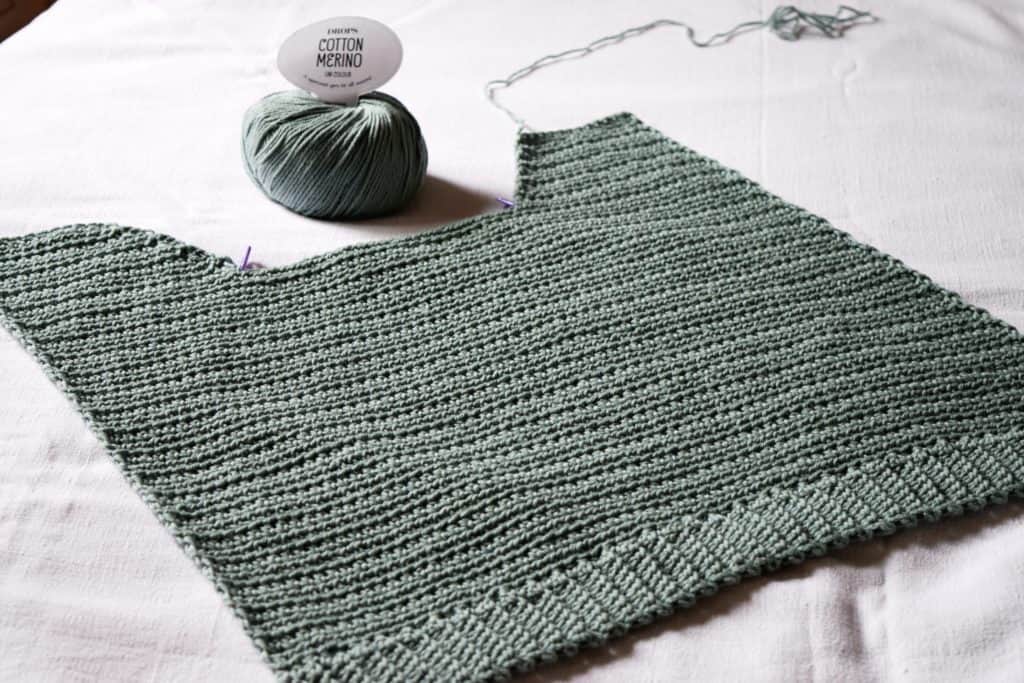
RUSTIC RIDGES SWEATER
This sweater is worked from bottom up in two main panels and has a ribbed edge, collar and sleeve cuffs. It has a classic fit, with a slightly positive ease. Sleeves and collar are crocheted onto the body once it’s sewn. There are directions in the pattern on how to make a longer or shorter sweater.

Helpful Tools & Tips
Not Ready to Crochet it Yet?!

- Share about this crochet pattern on Instagram & Facebook using #joyofmotioncrochet.
- Save on Pinterest to make it later.
 About the Rustic Ridges Sweater
Rustic Ridges Sweater comes in 9 sizes, from XS to 5XL, with instructions on how to make it longer or shorter if needed. Yarn used is 50% cotton and 50% merino wool and makes the sweater perfect to wear year round.
Project level: Easy
 Materials
Crochet Hook Size
5 mm / US: H – 8 / UK: 6 (or size needed to obtain gauge) and 4 mm / US: G – 6 / UK: 8 for ribbing (go up or down one hook size if you have had to change hook size for the gauge)
Yarn
- Yarn
- Drops – Cotton Merino in color Sea Green
- Weight
- 3 Light Yarn
- Fiber
- 50% merino wool, 50% cotton
One skein is 50 grams · 110 meters · 120 yards.
Approximately 850 – 1860 yards
Other Materials Needed
 Gauge
Measured over half double crochet stitches crocheted in rows:
15 stitches & 10 rows per 10 x 10 cm (4” x 4”).
How to make: with H/8 – 5.00 mm crochet hook, CH 16.
ROW 1: HDC in 2nd chain from hook and across (15 HDC), CH 1 and turn.
ROW 2: HDC FLO across (15 HDC), CH 1 and turn.
ROW 3: HDC across (15 HDC), CH 1 and turn.
ROW 4 – 10 : Repeat rows 2 – 3
 Crochet Pattern Notes
- This crochet pattern is written in US terms.
- All measurements given are unblocked.
- Note that measurements are given as exact as possible. But crochet tension & technique might give variations in the result, that changes from person to person.
- Pattern is written as follows: XS (S, M, L, XL, 2XL, 3XL, 4XL, 5XL). Grab a PDF pattern for color-coded sizing and step-by-step photos!
- Sweater is worked from bottom up in two main panels. Sleeves and collar are crocheted onto the body once it’s sewn.
- You can increase or decrease the number of rows for front and back panels, to make a longer or shorter sweater.
- Chain one at the beginning of every row doesn’t count as a stitch.
- At the end of each row, the stitch count is given in parenthesis.
- Optional: put a stitch marker to mark the right side of work.
- Read pattern instructions carefully before beginning to make sure you understand everything. It might save you hours frogging your work & crocheting it again!
- Make a swatch that measure at least 10 x 10 cm / 4 x 4 inches using the stitch the gauge is given for. If your swatch matches the gauge, you’re good to go. If the gauge is wrong, you might need to change your hook. Go up in crochet hook size if your stitches are smaller & go down in crochet hook size if your stitches are bigger. Learn more about testing gauge.
- Check yarn info if you want to find an alternative or test your yarn against the gauge. Learn more about substituting yarn.
 Sizes and Measurements

FINISHED BUST MEASUREMENTS
| Sizes | Finished Bust |
|---|---|
| XS | 77.5 cm / 30.5 inches |
| S | 87.5 cm / 34.5 inches |
| M | 98 cm / 38.5 inches |
| L | 108 cm / 42.5 inches |
| XL | 118 cm / 46.5 inches |
| 2XL | 128 cm / 50.5 inches |
| 3XL | 138.5 cm / 54.5 inches |
| 4XL | 148.5 cm / 58.5 inches |
| 5XL | 160 cm / 63 inches |
 Abbreviations
- BLO = Back Loop only
- CH = chain
- FLO = Front Loop only
- hdc = Half Double Crochet
- HDC2TOG = Half Double Crochet 2 together
- RS = Right side
- sc = Single Crochet
- sl st = Slip Stitch
- ST(S) = Stitch/es
- WS = Wrong side
We try our best to include all crochet abbreviations in the list above for the crochet pattern, but sometimes we may forget one or two.
Learn more about crochet abbreviations & find a complete list on our Crochet Abbreviations & Terms post.
 Instructions for the Rustic Ridges Sweater
FRONT PANEL: RIBBING
With G/6 – 4.00 mm crochet hook, CH 9.
ROW 1: SC in 2nd chain from hook and across (8 STS), CH 1 and turn.
ROW 2: SC BLO across (8 STS), CH 1 and turn.
ROW 3: Repeat ROW 2 until ribbing measures 15” – 17” – 19” – 21” – 23.5” – 25.5” – 27” – 29” – 31.5” (38,5 cm – 43,5 cm – 49 cm – 54 cm – 59,5 cm – 64,5 cm – 69 cm – 74 cm – 80 cm) without stretching.
Do not fasten off. Change hook.
With H/8 – 5.00 mm crochet hook, CH 1. We will now work along the side of ribbing.
FRONT PANEL: BODY
ROW 1 (RS): HDC 58 – 66 – 74 – 82 – 90 – 98 – 104 – 112 – 120 evenly across the ribbing. CH 1 and turn.
ROW 2 (WS): HDC FLO across (58 – 66 – 74– 82 – 90 – 98 – 104 – 112 – 120 sts), CH 1 and turn.
ROW 3 (RS): HDC across (58 – 66 – 74– 82 – 90 – 98 – 104 – 112 – 120 sts), CH 1 and turn.
ROW 4 until ROW 32 (34/34/36/36/38/38/40/40): Repeat ROW 2 and ROW 3 (Note: if you want your sweater to be longer or shorter, add or subtract rows here).
We will now create the neck opening:
ROW 33 (35/35/37/37/39/39/41/41): HDC 17 – 20 – 23 – 26 – 29 – 32 – 35 – 38 – 42, put a stitch marker in last HDC, CH 1 and turn.
ROW 34 (36/36/38/38/40/40/42/42): HDC2TOG once, HDC FLO across (16 – 19 – 22 – 25 – 28 – 31 – 34 – 37 – 41 total sts). CH 1 and turn.
ROW 35 (37/37/39/39/41/41/43/43): HDC across until 2 sts remain, HDC2TOG (15 – 18 – 21 – 24 – 27 – 30 – 33 – 36 – 40 total sts). CH 1 and turn.
ROW 36 (38/38/40/40/42/42/44/44): HDC2TOG once, HDC FLO across (14 – 17 – 20 – 23 – 26 – 29 – 32 – 35 – 39 total sts). CH 1 and turn.
ROW 37 (39/39/41/41/43/43/45/45): HDC across until 2 sts remain, HDC2TOG (13 – 16 – 19 – 22 – 25 – 28 – 31 – 34 – 38 total sts). CH 1 and turn.
ROW 38 (40/40/42/42/44/44/46/46): HDC2TOG once, HDC FLO across (12 – 15 – 18 – 21 – 24 – 27 – 30 – 33 – 37 total sts). CH 1 and turn.
ROW 39 (41/41/43/43/45/45/47/47): HDC across until 2 sts remain, HDC2TOG (11 – 14 – 17 – 20 – 23 – 26 – 29 – 32 – 36 total sts). CH 1 and turn.
ROW 40 (42/42/44/44/46/46/48/48): HDC2TOG once, HDC FLO across (10 – 13 – 16 – 19 – 22 – 25 – 28 – 31 – 35 total sts). CH 1 and turn.
ROW 41 (43/43/45/45/47/47/49/49): HDC across until 2 sts remain, HDC2TOG (9 – 12 – 15 – 18 – 21 – 24 – 27 – 30 – 34 total sts). Fasten off and leave a long end for seam.
Now we have to work the other side of neck opening to complete.
From first stitch marker, count 25 – 27 – 29 – 31 – 33 – 35 – 35 – 37 – 37 sts and place a second stitch marker in last st. Attach yarn and CH 1.
ROW 33 (35/35/37/37/39/39/41/41): (Note: you will put your first HDC in the same space as CH 1) HDC 17 – 20 – 23 – 26 – 29 – 32 – 35 – 38 – 42, CH 1 and turn.
ROW 34 (36/36/38/38/40/40/42/42): HDC FLO across until 2 sts remain, HDC2TOG (16 – 19 – 22 – 25 – 28 – 31 – 34 – 37 – 41 total sts). CH 1 and turn.
ROW 35 (37/37/39/39/41/41/43/43): HDC2TOG once, HDC across (15 – 18 – 21 – 24 – 27 – 30 – 33 – 36 – 40 total sts). CH 1 and turn.
ROW 36 (38/38/40/40/42/42/44/44): HDC FLO across until 2 sts remain, HDC2TOG (14 – 17 – 20 – 23 – 26 – 29 – 32 – 35 – 39 total sts). CH 1 and turn.
ROW 37 (39/39/41/41/43/43/45/45): HDC2TOG once, HDC across (13 – 16 – 19 – 22 – 25 – 28 – 31 – 34 – 38 total sts). CH 1 and turn.
ROW 38 (40/40/42/42/44/44/46/46): HDC FLO across until 2 sts remain, HDC2TOG (12 – 15 – 18 – 21 – 24 – 27 – 30 – 33 – 37 total sts). CH 1 and turn.
ROW 39 (41/41/43/43/45/45/47/47): HDC2TOG once, HDC across (11 – 14 – 17 – 20 – 23 – 26 – 29 – 32 – 36 total sts). CH 1 and turn.
ROW 40 (42/42/44/44/46/46/48/48): HDC FLO across until 2 sts remain, HDC2TOG (10 – 13 – 16 – 19 – 22 – 25 – 28 – 31 – 35 total sts). CH 1 and turn.
ROW 41 (43/43/45/45/47/47/49/49): HDC2TOG once, HDC across (9 – 12 – 15 – 18 – 21 – 24 – 27 – 30 – 34 total sts). Fasten off and leave a long end for seam.
Back PANEL: RIBBING
With G/6 – 4.00 mm crochet hook, CH 9.
ROW 1: SC in 2nd chain from hook and across (8 STS), CH 1 and turn.
ROW 2: SC BLO across (8 STS), CH 1 and turn.
ROW 3: Repeat ROW 2 until ribbing measures 15” – 17” – 19” – 21” – 23.5” – 25.5” – 27” – 29” – 31.5” (38,5 cm – 43,5 cm – 49 cm – 54 cm – 59,5 cm – 64,5 cm – 69 cm – 74 cm – 80 cm) without stretching.
Do not fasten off. Change hook.
With H/8 – 5.00 mm crochet hook, CH 1. We will now work along the side of ribbing.
Back PANEL: BODY
ROW 1 (RS): HDC 58 – 66 – 74 – 82 – 90 – 98 – 104 – 112 – 120 evenly across the ribbing. CH 1 and turn.
ROW 2 (WS): HDC FLO across (58 – 66 – 74 – 82 – 90 – 98 – 104 – 112 – 120 sts), CH 1 and turn.
ROW 3 (RS): HDC across (58 – 66 – 74 – 82 – 90 – 98 – 104 – 112 – 120 sts), CH 1 and turn.
ROW 4 until ROW 41 (43/43/45/45/47/47/49/49): Repeat ROW 2 and ROW 3 (Note: if you want your sweater to be longer or shorter, add or subtract rows here). Fasten off and leave a long end for seam.
Now we have to seam panels together: leave back panel RS facing you and put on it the front panel with WS facing up. Seam sides together with a whip stitch, beginning from bottom until 16 – 17 – 19 – 20 – 21 – 23 – 24 – 25 – 26 ROWS remain.
Seam shoulders together being careful to sew evenly the parts.

Turn your work right side out.
SLEEVES
Attach yarn to armpit (we will continue to work in turned rows to maintain the texture of body), CH 1.
ROW 1 (RS): Place 44 – 48 – 52 – 56 – 64 – 68 – 72 – 76 – 80 HDC evenly across. SL ST to first HDC, CH 1 and turn.
ROW 2 (WS): HDC FLO across (44 – 48 – 52 – 56 – 64 – 68 – 72 – 76 – 80 sts), SL ST to first HDC. CH 1 and turn.
ROW 3 (RS): HDC across (44 – 48 – 52 – 56 – 64 – 68 – 72 – 76 – 80 sts), SL ST to first HDC. CH 1 and turn.
ROW 4 until ROW 37 (38/38/39/39/40/40/42/42): Repeat ROW 2 and ROW 3 (Note: if you want your sleeve to be longer or shorter, add or subtract rows here). SL ST to first HDC, CH 1 and turn.
ROW 38 (39/39/40/40/41/41/43/43): HDC2TOG all around (22 – 24 – 26 – 28 – 32 – 34 – 36 – 38 – 40 total sts). SL ST to first HDC, CH 1 and turn.
ROW 39 (40/40/41/41/42/42/44/44): SC across (22 – 24 – 26 – 28 – 32 – 34 – 36 – 38 – 40 sts), SL ST to first SC. We will now working the ribbing cuff.
Change hook to G/6 – 4.00 mm and without cutting yarn, CH 9.
ROW 1: SC in 2nd chain from hook and across (8 STS), SL ST 2 onto SCs of sleeve. Turn your work so you’re working down back the ribbing.
ROW 2: SC BLO across (8 STS), CH 1 and turn.
ROW 3: SC BLO across (8 STS), SL ST 2 onto SCs of sleeve, turn.
Continue working ROW 2 and ROW 3 until no SC on sleeve remains. Seam both ends of ribbing together to finish the cuff.
Repeat all steps for second sleeve.
COLLAR
Attach yarn at center back of neck opening and with H/8 – 5.00 mm crochet hook SC evenly all around. SL ST to first SC. Without cutting yarn, change hook to G/6 – 4.00 mm and CH 7.
ROW 1: SC in 2nd chain from hook and across (6 STS), SL ST 2 onto SCs of neck opening. Turn your work so you’re working down back the ribbing.
ROW 2: SC BLO across (6 STS), CH 1 and turn.
ROW 3: SC BLO across (6 STS), SL ST 2 onto SCs of neck opening, turn.
Continue Working ROW 2 and ROW 3 until no SC on neck opening remains. Seam both ends of ribbing together to finish the collar.
Voilà! You’ve finished your sweater! 🙂

Share & Worth Noting

Thank you for sharing my FREE patterns & tutorials. When you do, you support me & the blog, which makes it possible to continue sharing free content with you.
Not all content on this blog website is free, but the more you share, the more free content I will be able to share. Note that all premium content are ad free.
My crochet patterns can be used to sell handmade pieces. You are required to credit Joy of Motion/Janne Kleivset as the designer by linking back to My website: https://joyofmotioncrochet.com. You can not use my pictures when selling your handmade items. Finally, you can not resell, reprint or share any parts of my patterns as your own.