
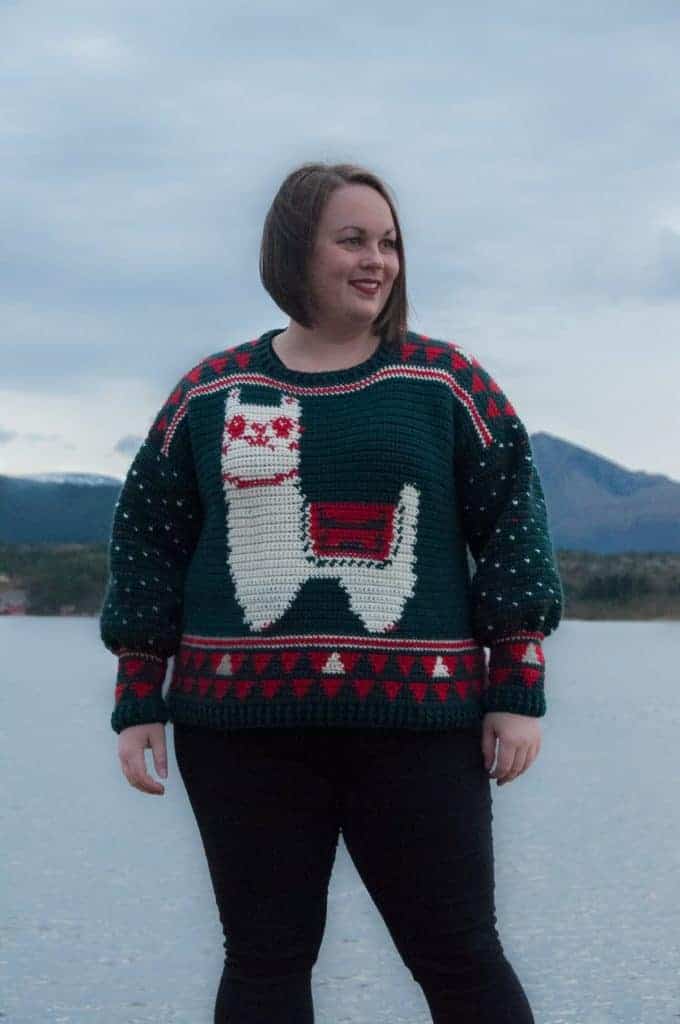
You’re going to love the free crochet pattern for the Crochet Christmas Sweater, this is truly a fun Christmas & holiday crochet pattern.
Need something to wear during the Holiday season & for the annual Ugly Christmas Sweater day or a Christmas party? Perfect reasons to make your own ugly Christmas Sweater!
This free crochet ugly Christmas sweater pattern comes in 9 sizes from XS to 5XL. The sizes are woman’s sizing, but this pattern can definitely be used by men too.
New Crocheter? Learn How To Crochet A Sweater Even Though You’re A Beginner!
Find more: Women’s Sweater FREE Crochet Patterns.

Table of Contents

How to get this crochet pattern

This pattern is FREE to read right here on the blog ↓
Buy the printable PDF
Available in the Crochet Everyday Bliss membership
Pattern overview

How to crochet the Crochet Christmas Sweater
The crochet Christmas sweater has skill level intermediate, but it’s a relatively easy pattern, because it’s mostly single crochet stitches with color changes.
Next, the crochet ugly Christmas sweater is worked in 4 pieces, the front, the back & two sleeves.
To finish it all you need to do is whip stitch the pieces together with a needle. If you prefer you can also join the pieces together using a crochet hook and slip stitch.

Would you like to save this?
We will email this pattern to you, so you can come back to it later.
Free, and you can unsubscribe any time.
If you like this crochet pattern, save it on Pinterest!

Helpful Tools & Tips
Not ready to crochet it yet?!

- Share about this crochet pattern on Instagram & Facebook using #joyofmotioncrochet.
- Save on Pinterest to make it later.
 About the Crochet Christmas Sweater
The free crochet pattern for the Crochet Ugly Christmas sweater perfect for anyone who want’s to express their fun Holiday cheer around Christmas.
It’s a great crochet project made with 3 yarn colors and mostly single crochet stitches. What’s great about this crochet Christmas sweater is the fact that it’s unisex & can be used both by men & women.
Note: The sizing in the pattern is based on Women’s sizes.
Project level: Intermediate
 Materials
Crochet Hook Size
Yarn
- Yarn
- We Are Knitters – The Petite Wool in color Forest (color A – green), Natural (color B – white), Red (color C)
- Weight
- 5 Bulky Yarn
- Fiber
- 100% highland wool
Yarn amount needed:
| Color | Skeins | Grams | Meters | Yards |
|---|---|---|---|---|
| Size XS | ||||
| Color A (Green) | 6 | 570 | 795 | 870 |
| Color B (White) | 2 | 115 | 155 | 170 |
| Color C (Red) | 2 | 140 | 200 | 215 |
| Total | 10 | 825 | 1150 | 1255 |
| Size S | ||||
| Color A (Green) | 7 | 645 | 905 | 990 |
| Color B (White) | 2 | 130 | 180 | 195 |
| Color C (Red) | 2 | 160 | 225 | 245 |
| Total | 11 | 935 | 1310 | 1430 |
| Size M | ||||
| Color A (Green) | 8 | 725 | 1015 | 1110 |
| Color B (White) | 2 | 145 | 200 | 220 |
| Color C (Red) | 2 | 180 | 250 | 275 |
| Total | 12 | 1050 | 1465 | 1605 |
| Size L | ||||
| Color A (Green) | 8 | 785 | 1095 | 1200 |
| Color B (White) | 2 | 155 | 215 | 235 |
| Color C (Red) | 2 | 195 | 270 | 295 |
| Total | 12 | 1135 | 1580 | 1730 |
| Size XL | ||||
| Color A (Green) | 9 | 840 | 1175 | 1285 |
| Color B (White) | 2 | 165 | 230 | 255 |
| Color C (Red) | 3 | 210 | 295 | 320 |
| Total | 14 | 1215 | 1700 | 1860 |
| Size 2XL | ||||
| Color A (Green) | 9 | 900 | 1260 | 1375 |
| Color B (White) | 2 | 180 | 250 | 270 |
| Color C (Red) | 3 | 225 | 310 | 340 |
| Total | 14 | 1305 | 1820 | 1985 |
| Size 3XL | ||||
| Color A (Green) | 10 | 975 | 1370 | 1495 |
| Color B (White) | 2 | 195 | 270 | 295 |
| Color C (Red) | 3 | 245 | 340 | 370 |
| Total | 15 | 1415 | 1980 | 2160 |
| Size 4XL | ||||
| Color A (Green) | 11 | 1055 | 1480 | 1615 |
| Color B (White) | 3 | 210 | 290 | 320 |
| Color C (Red) | 3 | 265 | 365 | 400 |
| Total | 17 | 1530 | 2135 | 2335 |
| Size 5XL | ||||
| Color A (Green) | 12 | 1135 | 1585 | 1735 |
| Color B (White) | 3 | 225 | 315 | 340 |
| Color C (Red) | 3 | 280 | 395 | 430 |
| Total | 18 | 1640 | 2295 | 2505 |
One skein is 100 grams · 140 meters · 153 yards.
Other Materials Needed

 Gauge
Measured over single crochet stitches crocheted in rows:
13.5 stitches & 16 rows per 10 cm / 4".

 Crochet Pattern Notes
- This crochet pattern is written in US terms.
- All measurements given are unblocked.
- Note that measurements are given as exact as possible. But crochet tension & technique might give variations in the result, that changes from person to person.
- Read pattern instructions carefully before beginning to make sure you understand everything. It might save you hours frogging your work & crocheting it again!
- Make a swatch that measures at least 10 x 10 cm / 4 x 4 inches using the stitch the gauge is given for. If your swatch matches the gauge, you’re good to go. If the gauge is wrong, you might need to change your hook. Go up in crochet hook size if your stitches are smaller & go down in crochet hook size if your stitches are bigger. Learn more about testing gauge.
- Check yarn info if you want to find an alternative or test your yarn against the gauge. Learn more about substituting yarn.
- This pattern is written for 9 sizes, where the different sizes are given in parenthesis like this: XS (S) M (L) XL (2XL) 3XL (4XL) 5XL. If just one number is given, it applies to all sizes. I recommend that you highlight or circle the size you’re making before you begin to make the pattern easier to follow. Size adjustments are added under the heading “Sizes & Measurements”.
- At the end of each row, the stitch count is given in parenthesis.
- Please note, that odd rows on diagram are read from the right to the left, while even rows are read from the left to the right.
 Sizes and Measurements

| Sizes | Bust/Waist/Hip Circumference | Body Length | Armhole Circumference |
|---|---|---|---|
| XS | 85.4 cm / 33.6 inches | 59.1 cm / 23.3 inches | 35 cm / 13.8 inches |
| S | 97.1 cm / 38.2 inches | 59.1 cm / 23.3 inches | 35 cm / 13.8 inches |
| M | 108.8 cm / 42.8 inches | 59.1 cm / 23.3 inches | 35 cm / 13.8 inches |
| L | 117.6 cm / 46.3 inches | 59.1 cm / 23.3 inches | 38 cm / 14.8 inches |
| XL | 126.5 cm / 49.8 inches | 59.1 cm / 23.3 inches | 38 cm / 14.8 inches |
| 2XL | 135.3 cm / 53.3 inches | 59.1 cm / 23.3 inches | 38 cm / 14.8 inches |
| 3XL | 147.1 cm / 57.9 inches | 59.1 cm / 23.3 inches | 40 cm / 15.7 inches |
| 4XL | 158.8 cm / 62.5 inches | 59.1 cm / 23.3 inches | 40 cm / 15.7 inches |
| 5XL | 170.6 cm / 67.2 inches | 59.1 cm / 23.3 inches | 40 cm / 15.7 inches |
Size Notes
- This crochet pattern is written to have positive ease. Learn more about mastering ease in crochet garments.
 Schematics


 Abbreviations
- beg = beginning
- BPdc = back post double crochet
- CA = color A
- CB = color B
- CC = contrasting color / color C
- ch = chain
- dc = double crochet
- FPdc = front post double crochet
- prev = previous
- rep = repeat
- sc = single crochet
- sl st = slip stitch
- st = stitch(es)
- yo = yarn over
We try our best to include all crochet abbreviations in the list above for the crochet pattern, but sometimes we may forget one or two.
Learn more about crochet abbreviations & find a complete list on our Crochet Abbreviations & Terms post.
 Stitches You Will Need

Back Post Double Crochet Stitch (BPdc)
This stitch is crocheted around the post of the stitch.
Yo, insert your hook from back to front between the previous stitch & the stitch you’re working, & bring it to the back again between the stitch you’re working & the next stitch, yo & pull up a loop, you have 3 loops on the hook, yo & pull through 2 loops, yarn over and pull through the 2 last loops.
Front Post Double Crochet Stitch (FPdc)
This stitch is crocheted around the post of the stitch.
Yo, insert your hook from front to back between the prev st & the st you’re working, & bring it to the front again between the st you’re working & the next st, yo & pull up a loop, you have 3 loops on the hook, yo & pull through 2 of the 3 loops, yo and pull through the 2 last loops.
 Techniques You Will Need

Tapestry Crochet
Tapestry Crochet – form of color work in crochet where you carry the yarn you are not using through the project you’re making.
Reading Color Diagram
- On odd rows move yarn strands due to color changes on the wrong side, behind the work (furthest from yourself), on even rows keep yarn strands due to color changes in on the wrong side, in front of the work (closest to yourself).
- Please note, that odd rows are read from the right to the left, while even rows are read from the left to the right.
- Grey vertical lines are made to show sizes. For shoulder diagram & back diagram, start counting the grey vertical lines from the right, where the first line is for size XS, the second for size S and so on.
- The same vertical lines are made on the front of the sweater, but should be counted from the middle, where the first two lines closes to the middle is for size XS, the two second lines is for size S and so on.
- On the both diagrams on for the sleeves these vertical lines are for 3 sizes at a time.
Change Colors / Tapestry Crochet
When changing from one color to another, you’ll never finish the stitch with the color you where working with.
Do all the steps of the stitch, then leave the last step unworked. Yarn over with the color for the next st & pull yarn through.
Repeat this every time you change colors to make the color changes look beautiful.
Tip: When working on parts where there’s many stitches between the same color on the same row, it might be easier to use two skeins for that color. Pick it up each time you come to that part. An example is when working on the Alpaca, where there’s two big parts of green on each side with many stitches in between.
Change Colors When The First & Second Stitch On A Row Has Different Colors
When the first & second stitch on a row has different colors, you should finish the last stitch on the previous row with the color for the first stitch on the next row.
Then you should do the first chain to start the row with the color for the second stitch on the row you are starting.


 Instructions for the Crochet Christmas Sweater
Front
The front is crocheted from the bottom up.
Ch 60 (68) 76 (82) 88 (94) 102 (110) 118 st.
Row 1 with CA: Start row in 4th ch from hook, dc 1 in each st until end of row, turn (= 58 (66) 74 (80) 86 (92) 100 (108) 116 st).
Row 2 with CA: Ch 2 (counts as 1st st), *FPdc 1 in next st, BPdc 1 in next st*, repeat from *to* until end of row, turn (= 58 (66) 74 (80) 86 (92) 100 (108) 116 st).
Row 3 with CA: Rep row 2.
Row 4 with CA: Ch 1 (counts as 1st st), sc 1 in next st until end of row, turn (= 58 (66) 74 (80) 86 (92) 100 (108) 116 st).
- You will now start following the diagram below for color changes, starting on row 1 on diagram until you reach the end of the front part of the sweater.
- Each vertical line shows how many stitches each size has. Stitch count given horizontally & you should only follow the pattern from the right vertical line of your size to the left vertical line corresponding to your size.
- XS: Work column 30-87.
- S: Work column 26-91.
- M: Work column 22-95.
- L: Work column 19-98.
- XL: Work column 16-101.
- 2XL: Work column 13-104.
- 3XL: Work column 9-112.
- 4XL: Work column 5-112.
- 5XL: Work column 1-116.
- See more instructions on reading diagrams under the heading “TECHNIQUES YOU WILL NEED”.
- Click to open chart in a new window to view a bigger version of the chart & to zoom.
- Tapestry crochet tutorial.
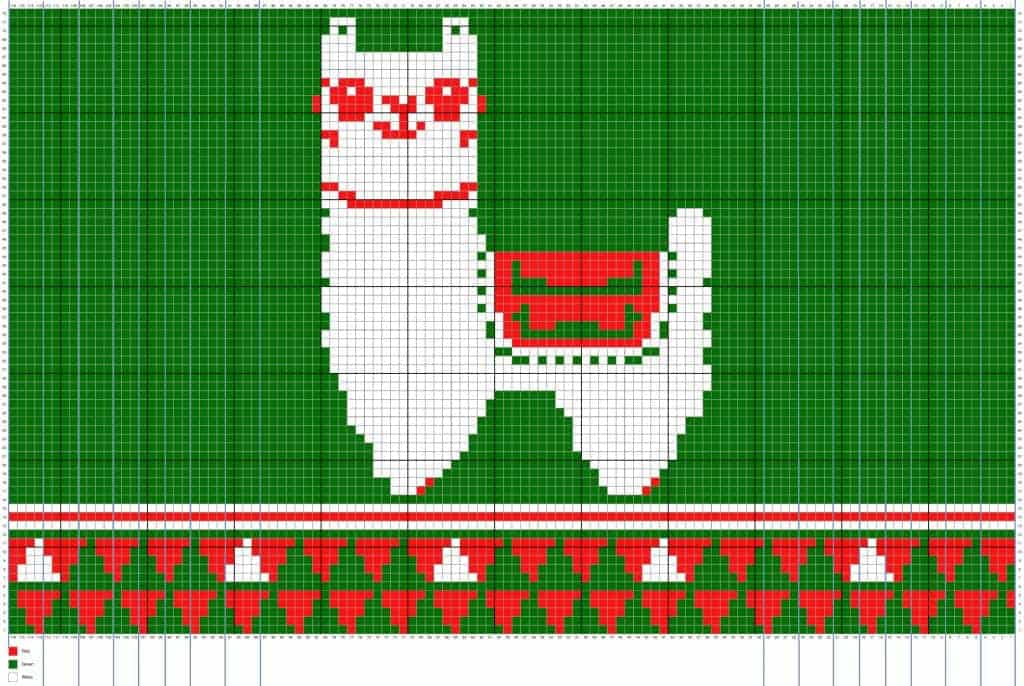
Row 5: Ch 1 (counts as 1st st), sc 1 in next st until end of row, change colors according to the diagram, turn (= 58 (66) 74 (80) 86 (92) 100 (108) 116 st).
You’ve now worked row 1 of the diagram.
Row 6 – 76: Repeat row 5, working row 2-72 on diagram once.
Row 77-80: Repeat row 5, working row 13-16 on diagram once.
Shoulders
Repeat twice, on each side on top of the front part. Between the left and right shoulder there will be 24 unworked stitches.
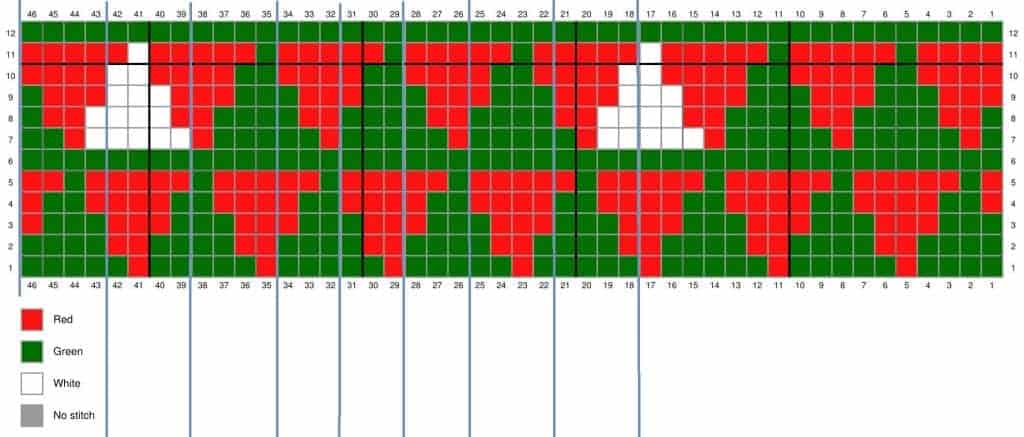
- You will now start following the diagram below for color changes, starting on row 1 on diagram until you reach the end of the shoulder on the front part of the sweater.
- Each vertical line shows how many stitches each size has, stitch count given horizontally & you should only follow the part to the right of the line that shows your size.
- See more instructions on reading diagrams under the heading “TECHNIQUES YOU WILL NEED”.
Row 1: Ch 1 (counts as 1st st), sc 1 in next st until end of row, change colors according to the diagram, turn (= 17 (21) 25 (28) 31 (34) 38 (42) 46 st).
You’ve now worked row 1 of the diagram.
Row 2-12: Repeat row 5, working row 2-12 on diagram once.
- Click to open chart in a new window to view a bigger version of the chart & to zoom.
Fasten off & cut yarn.
Back
The back is crocheted from the bottom up.
Ch 60 (68) 76 (82) 88 (94) 102 (110) 118 st.
Row 1 with CA: Start row in 4th ch from hook, dc 1 in each st until end of row, turn (= 58 (66) 74 (80) 86 (92) 100 (108) 116 st).
Row 2 with CA: Ch 2 (counts as 1st st), *FPdc 1 in next st, BPdc 1 in next st*, repeat from *to* until end of row, turn (= 58 (66) 74 (80) 86 (92) 100 (108) 116 st).
Row 3 with CA: Rep row 2.
Row 4 with CA: Ch 1 (counts as 1st st), sc 1 in next st until end of row, turn (= 58 (66) 74 (80) 86 (92) 100 (108) 116 st).
- You will now start following the diagram below for color changes, starting on row 1 on diagram until you reach the end of the back part of the sweater.
- Each vertical line shows how many stitches each size has, stitch count given horizontally & you should only follow the part to the right of the line that shows your size.
- See more instructions on reading diagrams under the heading “TECHNIQUES YOU WILL NEED”.
- Click to open chart in a new window to view a bigger version of the chart & to zoom.

Row 5: Ch 1 (counts as 1st st), sc 1 in next st until end of row, change colors according to the diagram, turn (= 58 (66) 74 (80) 86 (92) 100 (108) 116 st).
You’ve now worked row 1 of the diagram
Row 6 – 76: Repeat row 5, working row 2-25 on diagram once. Then repeat row 18-25 on diagram 5 times. Then repeat row 18-24 on diagram once.
Row 77-80: Repeat row 5, working row 13-16 on diagram once.
Row 81-92: Repeat row 5, working row 1-12 on diagram once.
Fasten off & cut yarn.
Sleeves
The sleeves are crocheted from the bottom up. Repeat two times to make 2 sleeves to crochet a right sleeve and a left sleeve.
Ch 30 (30) 30 (32) 32 (32) 34 (34) 34 st.
Row 1 with CA: Start row in 4th ch from hook, dc 1 in each st until end of row, turn (= 28 (28) 28 (30) 30 (30) 32 (32) 32 st).
Row 2 with CA: Ch 2 (counts as 1st st), *FPdc 1 in next st, BPdc 1 in next st*, repeat from *to* until end of row, turn (= 28 (28) 28 (30) 30 (30) 32 (32) 32 st).
Row 3 with CA: Rep row 2.
Row 4 with CA: Ch 1 (counts as 1st st), sc 1 in next st until end of row, turn (= 28 (28) 28 (30) 30 (30) 32 (32) 32 st).
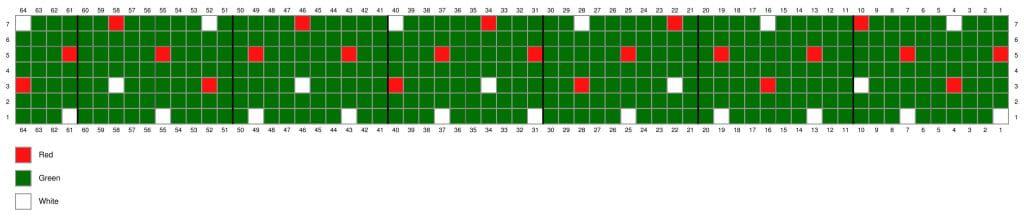
- You will now start following the diagram below for color changes, starting on row 1 on diagram.
- Each vertical line shows how many stitches each size has, stitch count given horizontally & you should only follow the part to the right of the line that shows your size.
- See more instructions on reading diagrams under the heading “TECHNIQUES YOU WILL NEED”.
Row 5 Ch 1 (counts as 1st st), sc 1 in next st until end of row, change colors according to the diagram, turn (= 28 (28) 28 (30) 30 (30) 32 (32) 32 st).
Row 6 – 19: Repeat row 5.
- Click to open chart in a new window to view a bigger version of the chart & to zoom.
Row 20 with CA: Ch 1, sc 1 in 1st st, sc 2 in each st until end of row, turn (= 56 (56) 56 (60) 60 (60) 64 (64) 64 st).
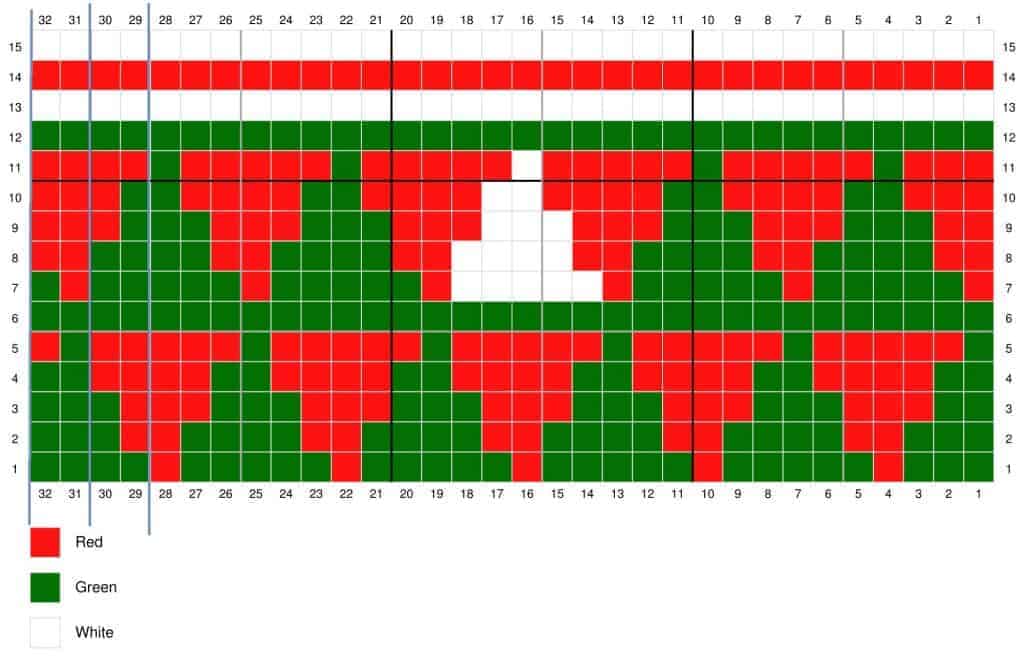
- You will now start following the diagram below for color changes, starting on row 1 on diagram.
- Each vertical line shows how many stitches each size has, stitch count given horizontally & you should only follow the part to the right of the line that shows your size.
- See more instructions on reading diagrams under the heading “TECHNIQUES YOU WILL NEED”.
Row 21: Ch 1 (counts as 1st st), sc 1 in next st until end of row, change colors according to the diagram, turn (= 56 (56) 56 (60) 60 (60) 64 (64) 64 st).
You’ve now crocheted the first row on the diagram.
Row 22 – 71: Repeat row 21, working row 2-7 on diagram once. Then repeat row 1-7 on diagram 6 times. Then repeat row 1-2 on diagram once.
- Click to open chart in a new window to view a bigger version of the chart & to zoom.
Fasten off & cut yarn.
 Finishing
When you’re finished crocheting you have 4 parts:
1.- Sew the shoulder part on the front together with the corresponding stitches from the back, using a needle and whip stitches.
2.- Sew the arms to the front & back in a way that the middle of the arm is in line with the shoulder seam.
3.- Sew the sides & arms together.
Fasten threads & weave in ends.
Neckline
Crocheted around the opening for the head. Attach yarn in one shoulder seam.
Round 1: Crochet 1 round of dc stitches evenly spread out, sl st in 1st st made.
Round 2: Ch 2 (counts as 1st st), *FPdc 1 in next st, BPdc 1 in next st* repeat from *to* until end of round, sl st in 2nd ch from beg of round.
Fasten off & cut yarn.
Weave in ends.
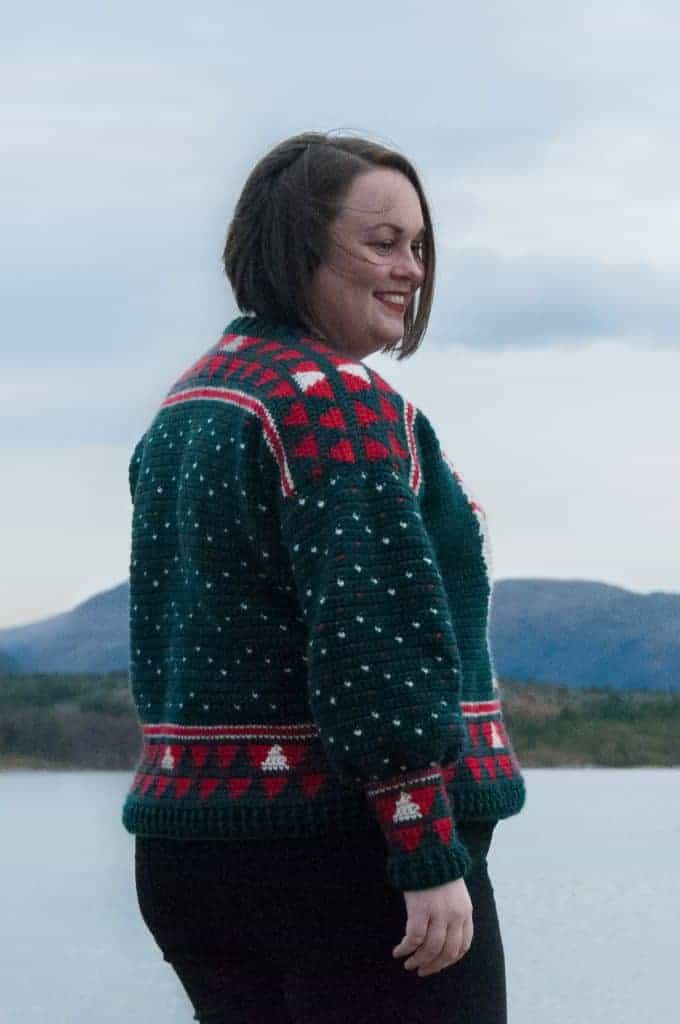
Your crochet Christmas sweater is finished & you can wear it!
Share & Worth Noting

Thank you for sharing my FREE patterns & tutorials. When you do, you support me & the blog, which makes it possible to continue sharing free content with you.
Not all content on this blog website is free, but the more you share, the more free content I will be able to share. Note that all premium content are ad free.
My crochet patterns can be used to sell handmade pieces. You are required to credit Joy of Motion/Janne Kleivset as the designer by linking back to My website: https://joyofmotioncrochet.com. You can not use my pictures when selling your handmade items. Finally, you can not resell, reprint or share any parts of my patterns as your own.