FREE CROCHET PATTERNS FREE CROCHET TUTORIALS FREE CROCHET CHEAT SHEETS GRANNY SQUARES 101 CROCHET QUIZ!

Sweater Weather Raglan – FREE Crochet Pattern

Chantal Barnett
By
Last Updated
Disclosure. Most pages on this website contain affiliate links. This means I get a small commission if you click-through & purchase (no additional cost to you). Read the affiliate disclosure..

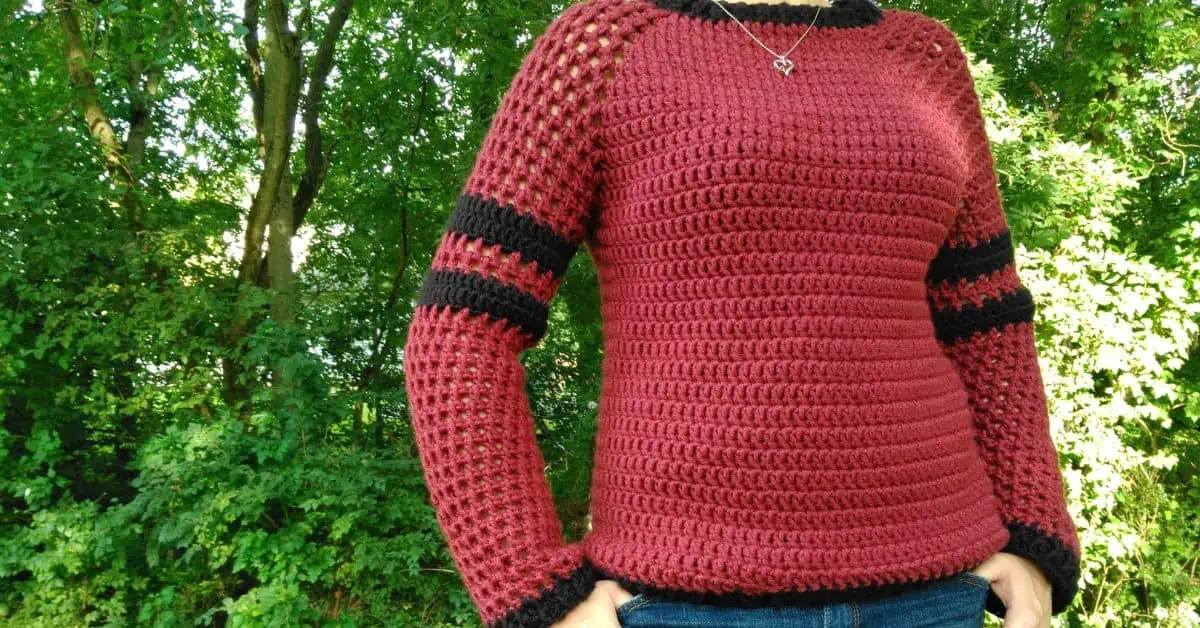
The Sweater Weather Raglan is a top-down raglan style sweater that’s sure to become a new fav! Sized from XS-3X and made using bulky weight yarn and a large 7 mm hook, you can even make a few as gifts this holiday season. This has quickly become one of my new favorite lounging sweaters and I hope you love it as much as I do!

Find more: 21+ Women’s Sweater Crochet Pattern Collection.

Want to crochet your first sweater? Learn tips on how to crochet a sweater here. 
Sweater Weather Raglan - FREE Crochet Pattern

The Yarn


This two color crochet pattern works up super quickly using bulky weight yarn. The yarn used in the photos is Lion Brand Color Made Easy. The Color Made Easy line is such a soft and beautiful yarn and is available is so many great colors! Since there is such a large variance in this weight category, I strongly recommend using the same yarn. If you choose to use another yarn, however, just make sure you swatch and meet accurate gauge before you get started!

Sweater Weather Raglan - FREE Crochet Pattern

YOUR NEW FAVORITE FALL SWEATER


My goal here was to create what could become anyone’s new favorite fall sweater. You know, that sweater that you always grab for whether you’re running out the door or just lounging around the house and want to be comfy and warm. The bulky weight yarn makes it just heavy and thick enough to keep you toasty warm without being overly bulky and constricting. Made with 4-6″ of positive ease and slightly loosely fitted sleeves, this is one of the comfiest sweaters I now own! I can’t wait to get so much use out of it this coming fall!

Since you like the Sweater Weather Raglan, these might interest you too?

Sweater Weather Raglan - FREE Crochet Pattern

How Long Does It Take To Crochet That?


How long it takes to crochet something varies depending on your skill & how fast you crochet. But that isn’t a helpful answer is it?

Well, I’ve developed a yarn calculator to help you get the answer to this question.

It will help you calculate exactly how much time you’ll spend crocheting a project.

All you need to know is how much yarn you will use on the project in either meters, yards or skeins. Then crochet your test square & time it.

Calculate how long it takes to crochet that. 

SWEATER WEATHER RAGLAN – THE FREE CROCHET PATTERN


Pattern Options


GRAB THE INEXPENSIVE, AD-FREE, AND COLOR-CODED PDF ON RAVELRY, ETSY, OR LOVECRAFTS!

About The Pattern


The Sweater Weather Raglan works up very quickly with bulky weight yarn and a large 7 mm hook. It is sized from XS-3X and is sure to become your new favorite fall sweater!

Sweater Weather Raglan - FREE Crochet Pattern

Project Level 


Easy Skill Level

Read about skill levels.

WHAT’S YOUR CROCHET SKILL LEVEL?

Take the Quiz

Get helpful tips for your next crochet project & increase your skills!

Materials Needed


Crochet Hook

7 mm / US: – / UK: 2

Yarn

Yarn used:

Lion Brand Color Made Easy in Caviar (contrast color) and Pomegranate (main color)

Find it here.

Yarn amount used: 

Main Color:

3-5 skeins / 21-35 oz / 600-1000 g / 678-1130 m / 741-1235 yards

Contrast Color:

<1 skein / 7 oz / 200 g / 226 m / 247 yards

Yarn characteristics:

Other Materials Needed

Gauge


Measured with double crochet crocheted in rounds:

10.5 stitches & 6 rows per 10 cm / 4”.

Notes 


  • This crochet pattern is written in US terms.
  • Use invisible decreases throughout the pattern unless stated otherwise (yo, insert hook into the FLO of the first stitch to decrease, insert hook into the FLO of the second stitch to decrease, yo and pull through 2 loops, finish stitch as usual)
  • Pattern is written as follows: XS (S, M, L, XL, 2X, 3X). Grab an inexpensive PDF for color-coded sizing! 
  • *   * indicates a repeat
  • (xx) at the end of a row/round indicates how many total stitches for that row/round
  • Read pattern instructions carefully before beginning to make sure you understand everything. It might save you hours frogging your work & crocheting it again!
  • Make a swatch that measures at least 10 x 10 cm / 4 x 4 inches using the stitch the gauge is given for. If your swatch matches the gauge, you’re good to go. If the gauge is wrong, you might need to change your hook. Go up in crochet hook size if your stitches are smaller & go down in crochet hook size if your stitches are bigger (more details).
  • Check yarn info if you want to find an alternative or test your yarn against the gauge. Learn more about substituting yarn.

Size & Measurements


All sizes are based on the Craft Yarn Council’s standard women’s size chart. The Sweater Weather Raglan is written with 2-4″ of positive ease and the length is completely customized by you with notes throughout the pattern.

Abbreviations

We try our best to include all crochet abbreviations in the list above for the crochet pattern, but sometimes we may forget one or two.

Learn more about crochet abbreviations & find a complete list on our Crochet Abbreviations & Terms post.

Techniques You Will Need 


Foundation stitches

Working in the round

Back post/front post stitches

Sweater Weather Raglan - FREE Crochet Pattern

Sweater Weather Raglan Pattern Instructions


To access this Exclusive Subscriber content, simply click the box below. Grow will appear and you can subscribe to my blog and Joy of Motion Crochet. Then enter email and create a password. Once you’ve done that, you can log in to your account whenever you see Exclusive Content on my Blog and enjoy all the benefits.

Foundation/R1 (with contrast color and leaving a 5-6” beginning tail) fdc 60 (60, 60, 60, 68, 68, 68) join with a sl st to the first st (use the longer beginning tail to join the first and last foundation sts), do not ch, do not turn

R2 [sc, LOOSELY ch 1] all in the same joining st (counts as 1 bpdc), *fpdc, bpdc* repeat from * to * around until 1 st remains, fpdc in the last st, join with a sl st, do not ch, do not turn (60, 60, 60, 60, 68, 68, 68)

R3 (Switching to Main Color) ch 4 (counts as dc + ch 2), dc in the same st (VST made), *ch 1, sk 1 dc, dc in the next ch-sp* 5 (5, 5, 5, 6, 6, 6) times, ch 1, sk 1 dc, VST in the next dc, dc in the next 17 (17, 17, 17, 19, 19, 19) sts, VST in the next dc, repeat from * to * 5 (5, 5, 5, 6, 6, 6) times, ch 1, sk 1 dc, VST in the next dc, dc in the next 17 (17, 17, 17, 19, 19, 19) sts, join with a sl st to the 2nd ch of the beginning ch 4 

R4 slstBLO of the next ch, sl st into/around the same ch-sp, ch 4 (counts as dc + ch 2), dc in the same ch-sp (VST made), ch 1, *sk 1 dc, dc in the next ch-sp, ch 1* to the next corner VST, VST in the ch 2 of the previous round’s VST, dc in each dc to the next corner VST, VST in the ch 2 of the previous round’s VST, repeat from * to * to the next corner VST, VST in the ch 2 of the previous round’s VST (final corner complete), dc in each dc across until 1 st remains, dc2tog over the last dc of the round and the base of the ch 4 (this is just so there isn’t a gap between the beginning and end of the round), join with a sl st to the 2nd ch of the beginning ch 4

R5-12 (13, 14, 15, 17, 18, 20) repeat R4

Note: Your yoke will not be square and will not sit flat as the shoulder sides are shorter than the front and back sides.

After your final yoke round and before the split row you should have the following on each side respectively:

XS 15 windows + 2 corner VST windows and 37 dc across (including the corner VST dcs)

S 16 windows + 2 corner VST windows and 39 dc across (including the corner VST dcs)

M 17 windows + 2 corner VST windows and 41 dc across (including the corner VST dcs)

L 18 windows + 2 corner VST windows and 43 dc across (including the corner VST dcs)

XL 20 windows + 2 corner VST windows and 47 dc across (including the corner VST dcs)

2X 21 windows + 2 corner VST windows and 49 dc across (including the corner VST dcs)

3X 23 windows + 2 corner VST windows and 53 dc across (including the corner VST dcs)

Split row (XS)

[sc, LOOSELY ch 1] all in the same joining st (counts as 1 dc), *dc in the corner ch-sp, ch 1, sk all windows to the next corner ch-sp, dc in the corner ch-sp*, dc in each dc to the next corner, repeat from * to * once, dc in each dc across, join with a sl st to the beginning st, do not join, do not ch, do not turn (80)

Split row (S)

[sc, LOOSELY ch 1] all in the same joining st (counts as 1 dc), *2 dc in the corner ch-sp, sk all windows to the next corner ch-sp, 2 dc in the corner ch-sp*, dc in each dc to the next corner, repeat from * to * once, dc in each dc across, join with a sl st to the beginning st, do not join, do not ch, do not turn (86)

Split row (M)

[sc, LOOSELY ch 1] all in the same joining st (counts as 1 dc), *2 dc in the corner ch-sp, ch 1, sk all windows to the next corner ch-sp, 2 dc in the corner ch-sp*, dc in each dc to the next corner, repeat from * to * once, dc in each dc across, join with a sl st to the beginning st, do not join, do not ch, do not turn (92)

Split row (L)

[sc, LOOSELY ch 1] all in the same joining st (counts as 1 dc), *2 dc in the corner ch-sp, ch 2, sk all windows to the next corner ch-sp, 2 dc in the corner ch-sp*, dc in each dc to the next corner, repeat from * to * once, dc in each dc across, join with a sl st to the beginning st, do not join, do not ch, do not turn (98)

Split row (XL)

[sc, LOOSELY ch 1] all in the same joining st (counts as 1 dc), *2 dc in the corner ch-sp, ch 1, sk all windows to the next corner ch-sp, 2 dc in the corner ch-sp*, dc in each dc to the next corner, repeat from * to * once, dc in each dc across, join with a sl st to the beginning st, do not join, do not ch, do not turn (104)

Split row (2X)

[sc, LOOSELY ch 1] all in the same joining st (counts as 1 dc), *2 dc in the corner ch-sp, ch 2, sk all windows to the next corner ch-sp, 2 dc in the corner ch-sp*, dc in each dc to the next corner, repeat from * to * once, dc in each dc across, join with a sl st to the beginning st, do not join, do not ch, do not turn (110)

Split row (3X)

[sc, LOOSELY ch 1] all in the same joining st (counts as 1 dc), *2 dc in the corner ch-sp, ch 1, sk all windows to the next corner ch-sp, 2 dc in the corner ch-sp*, dc in each dc to the next corner, repeat from * to * once, dc in each dc across, join with a sl st to the beginning st, do not join, do not ch, do not turn (116)


Body (all sizes)

Row count will start back at 1 for all sizes

R1 sc in the same joining st (PM in the 1st st of the round here and throughout), hdc in the next st, dc in the next st and each st around, do not join, do not turn, we will now work in continuous rounds (80, 86, 92, 98, 104, 110, 116)

For the dress length ONLY: After the following repeat, your piece should hit right at about your belly button, before you start to widen at the hips. Add or subtract rows according to your height and/or personal preferences, then proceed with the pattern as usual.

R2-16 dc in each st around, PM in the 1st st of each round (80, 86, 92, 98, 104, 110, 116)

For the sweater length ONLY: Continue with pattern for 3 more rounds (19 rounds total) or until your piece hits about 1” (2.5cm) above your hip bone or until you reach your desired length keeping in mind that you will add about another 1 ¼ “ (3.5cm) to the final length with the ribbing. Model in the photos is 5’5” for reference of length. After you have completed this section and reached your desired length, proceed to ‘Ribbing’ section.

R17 *2dc in the next dc (inc), dc in the next 20 (21, 22, 23, 24, 26, 28) sts* repeat from * to * around, dc in any remaining sts, do not ch (84, 90, 96, 102, 108, 114, 122)

R18 dc in each st around, PM in the 1st st of each round (84, 90, 96, 102, 108, 114, 122)

R19-26 repeat R17-18 (104, 110, 116, 124, 130, 136, 142)

Note: The next repeat is where you will crochet to your preferred finished length. Model in the photos is 5’5” for reference of length. Add or subtract rows according to your height and/or personal preferences keeping in mind that you will add about another 1 ¼ “ (3.5cm) to the final length with the ribbing. 

R27-41 dc in each st around, PM in the 1st st of each round (104, 110, 116, 124, 130, 136, 142)

Ribbing (all sizes)

Before you begin the ribbing and still with your Main Color, hdc in the next st, sc in the next st, sl st in the next 2 sts (Switching to Contrast Color on the 2nd sl st), (this is just to even out the hemline so there isn’t a dip between the previous continuous rows and the ribbing.) You may now remove your stitch marker. All sizes proceed to R1.

R1 [sc, LOOSELY ch 1] all in the same joining st (counts as 1 dc), dc in each st around, join with a sl st, do not ch, do not turn (104, 110, 116, 124, 130, 136, 142)

R2 [sc, LOOSELY ch 1] all in the same joining st (counts as 1 bpdc), *fpdc, bpdc* repeat from * to * around until 1 st remains, fpdc in the last st, join with a sl st and break yarn OR use an invisible join (104, 110, 116, 124, 130, 136, 142)


Sleeves (both, all sizes)

R1 (with main color) attach a new strand with a sl st in the ch-sp of the VST to the right of the center of the armpit, ch 3 (counts as 1 dc + 1 ch), dc into the side of the dc directly to the left of where you attached your yarn, ch 1, dc in the very center of the armpit where the ch 1 on your split row of the yoke is, ch 1, dc into the side of the dc directly to the left of the center of the armpit, ch 1, dc into the ch-sp of the next VST, *ch 1, dc in the next ch-sp* repeat from * to * to the beg of the round ending with a ch after the last dc, sl st to the 2nd ch of the beg ch 3, do not ch, do not turn

R2 sl st BLO of the next ch, sl st into/around the same ch-sp, ch 3 (counts as 1 dc + ch 1), dc2tog over the next 2 ch-sp leaving the dc between them unworked, *dc in the next ch-sp, ch 1, sk 1 dc* repeat from * to * around, join with a sl st to the 2nd ch of the beg ch 3, do not ch, do not turn

Note: Be sure to use invisible decreases in subsequent rows for smooth decreases.

R3 join contrast color with a standing dc in the ch-sp to the right of the joining st of the previous round, dc2tog over the next dc and ch, dc in each dc and ch-sp around, join with a sl st to the 1st st of the round, do not ch, do not turn 

R4 [sc, LOOSELY ch1] in the same joining st (counts as 1 dc), dc2tog, dc in each st around, join with a sl st to the 1st st of the round, break yarn 

R5 join main color with a sl st in the dc to the right of the joining st of the previous round, ch 3 (counts as 1 dc + ch 1), sk 1 dc, (not using an invisible decrease): dc2tog skipping 1 dc in between the two posts of your decrease, ch 1, sk 1 dc, *dc in the next dc, ch 1, sk 1 dc* repeat from * to * around,  join with a sl st to the 2nd ch of the beg ch 3, do not ch, do not turn 

R6 sl st BLO of the next ch, sl st into/around the same ch-sp, ch 3 (counts as 1 dc + ch 1), *dc in the next ch-sp, ch 1, sk 1 dc* repeat from * to * around,  join with a sl st to the 2nd ch of the beg ch 3, break yarn 

R7 attach contrast color with a standing dc in the ch-sp to the right of the joining st, dc in each dc around, join with a sl st to the 1st st, do not ch, do not turn (38)

R8 [sc, LOOSELY ch1] in the same joining st (counts as 1 dc), dc in each st around, join with a sl st to the 1st st of the round, break yarn (38)

R9 attach a new strand of your main color with a sl st in the dc to the right of the joining st of the previous round, ch 3 (counts as 1 dc + ch 1), sk 1 dc, *dc in the next dc, ch 1, sk 1 dc* repeat from * to * around,  join with a sl st to the 2nd ch of the beg ch 3, do not ch, do not turn 

Note: The next repeat is where you will crochet to your preferred finished sleeve length. Add or subtract rows according to your height and/or personal preferences keeping in mind that you will add about another 1 ¼ “ (3.5cm) to the final length with the ribbing. 

R10-26 sl st BLO of the next ch, sl into/around the same ch-sp, ch 3 (counts as 1 dc + ch 1), *dc in the next ch-sp, ch 1, sk 1 dc* repeat from * to * around,  join with a sl st to the 2nd ch of the beg ch 3, break yarn after the last round


Ribbing (all sizes)

R1 join contrast color with a standing dc in any st, dc in each ch-sp and dc around placing 2 dc2tog evenly (decreasing by 2 stitches total), join with a sl st to the 1st st of the round, do not ch, do not turn

R2 [sc, LOOSELY ch 1] in the same joining st (counts as 1 bpdc), *fpdc, bpdc* until 1 st remains, fpdc, join with a sl st to the 1st st of the round, break yarn (or use an invisible join if you prefer)

Weave in all your ends and you’re finished!

Sweater Weather Raglan - FREE Crochet Pattern

Share & Worth Noting


Thank you for sharing my FREE patterns & tutorials. When you do, you support me & the blog, which makes it possible to continue sharing free content with you.
Not all content on this blog website is free, but the more you share, the more free content I will be able to share. Note that all premium content are ad free.

My crochet patterns can be used to sell handmade pieces. You are required to credit Joy of Motion/Janne Kleivset as the designer by linking back to My website: https://joyofmotioncrochet.com. You can not use my pictures when selling your handmade items. Finally, you can not resell, reprint or share any parts of my patterns as your own.

Chantal Barnett

Chantal Barnett

Yarnique. Guest Designer.

Chantal is the creator behind Yarnique, offering free knit and crochet designs on her blog. A stay-at-home mom to three children, including 11-year-old and 4-year-old twins, she's been an avid crocheter since 2007. In the past year, she transformed her yarn passion into a business.


GRAB CROCHET CHEAT SHEETS

Sheets included: Hook sizes, Yarn weights, Crochet Hook for Yarn Weight, US vs UK Terms, Crochet Chart Symbols

Grab your copy now 👇