

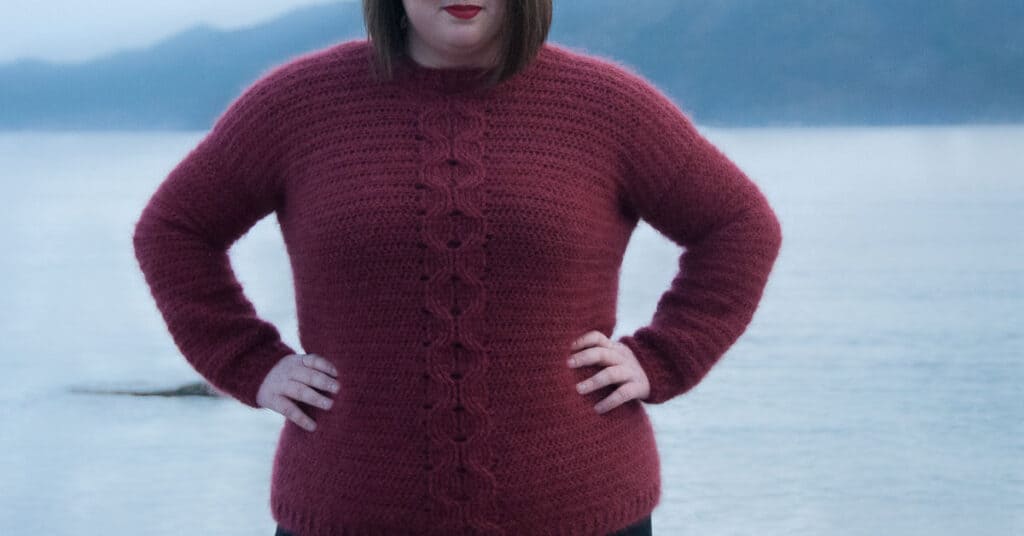
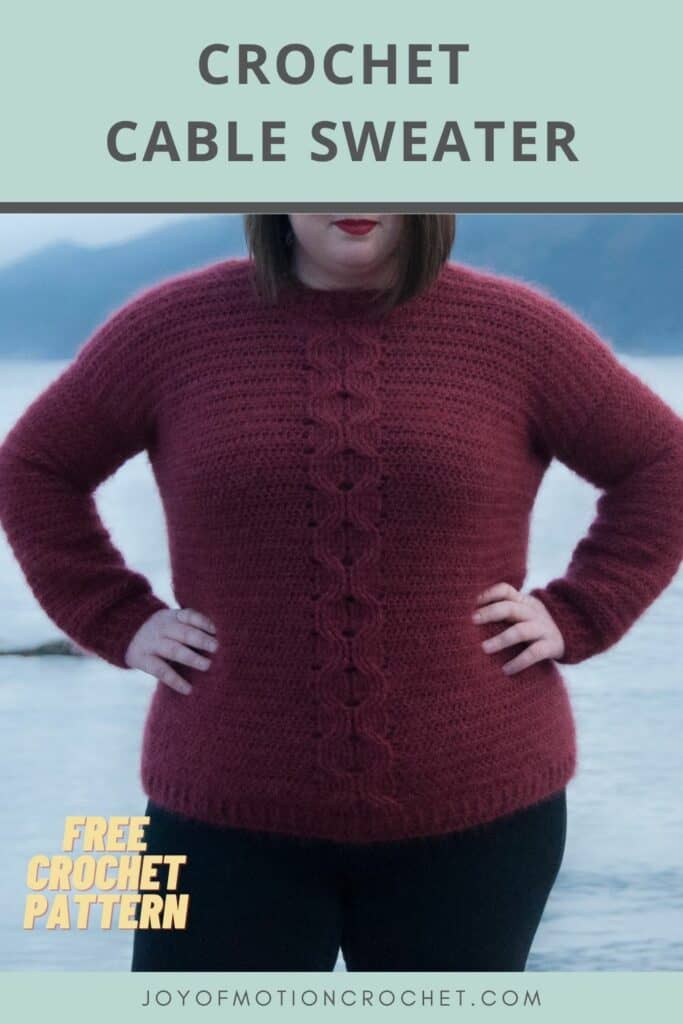
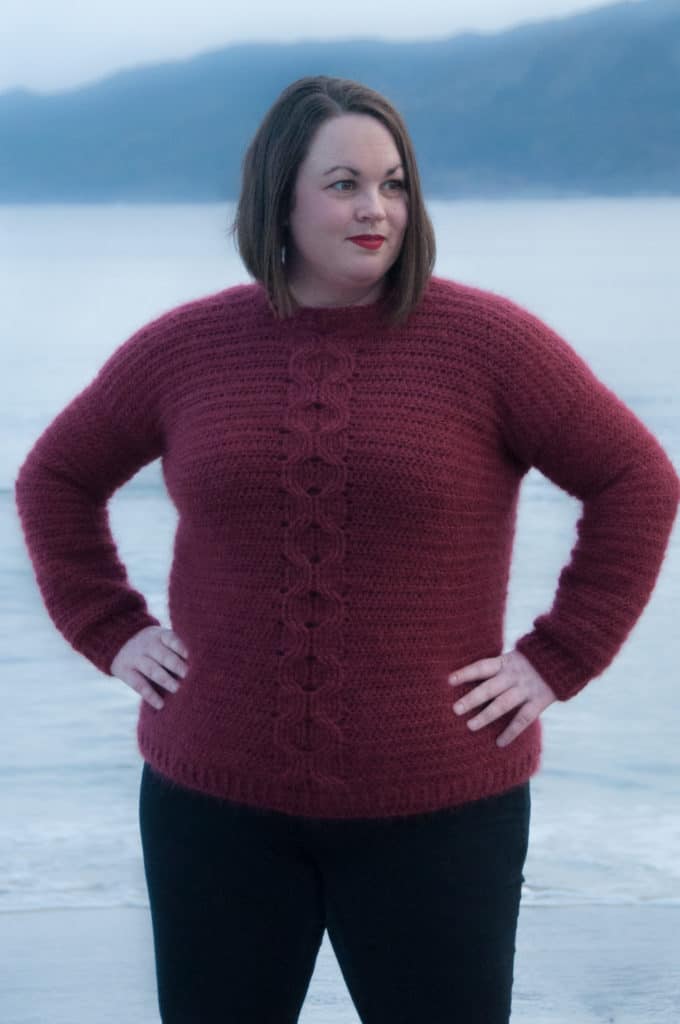
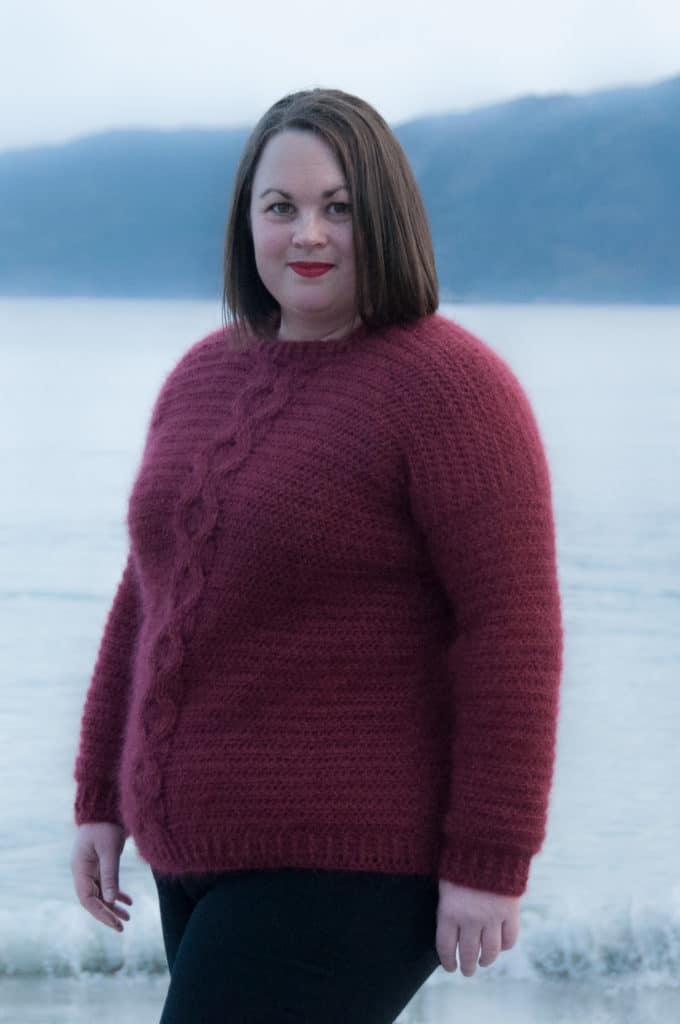
You’re going to love the Crochet Cable Sweater, because it’s such a classic sweater design.
The crochet cables makes this pattern really special & imagine using this cabled sweater together with jeans.
What’s so great about this garment is the fact that it comes in 9 sizes from XS to 5XL & there’s also suggestions on how to customize it to fit YOU perfectly!
Never crocheted a sweater before, don’t worry, read the how to crochet a sweater guide first.
Find more: 21+ Women’s Sweater Crochet Pattern Collection.
Would you like to save this?
How to get this crochet pattern:
Option 1: Scroll down to see the FREE Crochet Pattern ⬇️
Option 2: Purchase the printable PDF:
Option 3: Get the printable version inside the crochet pattern membership.
Option 4: Most of my crochet patterns can also be found on Ravelry, Love Crafts and Etsy.
How To Crochet The Cable Sweater
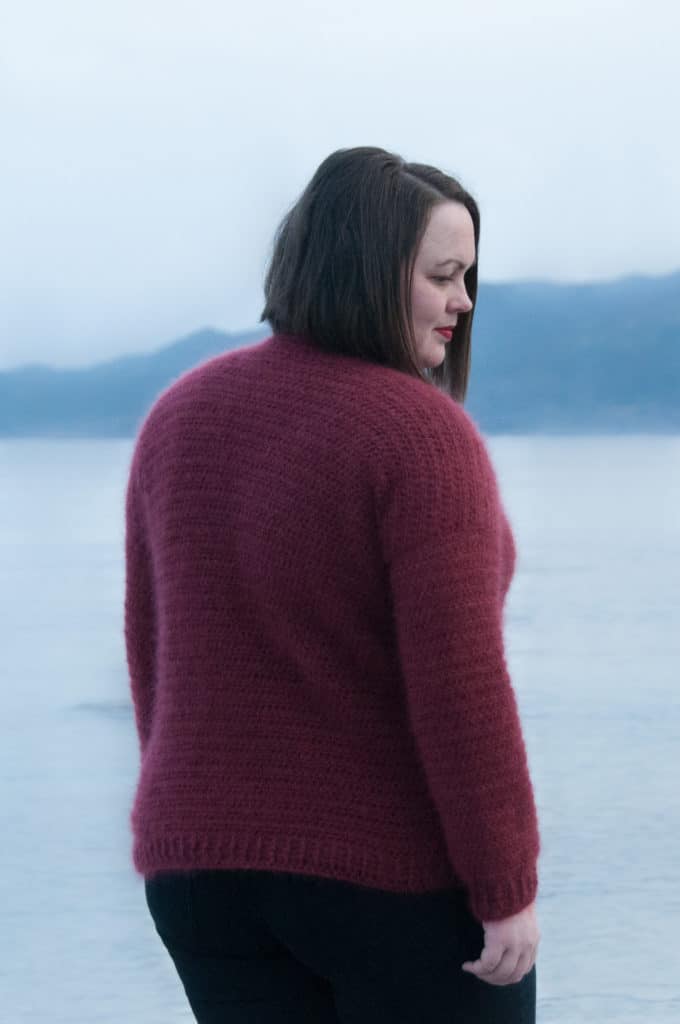
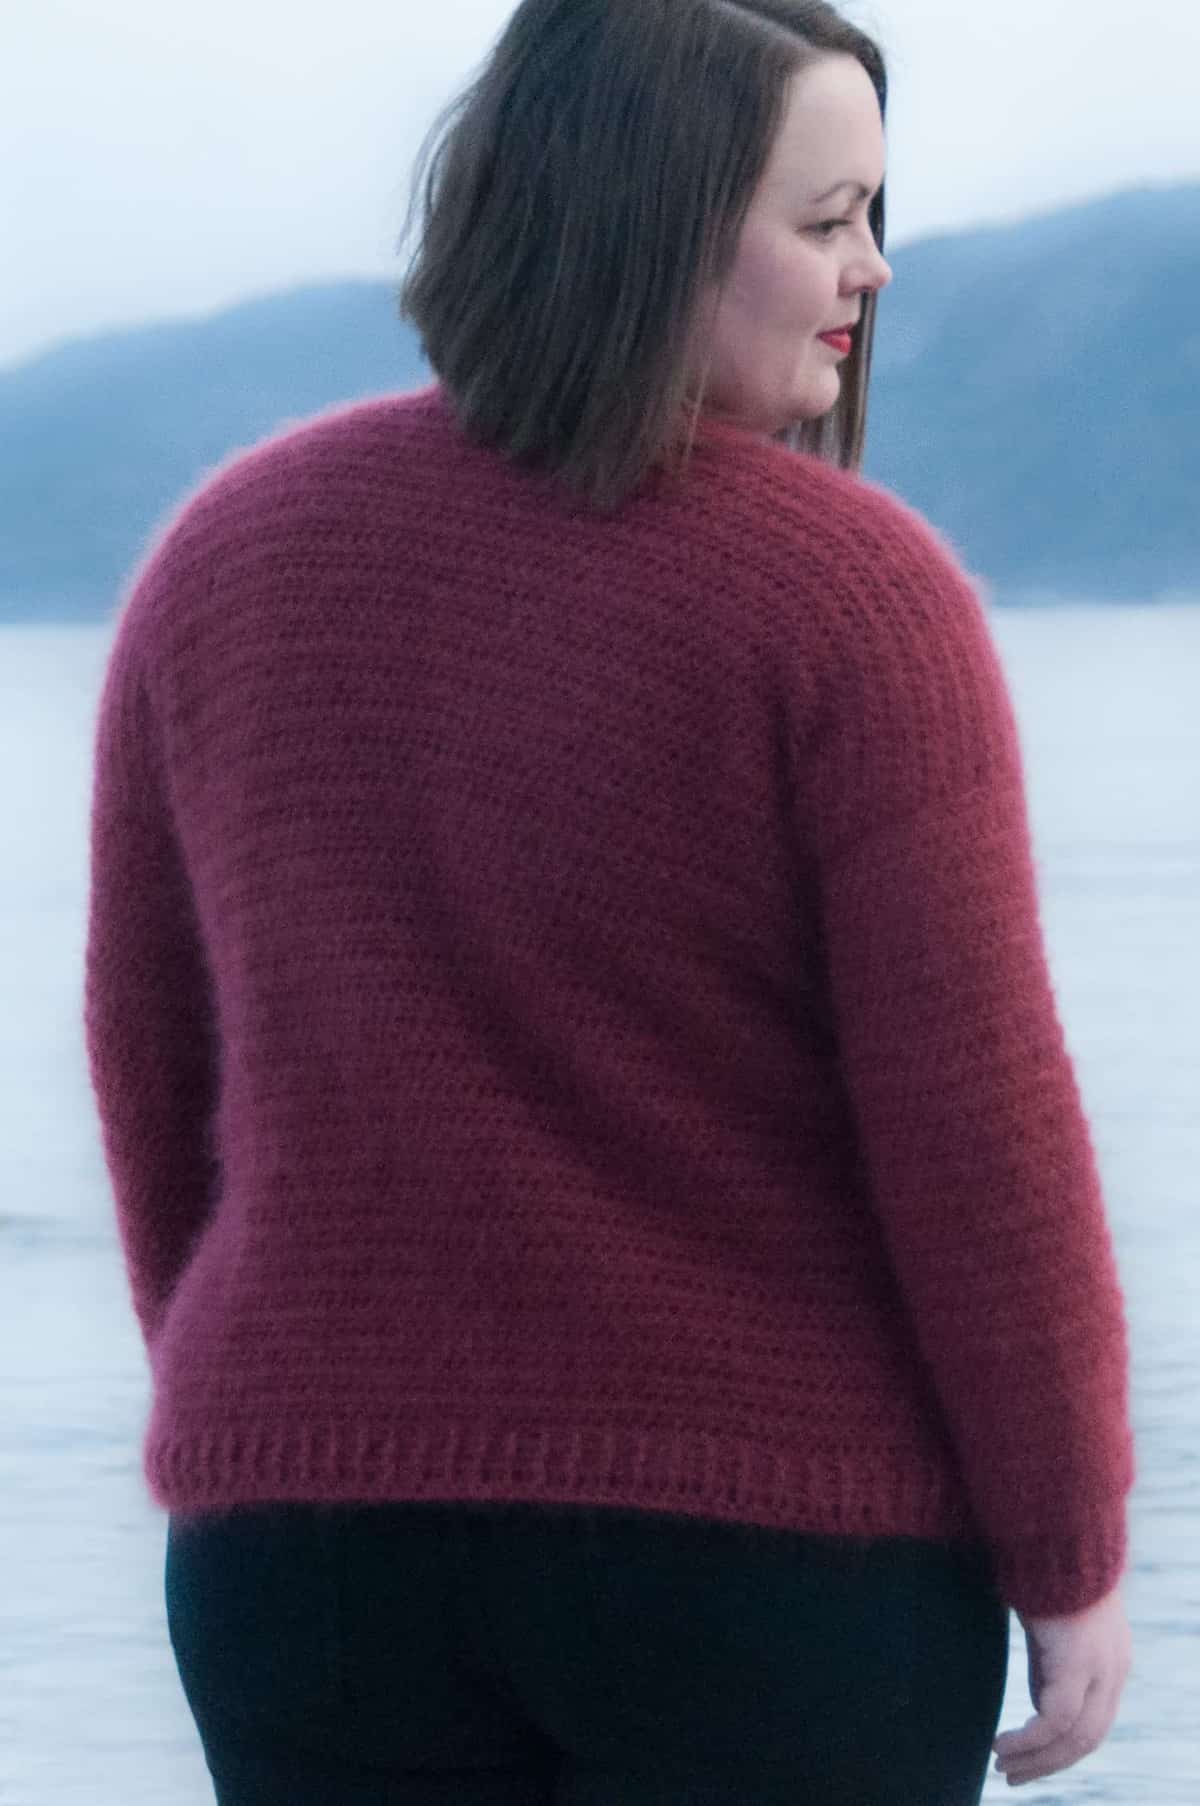
The Cable Crochet Sweater is worked back and forth in rows in 4 separate pieces and then assembled using the whip stitch.
Finally you will crochet an edging around the neck opening.
The stitches and techniques used in this crochet pattern is mostly half double crochet stitches. However, you will also need to know front and back post double crochet stitches to create crochet ribbing.
The post stitches are also used to create the crochet cables.
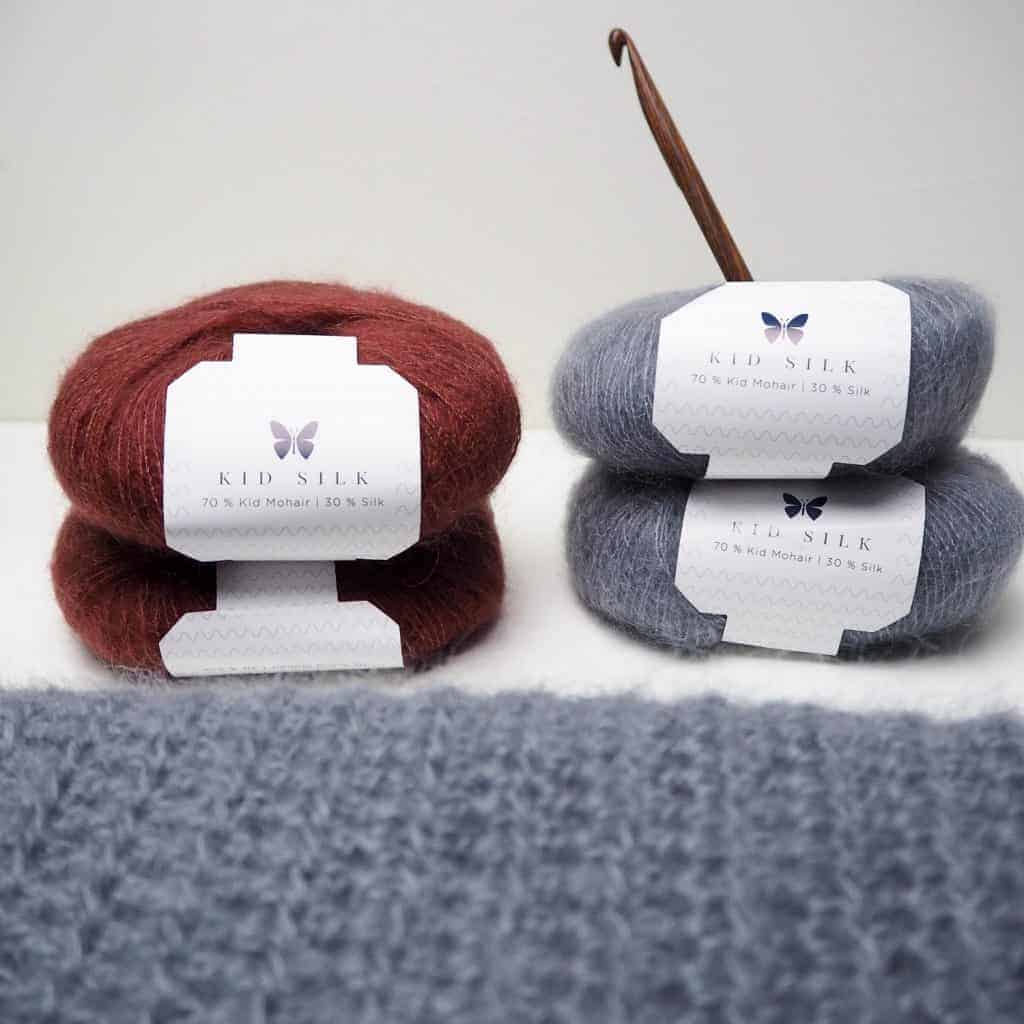
Yarn For The Cable Crochet Sweater
The yarn to design this pattern was gifted by Hobbii Yarns, however I’m not otherwise compensated by them.
The Kid Silk Yarn by Hobbii, is super soft & fun to crochet with. The only negative is the fact that Kid Silk yarn is hard to frog, but that’s typical for those types of yarn, no matter what brand.
There’s so many beautiful & soft color options of this yarn & the best thing is that it ships worldwide.
When crocheting the cable crochet sweater you will use two yarn strands at a time.
Fall/Winter Garment Crochet Pattern Bundle
Like this? Get the ad-free version + 19 other crochet patterns with the “Fall/Winter Garment Crochet Pattern Bundle”.
Learn more about the Fall/Winter Garment Pattern Bundle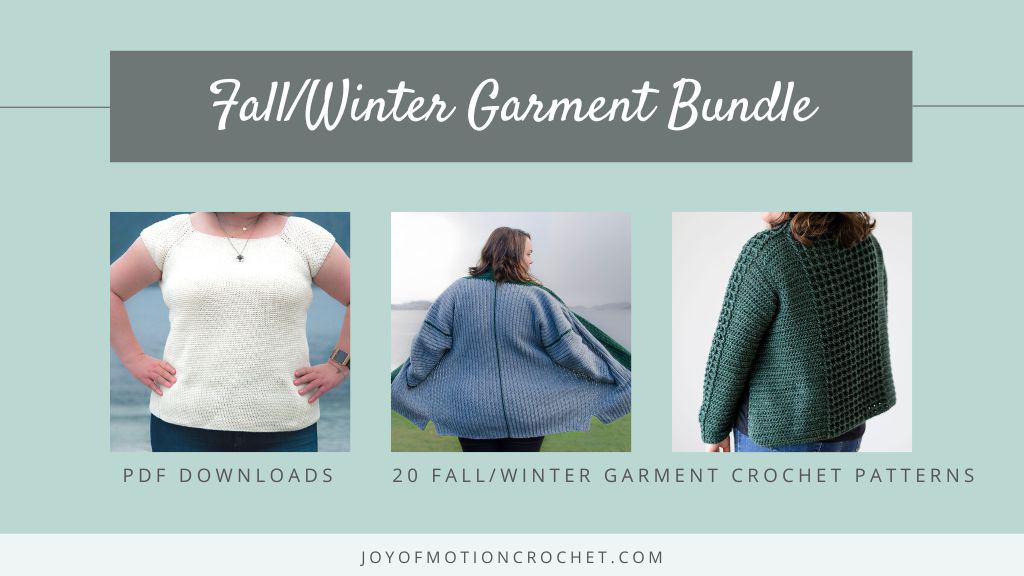
A Great Way To Try Crochet Cables
Crochet cables can be really beautiful & lift the look of a rather simple design with just a few stitches.
If you’re not familiar with crocheting cables, this pattern is a great place to start.
Love this crochet pattern? Save on Pinterest!
How Long Does It Take To Crochet That?
How long it takes to crochet something varies depending on your skill & how fast you crochet. But that isn’t a helpful answer is it?
Well, I’ve developed a yarn calculator to help you get the answer to this question.
It will help you calculate exactly how much time you’ll spend crocheting a project.
All you need to know is how much yarn you will use on the project in either meters, yards or skeins. Then crochet your test square & time it.
Calculate how long it takes to crochet that.
Buy the Cable Sweater Crochet Pattern
Get the downloadable PDF crochet pattern for this crochet pattern, or join the Crochet Everyday Bliss Membership and get access to download ALL crochet patterns and more
Not ready to crochet it yet?
- Share about this crochet pattern on Facebook & Instagram using #joyofmotioncrochet.
- Save on Pinterest to make it later.
The Free Cable Sweater Crochet Pattern
The Cable Pullover Crochet Pattern Summary
The crochet cable sweater is a great pullover with a classical look. The crochet sweater is slightly cropped, but there’s size adjustments included on how to adjust the length.
The jumper crochet pattern also includes 9 sizes from XS to 5XL.
Wear the beautiful crochet cable sweater with jeans or maybe a high waist crochet skirt.
Finally, this is a great introduction to crocheting cables, as the pattern otherwise is has basic crochet stitches & just 1 row of increases.
Project Level
WHAT’S YOUR CROCHET SKILL LEVEL?
Take the Quiz
Get helpful tips for your next crochet project & increase your skills!
Materials Needed For The Crochet Sweater
Crochet Hook
Size 6.5 mm / US: K – 10.5 / UK: 3
How much yarn needed for the cable crochet sweater:
- XS: 9 skeins / 220 g / 1690 m / 1850 yards
- S: 10 skeins / 230 g / 1790 m / 1955 yards
- M: 10 skeins / 245 g / 1890 m / 2065 yards
- L: 11 skeins / 255 g / 1990 m / 2170 yards
- XL: 11 skeins / 270 g / 2115 m / 2315 yards
- 2XL: 12 skeins / 290 g / 2270 m / 2485 yards
- 3XL: 13 skeins / 310 g / 2400 m / 2625 yards
- 4XL: 13 skeins / 325 g / 2525 m / 2760 yards
- 5XL: 14 skeins / 340 g / 2655 m / 2905 yards
* Worked with 2 strands of yarn at a time, amount above is the total amount needed.
Yarn characteristics:
- 0 Lace yarn.
- 70 % kid mohair, 30 % silk
Other Materials Needed
- Needle, find one here
- Scissors
- Tape Measure
Gauge
Measured with half double crochet stitches crocheted in rows:
12 stitches & 13 rows per 10 cm / 4”.
Crochet Pattern Notes
- This crochet pattern is written in US terms.
- All measurements given are unblocked.
- Note that measurements are given as exact as possible. But crochet tension & technique might give variations in the result, that changes from person to person.
- Read pattern instructions carefully before beginning to make sure you understand everything. It might save you hours frogging your work & crocheting it again!
- Make a swatch that measure at least 10 x 10 cm / 4 x 4 inches using the stitch the gauge is given for. If your swatch matches the gauge, you’re good to go. If the gauge is wrong, you might need to change your hook. Go up in crochet hook size if your stitches are smaller & go down in crochet hook size if your stitches are bigger. Learn more about testing gauge.
- Check yarn info if you want to find an alternative or test your yarn against the gauge. Learn more about substituting yarn.
- This pattern is written for 9 sizes, where the different sizes is given in parenthesis like this: XS (S) M (L) XL (2XL) 3XL (4XL) 5XL. If just one number is given, it applies to all sizes. I recommend that you highlight or circle the size you’re making before you begin to make the pattern easier to follow. Size adjustments are added under the heading “Size & Measurements”.
- At the end of each row, the stitch count is given in parenthesis.
Sizes And Measurements

Size Notes
- This pattern is written to have positive ease, that means the measurements on the garment is larger than your actual body measurements. Learn more about mastering ease in crochet garments.
- Take measurements to find the size that fits the best.
Size Adjustments
- Note: Any size adjustments affect yarn usage & you might need more/less yarn than suggested.
- For this pattern you can work the body (front + back) in one size & the arms in a different size.
Sleeves:
- Best place to adjust length by adding or reducing rows at the end.
- Adjust width by following the instructions to a larger or smaller size.
Body (front + back):
- Adjust length by adding or reducing rows at the end. Remember to adjust on both the front & back.
- The pattern is written to have the same length on all sizes, but you may want to adjust it to the length you prefer.
- Adjust width by following the instructions to a larger or smaller size.
- Width adjustments could also be done by adding/reducing the number of stitches on the back & front by 2 stitches at a time.
Abbreviations
- BPdc = back post double crochet
- ch = chain(s)
- dc = double crochet
- FSC = foundation single crochet
- FPdc = front post double crochet
- FPtr = front post treble crochet
- hdc = half double crochet
- prev= previous
- sk= skip
- st = stitch(es)
- yo = yarn over
We try our best to include all crochet abbreviations in the list above for the crochet pattern, but sometimes we may forget one or two.
Learn more about crochet abbreviations & find a complete list on our Crochet Abbreviations & Terms post.
Stitches Used In The Crochet Pattern
You will need to use the chain, the foundation single crochet, double crochet stitch, half double crochet stitch, the front post double crochet stitch, the front post treble crochet stitch & the back post double crochet stitch.
Foundation Single Crochet (FSC):
Written description:
Step 1: Ch 2 st.
Step 2: Insert hook into 2nd ch from hook, pull up a loop. Yo and pull through first loop (making “chain”). Yo and pull through both loops on hook.
Step 3: Insert hook into prev “chain” you made (It should look like you go through a resemblance of a “normal” st, with 2 strands of yarn), pull up a loop, yo and pull through first loop (making “chain”). Yo and pull through both loops on hook. Repeat step 3 until you’ve made enough stitches.
*2nd ch in step 1 makes 1 st, step 2 makes 1 st & every time step 3 is repeated you make 1 st.
Front Post Double Crochet Stitch (FPdc):
Written description:
Yo, insert your hook from front to back between the prev st & the st you’re working, & bring it to the front again between the st you’re working & the next st, yo & pull up a loop, you have 3 loops on the hook, yo & pull through 2 of the 3 loops, yo and pull through the 2 last loops.
Back Post Double Crochet Stitch (BPdc):
Written description:
Yo, insert your hook from back to front between the prev st & the st you’re working, & bring it to the back again between the st you’re working & the next st, yo & pull up a loop, you have 3 loops on the hook, yo & pull through 2 of the 3 loops, yo and pull through the 2 last loops.
Front Post Treble Crochet Stitch (FPtr):
Written description:
Yo twice, insert your hook from front to back between the prev st & the st you’re working, & bring it to the front again between the st you’re working & the next st, yo & pull up a loop, you have 4 loops on the hook, yo & pull through 2 of the 4 loops, you have 3 loops on the hook, yo & pull through 2 of the 3 loops, yo and pull through the 2 last loops.
Cable Crossing:
Cable crossing to the left or in front (cableL):
Sk 3 st, FPtr 1 in 4th st, FPtr 1 in 5th st ,FPtr 1 in 6th st, go back, make the next 3 st in front of the 3 FPtr you just made: FPtr 1 in 1st sk st, FPtr 1 in 2nd sk st, FPtr 1 in 3rd sk st.
Video tutorial (not necessarily the same stitch count)
Cable crossing to the right or behind (cableR):
Sk 3 st, FPtr 1 in 4th st, FPtr 1 in 5th st ,FPtr 1 in 6th st, go back, make the next 3 st behind the 3 FPtr you just made: FPtr 1 in 1st sk st, FPtr 1 in 2nd sk st, FPtr 1 in 3rd sk st.
Video tutorial (not necessarily the same stitch count)
You’ll follow this instruction for the 12 cable stitches in the middle of the fronts, marked “cableL“ or “cableR”, starting on row 4.
Cable Sweater Crochet Pattern Instructions
Crochet the whole sweater with two strands of yarns at a time.
Back Panel
FSC 54 (60) 66 (72) 78 (84) 90 (96) 102 st.
Row 1: Ch 2 (counts as 1st st), dc 1 in all st until end of row, turn (=54 (60) 66 (72) 78 (84) 90 (96) 102 st).
Row 2: Ch 2 (counts as 1st st), *FPdc, BPdc*, repeat from *to* until you have 1 st left, dc 1 in last st, turn (=54 (60) 66 (72) 78 (84) 90 (96) 102 st).
Row 3-4: Rep row 2.
Row 5: Ch 2 (counts as 1st st), hdc 1 in all st until end of row, turn (=54 (60) 66 (72) 78 (84) 90 (96) 102 st).
Row 6-74: Rep row 5.
Fasten off & cut yarn.
Front Panel
FSC 54 (60) 66 (72) 78 (84) 90 (96) 102 st.
Row 1: Ch 2 (counts as 1st st), dc 1 in all st until end of row, turn (= 54 (60) 66 (72) 78 (84) 90 (96) 102 st).
Row 2: Ch 2 (counts as 1st st), *FPdc, BPdc*, repeat from *to* until you have 1 st left, dc 1 in last st, turn (= 54 (60) 66 (72) 78 (84) 90 (96) 102 st).
Row 3-4: Rep row 2.
Row 5: Ch 2 (counts as 1st dc), hdc 1 in the next 21 (24) 27 (30) 33 (36) 39 (42) 45 st, FPdc 1 in the next 12 st, hdc 1 in the next 21 (24) 27 (30) 33 (36) 39 (42) 45 st (= 54 (60) 66 (72) 78 (84) 90 (96) 102 st).
Row 6: Ch 2 (counts as 1st dc), hdc 1 in the next 21 (24) 27 (30) 33 (36) 39 (42) 45 st, BPdc 1 in the next 12 st, dc 1 in the next 21 (24) 27 (30) 33 (36) 39 (42) 45 st (= 54 (60) 66 (72) 78 (84) 90 (96) 102 st).
Row 7: Ch 2 (counst as 1st dc), hdc 1 in the next 21 (24) 27 (30) 33 (36) 39 (42) 45 st, cableL, cableR, hdc 1 in the next 21 (24) 27 (30) 33 (36) 39 (42) 45 st, turn (=54 (60) 66 (72) 78 (84) 90 (96) 102 st).
Row 8: Repeat row 6.
Row 9: Repeat row 5.
Row 10: Repeat row 6.
Row 11: Ch 2 (counts as 1st dc), hdc 1 in the next 21 (24) 27 (30) 33 (36) 39 (42) 45 st, cableR, cableL, hdc 1 in the next 21 (24) 27 (30) 33 (36) 39 (42) 45 st, turn (= 54 (60) 66 (72) 78 (84) 90 (96) 102 st).
Row 12: Repeat row 6.
Row 13-68: Repeat row 5-12, until you have crocheted 68 rows.
Do not fasten off, continue directly on the first shoulder.
Shoulders
Repeated 2 times, continuing directly after row 53 on the front, across the 22 (25) 27 (30) 32 (35) 37 (40) 42 first & last stitches on the row.
Leave the middle 10 (10) 12 (12) 14 (14) 16 (16) 18 stitches unworked to create the neckline later.
Row 1: Ch 2 (counts as 1st st), hdc 1 in the next 21 (24) 26 (29) 31 (34) 36 (39) 41 st, turn (= 22 (25) 27 (30) 32 (35) 37 (40) 42 st).
Row 2-6: Repeat row 1.
Fasten off & cut yarn.
Sleeves
Repeat two times to make two sleeves.
FSC 26 (26) 28 (28) 30 (30) 32 (32) 34 st.
Row 1: Ch 2 (counts as 1st st), dc 1 in all st until end of row, turn (= 26 (26) 28 (28) 30 (30) 32 (32) 34 st).
Row 2: Ch 2 (counts as 1st st), *FPdc, BPdc*, repeat from *to* until you have 1 st left, dc 1 in last st, turn (= 26 (26) 28 (28) 30 (30) 32 (32) 34 st).
Row 3-4: Rep row 2.
*Note: Row 5 is the only place you will increase to make it wide enough to have the standard circumference for the armhole. If you find that size you’re following is either to narrow or wide, go up or down a size or adjust the number of increases.
Only size XS:
Row 5: Ch 2 (counts as 1st st), *hdc 2 in next st, hdc 1 in the next 3 st*, repeat from *to* 5 more times, hdc 1 in all st until end of row, turn (=32 st).
Only size S:
Row 5: Ch 2 (counts as 1st st), *hdc 2 in next st, hdc 1 in the next 2 st*, repeat from *to* 7 more times, hdc 1 in all st until end of row, turn (=34 st).
Only size M:
Row 5: Ch 2 (counts as 1st st), *hdc 2 in next st, hdc 1 in the next 2 st*, repeat from *to* 7 more times, hdc 1 in all st until end of row, turn (=36 st).
Only size L:
Row 5: Ch 2 (counts as 1st st), *hdc 2 in next st, hdc 1 in next st, hdc 2 in next st, hdc 1 in the next 2 st*, repeat from *to* 4 more times, hdc 1 in all st until end of row, turn (=38 st).
Only size XL:
Row 5: Ch 2 (counts as 1st st), *hdc 2 in next st, hdc 1 in next st, hdc 2 in next st, hdc 1 in the next 2 st*, repeat from *to* 4 more times, hdc 2 in next st, hdc 1 in next st, hdc 2 in next st, hdc 1 in last st, turn (=42 st).
Only size 2XL:
Row 5: Ch 2 (counts as 1st st), *hdc 2 in next 2 st, hdc 1 next st*, repeat from *to* 8 more times, hdc 1 the next 2 st, turn (=48 st).
Only size 3XL:
Row 5: Ch 2 (counts as 1st st), *hdc 2 in next 2 st, hdc 1 in next st*, repeat from *to* 9 more times, hdc 1 in next st, turn (= 52 st).
Only size 4XL:
Row 5: Ch 2 (counts as 1st st), hdc 1 in the next 3 st, *hdc 2 in next st*, repeat from *to* 23 more times, hdc 1 in the next 4 st, turn (= 56 st).
Only size 5XL:
Row 5: Ch 2 (counts as 1st st), hdc 1 in the next 3 st, *hdc 2 in next st*, repeat from *to* 25 more times, hdc 1 in the next 4, turn (=60 st).
All sizes:
Row 6: Ch 2 (counts as 1st st), hdc 1 in all st until end of row, turn (= 32 (34) 36 (38) 42 (48) 52 (56) 60 st).
Row 7-51*: Rep row 6.
*Continue crocheting until you reach desired sleeve length.
Fasten off & cut yarn.
Finishing And Assembly
Seaming
When you’re finished crocheting you have 4 parts:
- Seam the first shoulder together by attaching the top of the front to the back, seam 22 (25) 27 (30) 32 (35) 37 (40) 42 stitches by inserting the needle in corresponding stitches on each part using the whip stitch.
- Leave 10 (10) 12 (12) 14 (14) 16 (16) 18 stitches unworked on the back part.
- Seam the second shoulder together by attaching the top of the front to the back, seam 22 (25) 27 (30) 32 (35) 37 (40) 42 stitches by inserting the needle in corresponding stitches on each part.
- Seam the sleeves to the shoulder, by lining up the middle of the sleeve with the shoulder seam.
- Seam the sides & the seam under the sleeves.
Neckline
Attach yarn with in the left corner on the back with the right side facing.
Round 1: Ch 2 (counts as 1st st), dc 1 st for each row on the left side of the shoulder, dc 1 in the 10 (10) 12 (12) 14 (14) 16 (16) 18 unworked stitches on the front, dc 1 st for each row of the right shoulder, dc 1 in the 10 (10) 12 (12) 14 (14) 16 (16) 18 unworked stitches on the back, sl st in 1st st (= 32 (32) 36 (36) 40 (40) 44 (44) 48 st).
Round 2: Ch 2 (counts as 1st st), *FPdc, BPdc*, repeat from *to* until you have 1 st left, dc 1 in last st, turn (= 32 (32) 36 (36) 40 (40) 44 (44) 48 st).
Round 3: Rep row 2.
Fasten off & cut yarn.
Fasten threads & weave in ends.

Share & Worth Noting
Thank you for sharing my FREE patterns & tutorials. When you do, you support me & the blog, which makes it possible to continue sharing free content with you.
Not all content on this blog website is free, but the more you share, the more free content I will be able to share. Note that all premium content are ad free.
My crochet patterns can be used to sell handmade pieces. You are required to credit Joy of Motion/Janne Kleivset as the designer by linking back to My website: https://joyofmotioncrochet.com. You can not use my pictures when selling your handmade items. Finally, you can not resell, reprint or share any parts of my patterns as your own.

