
If you want to crochet granny square blankets, but want to learn the basics & go beyond that to create unique heirlooms, then you’re on the right place.
Discover 9 different granny squares & 9 granny square shapes, then learn how to assemble them into granny square blankets with 3 joining techniques.
Then decide on what granny square blanket layout inspires you the most.
You’ll also discover helpful tips when it comes to tools and materials, and also how to pick colors. To finish it all of, learn the best tips about blocking, washing and caring for granny square blankets.
Let’s dive into this comprehensive guide to granny square blankets!

Would you like to save this?
Key Takeaways to Crocheting Granny Square Blankets
With the help of this guide, you’ll be able to:
- Select the right tools and materials
- Discover the basic techniques you need to know
- Learn step by step how to create 9 different granny squares and 9 different granny square shapes
- Learn 3 different techniques to join granny squares together
- Discover over 19 layouts for granny square blankets
- Learn all you need about Granny Square Blanket sizes
- Learn helpful tips on how to pick colors for granny square blankets
- Discover finishing touches like blocking, washing & caring for your granny blanket

Tools and Materials
When starting your granny square blanket project, selecting the right tools and materials is crucial for both ease of crafting and the quality of your final product.
Begin with the choice of yarn; acrylic and cotton yarns are popular for their durability and ease of care, while wool yarns offer warmth and a luxurious feel.
The weight of the yarn should match your project’s desired thickness and warmth—lighter weights are ideal for baby blankets, whereas heavier weights suit cozy winter throws.
For crochet hooks, ensure that the size complements your yarn weight to maintain consistent stitch size and tension; typically, a hook size that is recommended on your yarn label is a good starting point.
Additionally, arm yourself with a comfortable, ergonomic crochet hook to help prevent hand fatigue during extended crafting sessions.
Other essential supplies include a yarn needle for weaving in ends, scissors for cutting yarn, and stitch markers to keep track of pattern repeats or significant stitches.
By carefully choosing high-quality tools and materials suited to your project needs, you’ll set the foundation for a beautifully crafted granny square blanket.

Basic Techniques
Mastering a few basic crochet techniques is essential for anyone looking to create granny square blankets.
The foundational skill is the ability to crochet the basic stitches: chain stitch (ch), slip stitch (sl st), single crochet (sc), double crochet (dc), and treble crochet (tr). These stitches form the basis of most granny square patterns.
You’ll also need to know how to make a magic ring, a technique used to start many granny squares, allowing you to pull the center tightly closed and avoid a hole in the middle of your squares.
Additionally, knowing how to read crochet patterns and understanding crochet abbreviations will greatly enhance your ability to follow and execute granny square designs accurately.
Finally, practice working in rounds and changing colors smoothly to ensure your granny squares have neat and even edges with crisp, clean color transitions.
These basic techniques will serve as building blocks for creating diverse and beautiful granny square blankets.

Step By Step Granny Squares
Below you will find different granny squares and granny square shapes that you can use to crochet granny square blankets. Ranging from the classic granny square, to other stunning squares & different granny square shapes.
The different granny square shapes includes everything from triangles, pentagons, hexagons, octagons, rectangles, hearts, stars & circles.
With the step by step guides linked you’re well on your way to creating stunning granny square blankets with these as building blocks.
Further down you can discover creative ways to join these granny squares & granny square shapes together to create stunning granny square blankets.

Classic Granny Square & Other Squares
Classic Granny Square
The Classic Granny Square is the easiest, a popular and the most obvious choice when it comes to crocheting granny square blankets. You can easily customize how big each granny square is by deciding how many rounds to include on each square.
See the step by step Classic Granny Square tutorial here.
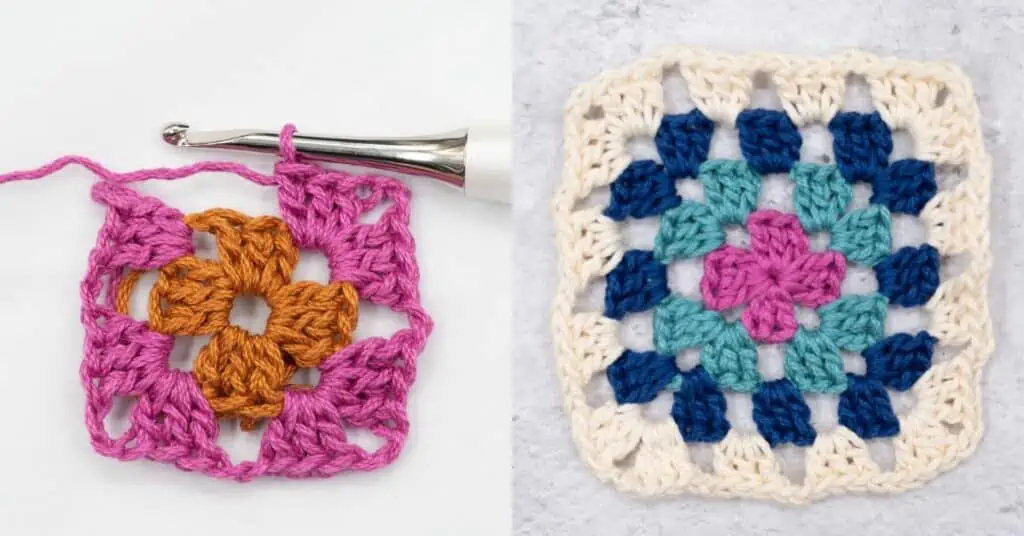
Solid Granny Square
The Solid Granny Square is a great alternative to the classic. It creates fewer gaps & you can use one color on the whole granny square which means fewer ends to weave in.
See the step by step Solid Granny Square tutorial here.

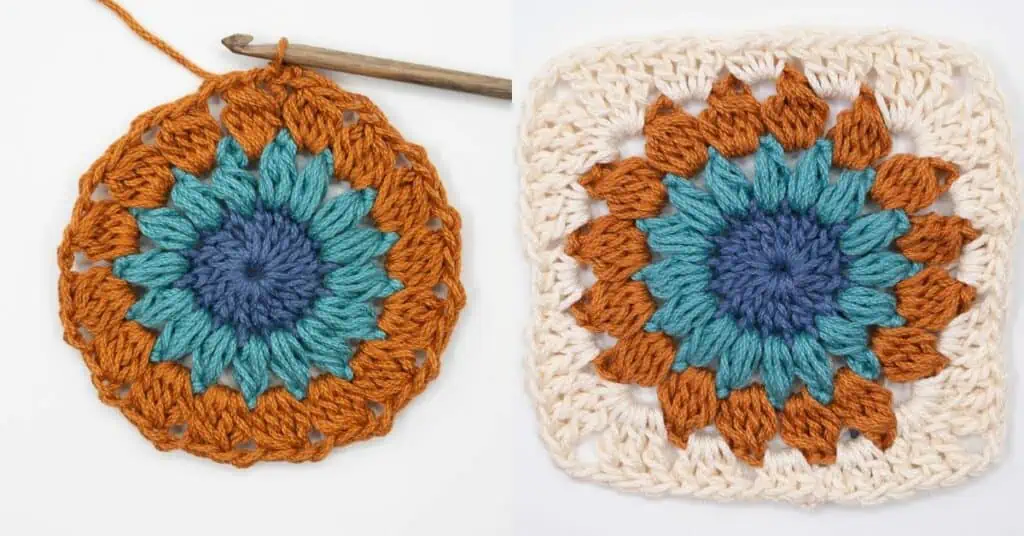
Sunburst Granny Square
The Sunburst Granny Square starts out as a circle in the middle and is then turned into a square.
See the step by step Sunburst Granny Square Tutorial here.
Daisy Granny Square
The Daisy Granny Square is a great flower granny square that will look stunning in any crochet blanket. Try using the same colors for the flower & change the background color on each square.
See the step by step Daisy Granny Square tutorial here.

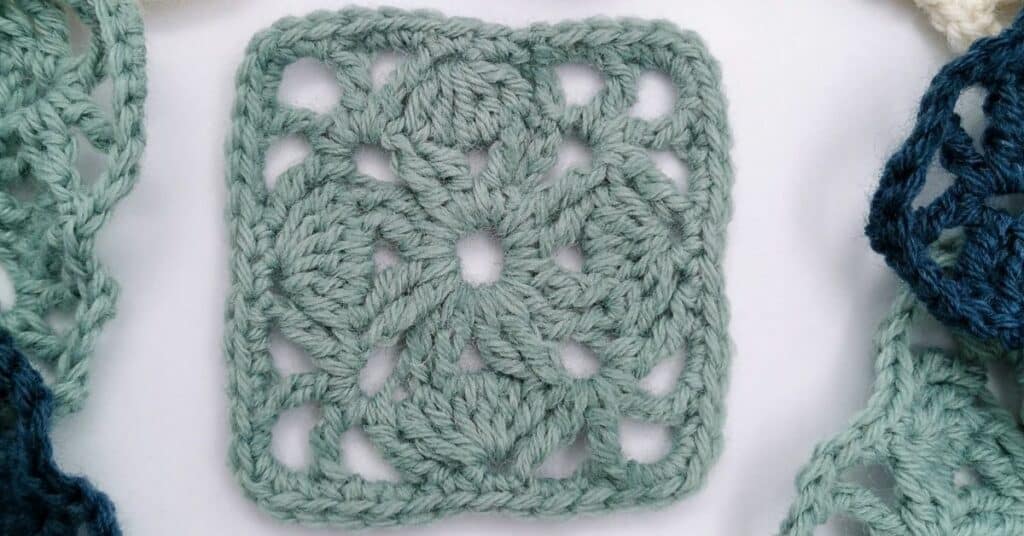
Leaf Clover Granny Square
The Leaf Clover Granny Square is a great alternative if you want to use just one color on each square.
See the step by step Leaf Clover Granny Square tutorial here.
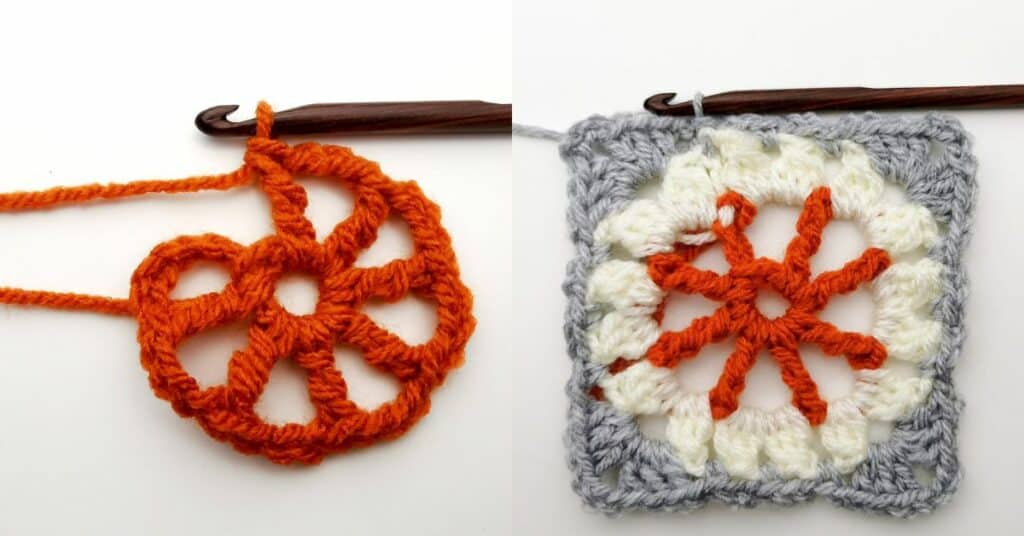
Ferris Wheel Granny Square
The Ferris Wheel Granny Square is a great granny square alternative with a beautiful lace detail in the middle that resembles a ferris wheel.
See the step by step Ferris Wheel Granny Square tutorial here.
Heart Granny Square
If you love hearts you may want to use the Heart Granny square for your crochet blanket. Try making the hearts in different colors, while keeping the background the same for a fun & colorful result.
See the step by step Heart Granny Square tutorial here.

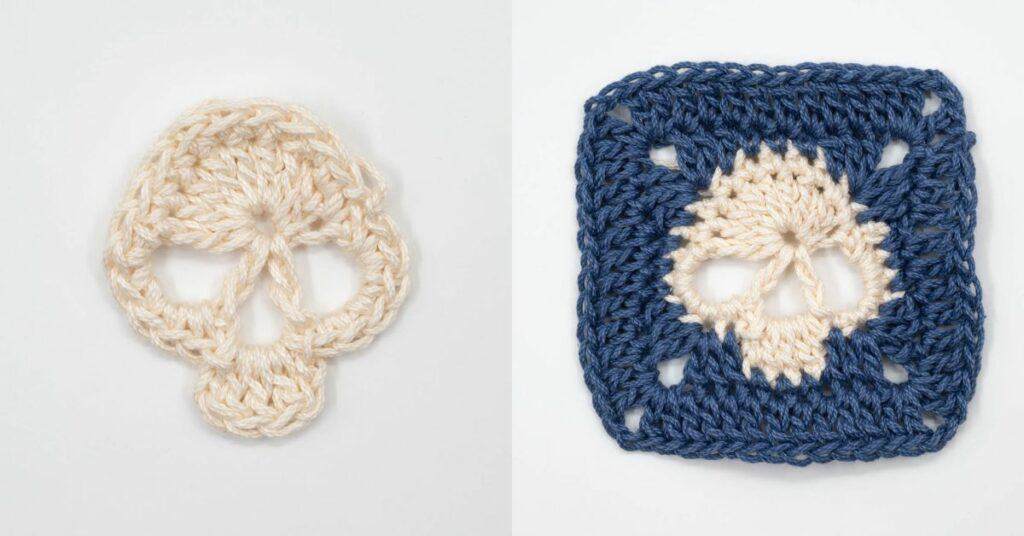
Skull Granny Square
The Skull Granny Square is the perfect option if you’d like to crochet a Halloween-themed crochet blanket.
See the step by step Skull Granny Square tutorial here.
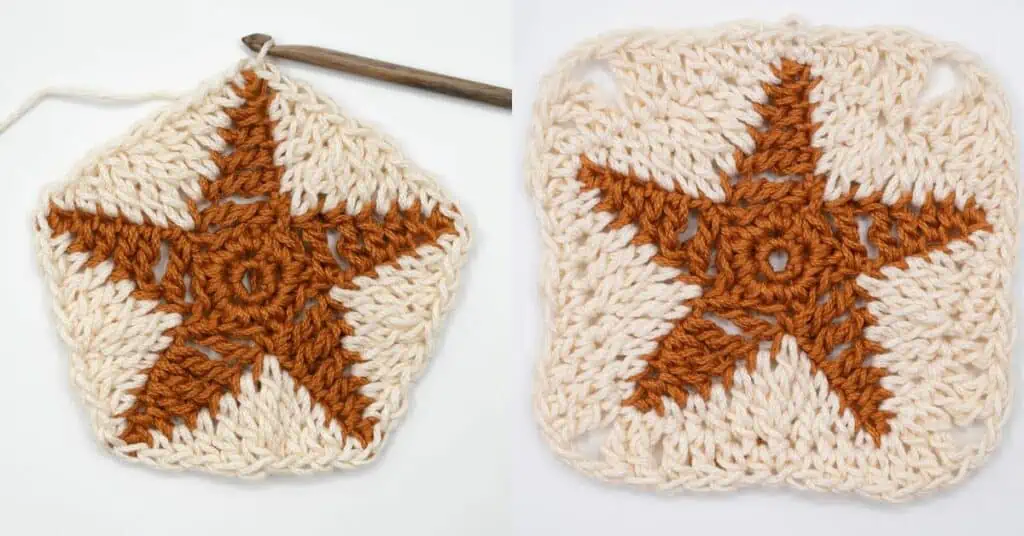
Star Granny Square
The Star Granny Square is another great choice & will look amazing in any granny square blanket. Try swapping the colors of the star on each star for a colorful result or make all the granny squares in the same two colors.
See the step by step Star Granny Square tutorial here.
Granny Square Shapes
Triangle Granny Square
The triangle granny square has the same technique and stitches as the regular granny square, but starts out with 3 double crochet groups instead of 4.
It’s a great alternative if you want a different looking granny square blanket & it also pairs well with other granny square shapes.
See the step by step Triangle Granny Square tutorial here.

Pentagon Granny Square
The pentagon granny square also uses the same stitches and techniques as the regular granny square, however it starts out with 5 double crochet groups instead of 4.
It can also be used to crochet granny square blankets, but may require having gaps between each granny square when combined together in a system.
See the step by step Pentagon Granny Square tutorial here.

Hexagon Granny Square
The Hexagon Granny Square is a great option if you want to use a different shape. It works well alone & also in combination with triangle granny squares.
See the step by step Hexagon Granny Square tutorial here.

African Flower Hexagon
The African Flower Hexagon is a stunning alternative to the traditional one.
On this granny square it’s fun to play with different colors & choose combinations that make the flower stand out.
See the step by step African Flower Granny Square here.

Octagon Granny Square
The Octagon Granny Square is a great choice to make your granny square blanket stand out. It pairs perfectly with the regular granny square.
See the step by step Octagon Granny Square tutorial here.

Rectangle Granny Square
The rectangle granny square is a fun alternative & can easily be used alone.
With this one you can use many colors & make a stunning rectangle.
See the step by step Rectangle Granny Square tutorial here.

Granny Heart
The Granny Heart is a cute option among the different granny square shapes.
While it may not be the straight forward to use on granny square blankets, there are some stunning & unique options.
See the step by step Granny Heart tutorial here.

Granny Circle
The Granny Circle is a fun variation of the classic granny square look.
It can easily be used to crochet granny square blankets in various designs.
See the step by step Granny Circle tutorial here.

Granny Star
The Granny Star is one of the most unique & stunning granny square shape alternatives. By continuing the pattern & creating a super big Granny Star you can create a stunning uniquely shaped granny square blanket.
If you want to combine it with other granny squares, it’s best to use it the same way as the Octagon Granny Square.
See the step by step Granny Star tutorial here.

Join Granny Squares Blankets Together
There are many ways to join granny squares together, but in this guide you’ll learn 3 great alternatives.
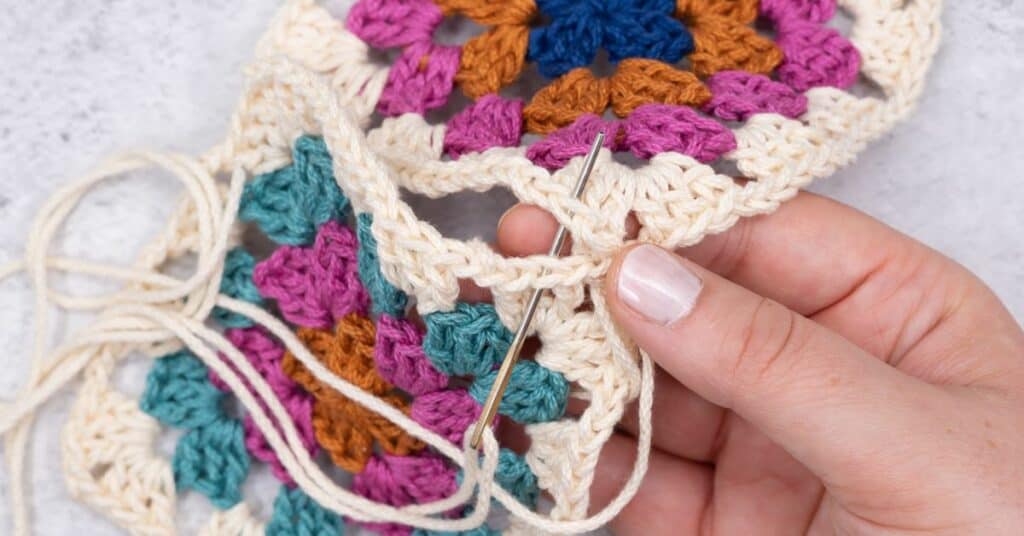
Join Granny Square Blankets Together Using the Whip Stitch
Using the whip stitch you can join granny squares easily & the seams will be almost invisible if you use the same color as the last of the round.
To make it stand out you use a different color & it’ll create a fun frame around the granny squares.
See the step by step Whip Stitch tutorial here.
Join Granny Square Blankets Together Using the Flat Slip Stitch Join
A stunning alternative way to join granny squares together is the flat slip stitch join.
What you do is essentially slip stitching the granny squares together & at the same time creating a stunning border around them.
For this technique choosing a different color is a great way to make the joins stand out.
See the step by step Flat Slip Stitch Join tutorial here.

Join Granny Square Blankets Together As You Go
Joining granny squares as you go is a great way to gradually finish up your granny square blanket as you make your granny squares.
This technique is usually used for square shapes & the tutorial includes 3 different methods.
See the step by step Join Granny Squares As You Go tutorial here.

Granny Square Blanket Layouts
When you have so many granny squares and granny square shapes to choose from, it’s time to explore ways you can join them together and turn them into granny square blankets.
Granny Square Blanket Layout for Squares
The regular square shaped granny squares offers the most traditional layout options, but can also be combined with other shapes as you’ll see further down.
Any shapes shown in dotted lines isn’t included in this guide, but are shown to see the option for creating half squares or part of the shapes to fill in the gaps. There are a short guide on how to create those half square or part shapes further down.
Classic Granny Square Blanket Layout
This is the most common granny square blanket layout & even though it’s a classic it’s still a great way to a assemble granny square blanket.

Granny Square Bricks Layout
This granny square blanket layout is a great alternative to the classic. Stack your regular shaped granny squares as bricks.
Create half granny squares to fill in the open spaces on two of edges or embrace the uneven edges as a design feature.

Granny Square Blanket Layout for Rectangles
Rectangles isn’t that different to the regular shaped granny squares. There are two great layout options for Rectangle Granny Squares.
Rectangle Granny Squares Classic Layout
This classic layout is a great option for rectangle granny squares.
With this type of granny square you can easily play with how big you make each square & ultimately how many you’ll need.

Rectangle Granny Squares Bricks Layout
This layout is a great alternative to the classic layout. Place the rectangle granny squares as bricks & create regular granny squares to fill in the gaps on the edges.

Granny Square Blanket Layout for Triangles
Triangle granny squares can create stunning granny square blankets, either alone or in combination with other granny square shapes.
Triangle Granny Square Blanket Layout
This way of assembling the Triangle Granny squares creates a stunning finish.
In this case you can either embrace the uneven edges & decorate them with a crocheted border or make half triangles to even out the edges.

Stacked Triangle Granny Square Blanket Layout
This way of assembling the Triangle Granny squares creates a arrow-like look.
With this one, like with the other triangle granny square blanket layout you may want to create half triangles to even out the edges.

Granny Square Blanket Layout for Pentagons
Pentagon Granny Squares isn’t the easiest to combine into granny square blankets, so below you’ll see 4 options.
But as you may notice you’ll have to embrace a lot of open spaces.
If you’re creating granny square blankets that will be mostly decorative, these layouts may be fun to play with even with the gaps.

Granny Square Blanket Layout for Hexagons
Hexagon Granny Squares work well together standalone or in combinations with Triangle Granny Squares. There are 3 great options below.
Hexagon Granny Square Blanket Layout
This classic way of assembling Hexagon Granny Squares creates a stunning finish.
With this one you may want to create part granny squares to create even edges or embrace them as a part of your design.

Triangles and Hexagons Granny Square Blanket Layout – Alternative 1
This combination of triangles and hexagons can create a stunning and unique granny square blanket.
For the edges you may want to create part hexagons or half triangles or simply let the border be uneven.

Triangles and Hexagons Granny Square Blanket Layouts – Alternative 2
This is also a great alternative of combining hexagons and triangles.
If you don’t want to create any part or half shapes, letting the edge that is shown on the left side be the edge is the best option.

Granny Square Blanket Layout for Octagons
Octagon Granny Squares looks amazing when assembled as granny square blankets in combination with squares.
Octagons with Squares Granny Square Blanket Layout – Alternative 1
In this combination of octagons and square you can even out the edges by creating half squares.

Octagons with Squares Granny Square Blanket Layout – Alternative 2
For this octagon and square combination the easiest is to embrace the uneven edges for your granny square blanket.
But an option is of course to create a part granny square or even out the edge when crocheting a border.

Granny Square Blanket Layout for Circles
Circle Granny Squares can be assembled to stunning granny square blankets, either alone or in combination with smaller circles or squares.
Circle Granny Square Blanket Layout – Alternative 1
This classic Circle Granny Square Blanket layout naturally creates gaps between the circles.
In some cases this may be the result you’re looking for, in other cases you may opt for the other options shown below.

Circle Granny Square Blanket Layout – Alternative 2
This way of assembling Circle Granny Squares reduces the gaps significantly.
By creating half circles you’ll also be able to create even edges.

Circle Granny Square with 2 Sizes Blanket Layout
Combine two different Circle Granny sizes to reduce the gaps between the Circle Grannies when assembling them into a granny square blanket.

Circle and Square Granny Square Blanket Layout
Combine Granny Circles with any of the square patterns to decrease the gaps even more.

Granny Square Blanket Layout for Hearts
Granny Hearts can be used in granny square blankets in various ways. It works amazingly as the border of a granny square blanket, but in combination it creates small flowers that then can be combined with other shapes.
Granny Heart Border Blanket Layout
This is a great way to incorporate Granny Hearts in granny square blankets.
Use the granny hearts as a border around your granny square & you’ll also get a unique layout of the squares as well.
Make sure to swatch both the granny squares and the granny hearts to make sure the sizes work together.

Granny Hearts with Octagons Blanket Layout
This is a fun combination of Granny Hearts & Granny Square Octagons.
With the patterns included you may actually need to use a thicker yarn for the hearts and a thinner yarn for the octagons to create shapes that work together.

Granny Hearts with Squares Blanket Layout
This is a fun granny square blanket layout where you combine Granny Hearts with squares.

Creating Half Shapes or Part Shapes
Here are some tips for creating half shapes and part shapes for your granny square blankets.
- Start by studying which part you need to create. Folding the granny square so you have that part facing towards you is a great way to do it.
- Try making a text swatch that includes just the stitches in the folded part.
- If it is worked in rows, it is best to still crochet everything from the right side to create a consistent result.
- Start the row on one end and cut the yarn once you reach the other end. Then start back at the same end for the next row.
By following these steps you are on your way to creating amazing half & part shapes.

Granny Square Blanket Sizes
When it comes to crocheting blankets there are some common sizes you may want to use to guide you.
- Start by creating a sample of the granny square or granny square shape you want to use.
- Measure the with and length of your shape.
- Find the blanket shape you want to use on the crochet blanket sizes chart.
- Divide the width of the desired blanket size with the width of your granny square to figure out how many granny squares you need for the width. Round up or down to the closes whole number.
- Then divide the length of your desired blanket size with the length of your granny squares to figure out how many granny squares you need for the length. Round up or down to the closes whole number.
- Tip: Consider if you want a border around the blanket and adjust for that when you decide on how many granny squares to make.
See the full crochet blanket sizes chart here.

Picking Colors for Granny Square Blankets
When you’re crocheting granny square blankets, the choice of colors can completely change the overall look of your finished blanket. Below I’ll cover some helpful tips to make it easier for you to decide on what color palette to use for your granny square blanket.
Decide Depending On How Or Who Will Use it
How the granny square blanket will be used and who will use it can greatly change the color combinations you choose.
How The Granny Square Blanket Will Be Used
If the granny square blanket will be used in your living room, outside in the garden, in a stroller or even while traveling, can greatly change which colors you’ll want to use.
For inside use, either pick colors that go well with the other colors in the room and the furniture. Alternatively, choose a contrasting color that makes you happy and makes it stand out.
For outside use in the garden, pick colors that will compliment the nature around your house. Picking colors that compliment flowers may also make it stand out even more.
If you’re crocheting a stroller blanket, consider the colors of the stroller itself. Should it complement it or stand out? Muted and soft colors are also popular for stroller blankets.

Who Will Use The Granny Square Blanket
Who the granny square blanket is for may also change the color choices drastically.
Consider implementing the persons favorite colors. Consider taking risks with 1-2 of the colors if you’re using multiple colors. In a blend you may create their new favorite combination.
If it’s for a baby, choose fresh colors or more traditional colors.
Muted or Vivid Colors?
Do you want muted or vivid colors, or a combination?
Vivid colors will show off the color changes more, while more muted color pallets allows the color changes to blend more.
If you are able to, consider trying a few color combinations before you make a final decision on yarn colors.
When in the yarn shop, hold colors you like together in different combinations & take photos. By going back and forth between photos, you may find it easier to decide.

How Many Colors to Use?
When it comes to crocheting granny square blankets, you can use anywhere from 1 to an endless amount of yarn colors.
In practical terms, it may be easiest to limit the colors to maybe 6 or 8, so you can use up full skeins instead of having too many leftovers.
Some granny squares may have designs that uses a specific amount of yarn colors, and you may want to make all of them the same.
But in other cases you may want to make multiple different color combinations for the granny squares.
Try making a few granny squares as you start on your project, to help you decide.
You can also try using the Granny Squares Color Pattern Generator (free tool).
Finishing Touches & Care
Adding Borders to Granny Square Blankets
Adding a border to your granny square blanket can significantly enhance its appearance, providing a neat finish and a touch of sophistication.
One simple yet stunning option for a border is the crochet crab stitch, also known as the reverse single crochet. This stitch creates a firm, rope-like texture that outlines your blanket beautifully and helps to firm up the edges.
To apply a crab stitch border, start at any corner of your completed blanket and work in the opposite direction to your usual crochet method.
For blankets that need a bit more structure, consider adding a round of single crochet stitches before starting the crab stitch. This base layer provides stability and a smoother edge for the crab stitch to accentuate.
The result is a visually appealing and durable border that complements the intricate patterns of your granny square blanket.
See the step by step Crab stitch tutorial here.

Blocking Granny Squares
Blocking is an essential step in finishing your granny squares, ensuring they have uniform shapes and sizes which will greatly facilitate their assembly into a blanket.
While there are many ways to block granny squares, one of the easiest ways are spray blocking them. It is a versatile and efficient technique suitable for any granny squares and granny square shapes.

How To Spray Block Your Crochet Granny Squares
Step 1: Pin and shape item on a blocking mat on a flat surface.

Step 2: Dampen crocheted piece using spray bottle filled with room temperature or lukewarm water.

Step 3: Let dry while pinned to the blocking mats.
Washing Instructions
Washing granny square blankets properly is essential to maintain their beauty and longevity.
Before washing, check the yarn labels for specific care instructions, as different fibers require different treatments.
For most granny square blankets, a gentle wash cycle in cold water is advisable to prevent the yarn from shrinking or felting.
Use a mild detergent and avoid bleach, which can damage the fibers and fade the colors.
After washing, avoid wringing the blanket; instead, gently press out excess water. Lay the blanket flat on a clean, dry towel and reshape it as it dries to prevent the squares from distorting.
Air drying is recommended because high heat from dryers can cause shrinking or pilling.
With these careful steps, your granny square blanket can be kept in pristine condition, preserving its intricate patterns and vibrant colors for years to come.
Caring for Your Granny Square Blanket
Caring for your granny square blanket extends its life and keeps it looking its best.
Regular maintenance starts with gentle handling during use to avoid unnecessary wear and tear.
Avoid placing heavy items on the blanket or using it on rough surfaces, which can snag or pull the yarn.
If spills occur, spot clean them promptly with cold water and a mild detergent, dabbing gently rather than rubbing to prevent the stain from setting or the yarn from felting.
For seasonal storage, ensure the blanket is clean and completely dry to prevent mold and mildew growth. Store it in a breathable cotton bag in a cool, dry place. Avoid plastic containers, which can trap moisture and cause damage over time.
Finally, regular reshaping and blocking after washes helps retain the blanket’s dimensions and crisp appearance.
By following these care steps, your granny square blanket will continue to provide warmth and comfort while retaining its handmade charm.


