This post may contain affiliate links. This means I get a small commission if you click-through & purchase (no additional cost to you). Affiliate disclosure.
We will email this pattern to you, so you can come back to it later.
Free, and you can unsubscribe any time.
We will also send you emails about our other blog posts, educational content, crochet patterns (free & paid), marketing & special offers. You are also agreeing to our Privacy Policy.
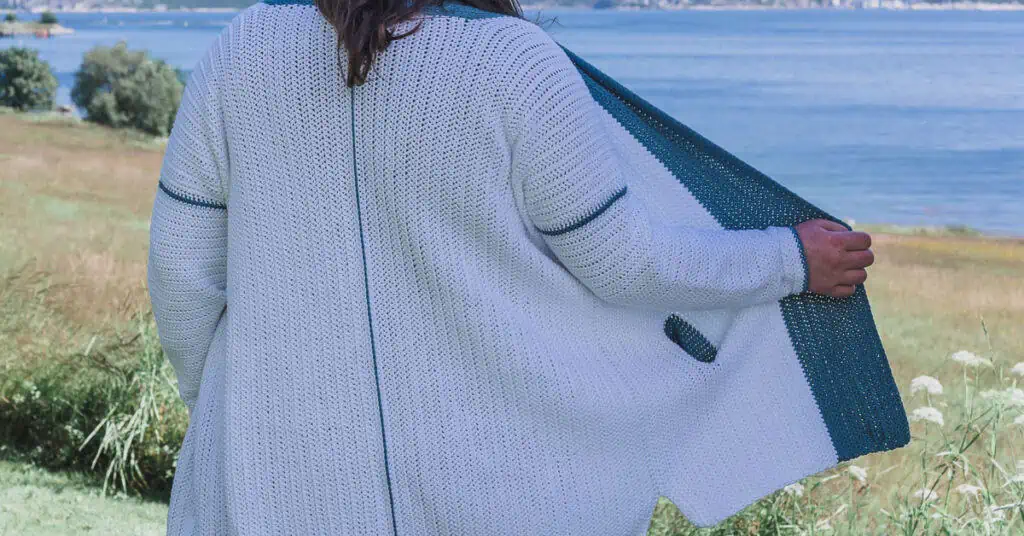
THE PERFECT CROCHETED CARDIGAN WITH POCKETS
If you like crocheting cardigans, having a pattern with pockets just makes it more exciting.
A place for your hands, phone or anything you want to bring is just perfect.
Since you like the crochet cardigan with pockets, these might interest you too?
Note that measurements are given as exact as possible. But crochet tension & technique might give variations in the result, that changes from person to person.
Read pattern instructions carefully before beginning to make sure you understand everything. It might save you hours frogging your work & crocheting it again!
Make a swatch that measure at least 10 x 10 cm / 4 x 4 inches using the stitch the gauge is given for. If your swatch matches the gauge, you’re good to go. If the gauge is wrong, you might need to change your hook. Go up in crochet hook size if your stitches are smaller & go down in crochet hook size if your stitches are bigger. Learn more about testing gauge.
This pattern is written for 9 sizes, where the different sizes is given in parenthesis like this: XS (S) M (L) XL (2XL) 3XL (4XL) 5XL. If just one number is given, it applies to all sizes. I recommend that you highlight or circle the size you’re making before you begin to make the pattern easier to follow. Size adjustments are added under the heading “Size & Measurements”.
At the end of each row, the stitch count is given in parenthesis.
Step 2: Insert hook into 2nd ch from hook, pull up a loop. Yo and pull through first loop (making “chain”). Yo and pull through both loops on hook.
Step 3: Insert hook into previous “chain” you made (It should look like you go through a resemblance of a “normal” st, with 2 strands of yarn), pull up a loop, yo and pull through first loop (making “chain”). Yo and pull through both loops on hook.
Repeat step 3 until you’ve made enough stitches. *2nd ch in step 1 makes 1 st, step 2 makes 1 st & every time step 3 is repeated you make 1 st.
Written description: Yarn over, draw up a loop from the next st, draw up a loop from the stitch after that, you have 4 loops on the hook, yo, pull through all loops on the hook.
HERRINGBONE HALF DOUBLE CROCHET STITCH (HBhdc):
Written description:
Yarn over, insert hook in next st, yarn over, pull through stitch, pull through 1st loop on hook, yarn over, pull through both loops on hook.
This cardigan is crocheted seamlessly in 2 pieces (right side & left side) and is then crocheted together with the flat slip stitch join method.
On the first row of each side you will create the hip split and armhole. Then on row 14 you create the opening for pockets. After that you will crochet inwards towards the center of the body.
Finally you will crochet the sleeves directly on the piece, by crocheting into the other side of the FSC stitches from the very first row made. You will also crochet the pockets directly in the pocket opening.
After making both the left and right side. You will crochet the front border on the assembled cardigan.
Crochet Cardigan With Pockets Pattern Instructions
RIGHT SIDE:
HIP TO ARMHOLE – RIGHT SIDE:
Crocheted with CA.
Row 1 (WS): Make 134 (136) 138 (142) 145 (150) 154 (158) 160 st using the FSC technique, sk 45 (47) 50 (53) 59 (67) 72 (78) 82 FSC st just made (making armhole), HBhdc on the other side of the next 77 (77) 76 (77) 74 (71) 70 (68) 66 FSC st,FSC 12 st (making split), turn (= 223 (225) 226 (231) 231 (233) 236 (238) 238 st).
SaveShowing how row 1 is worked. 1. Ready to make armhole. 2. First stitch on the other side of FSC made. 3. All FSC on other side made & ready to make split. 4. Split made & row 1 finished. (Example is made in a different yarn).
Row 2 (RS): Hdc 1 in 1st st (no ch), HBhdc 1 in all st, turn (= 223 (225) 226 (231) 231 (233) 236 (238) 238 st).
Row 3–14: Rep row 2.
Row 15: Hdc 1 in 1st st (no ch), HBhdc 1 in the next 170 (172) 173 (178) 178 (180) 183 (185) 185 st, FSC 20 st, sk 20 st (making pocket), HBhdc 1 in all st until end of row, turn (= 223 (225) 226 (231) 231 (233) 236 (238) 238 st).
SaveShowing both left & right side made. You should now have finished #1, right side. Instructions for left side below.
SLEEVE – RIGHT SIDE:
On the right side, attach yarn in the middle under the arm.
Round 1 with CB (RS): Ch 1 (counts as 1st st), HBhdc 1 on the other side of each the FSC made on row 1 of “hip to armhole”, sl st in 1st st, turn (=45 (47) 50 (53) 59 (67) 72 (78) 82 st).
Change to CA, and use until row 50.
Round 2: Ch 1 (counts as 1st st), HBhdc 1 in each st, sl st in 1st st, turn (=45 (47) 50 (53) 59 (67) 72 (78) 82 st).
Round 36 (34) 32 (30) 26 (18) 16 (10) 10: Ch 1, hdc2tog in the next 2 st, HBhdc 1 in each st until you have 2 st left, hdc2tog in the next 2 st, sl st in 1st st, turn (=43 (45) 48 (51) 57 (65) 70 (76) 80 st).
Repeat row 2 and row 36 (34) 32 (30) 26 (18) 16 (10) 10 until you have crocheted 49 rows.
Round 50 with CB: Ch 1, sc 1 in each st until end of row, sl st in 1st st (=31 (31) 32 (33) 35 (35) 38 (38) 42 st).
Fasten off & cut yarn.
POCKET – RIGHT SIDE:
Crocheted with CB.
Attach yarn on the right side.
Round 1: Sc 1 in each st around the opening for the pocket, (=40 st).
Without ending the round, continue crocheting 1 sc stitch in each st until pocket measure 12 cm/ 4.7 inches or you have crocheted 23 rows.
Row 15*: Hdc 1 in 1st st (no ch), HBhdc 1 in the next 32 st, FSC 20 st, sk 20 st (making pocket), hdc 1 in all st until end of row, turn(= 223 (225) 226 (231) 231 (233) 236 (238) 238 st).
*Same for all sizes.
Repeat rows 16 – row 19 (21) 23 (25) 29 (31) 33 (35) 39 from right side.
Continue on the back without cutting the yarn.
Back – LEFT SIDE:
Crocheted with CA.
Row 1: Hdc 1 in 1st st (no ch), HBhdc 1 in the next 110 (111) 112 (114) 114 (115) 117 (118) 118 st, turn (= 111 (112) 113 (115) 115 (116) 118 (119) 119 st).
Row 2: Hdc 1 in 1st st (no ch), HBhdc 1 in all st from prev row, turn (= 111 (112) 113 (115) 115 (116) 118 (119) 119 st).
Work them together using color B and the flat slip stitch join method over the stitches worked on the back on each side.
FRONT EDGE:
Crocheted with CB.
Attach yarn from the right side in the lower right corner.
Row 1: HBhdc 1 in each st until you reach the back 112 (113) 113 (116) 116 (117) 118 (119) 119 st, HBhdc 1 st per row worked on back 20 (22) 26 (26) 28 (28) 30 (36) 36 , HBhdc 1 in each st until you reach the lower left corner 112 (113) 113 (116) 116 (117) 118 (119) 119 st, turn (= 244 (248) 252 (260) 260 (264) 270 (274) 274 st).
Row 2: Hdc 1 in 1st st (no ch), HBhdc 1 in all st, turn (= 244 (248) 252 (260) 260 (264) 270 (274) 274 st).
Thank you for sharing my FREE patterns & tutorials. When you do, you support me & the blog, which makes it possible to continue sharing free content with you. Not all content on this blog website is free, but the more you share, the more free content I will be able to share. Note that all premium content are ad free.
My crochet patterns can be used to sell handmade pieces. You are required to credit Joy of Motion/Janne Kleivset as the designer by linking back to My website: https://joyofmotioncrochet.com. You can not use my pictures when selling your handmade items. Finally, you can not resell, reprint or share any parts of my patterns as your own.
Founder, Crochet Pattern Designer & Owner of Joy of Motion Crochet.
Janne has helped millions of crocheters find their next crochet project with more than 250 free crochet patterns and 110 crochet tutorials on her blog.
With more than two decades of crochet experience, and crochet designing since 2011, she's been featured on multiple prominent sites such as Lion Brand Yarn, in crochet magazines and the OML "Make" book.