

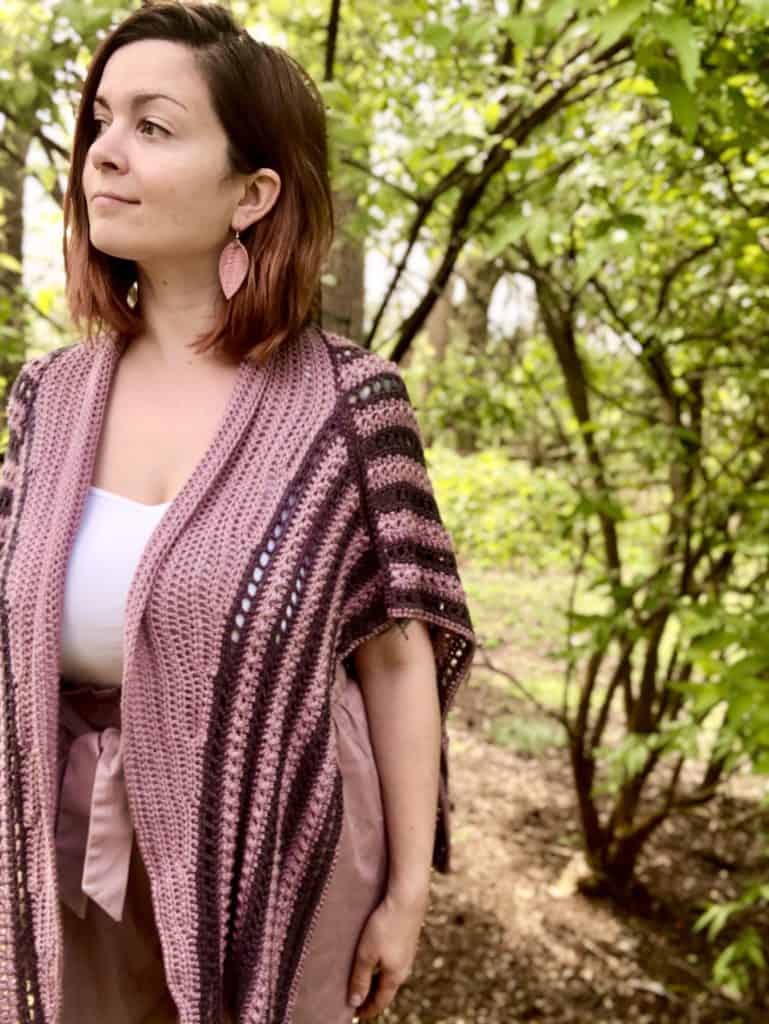
You are now viewing the The Persephone Cape by guest designer Melanie Depcinski.
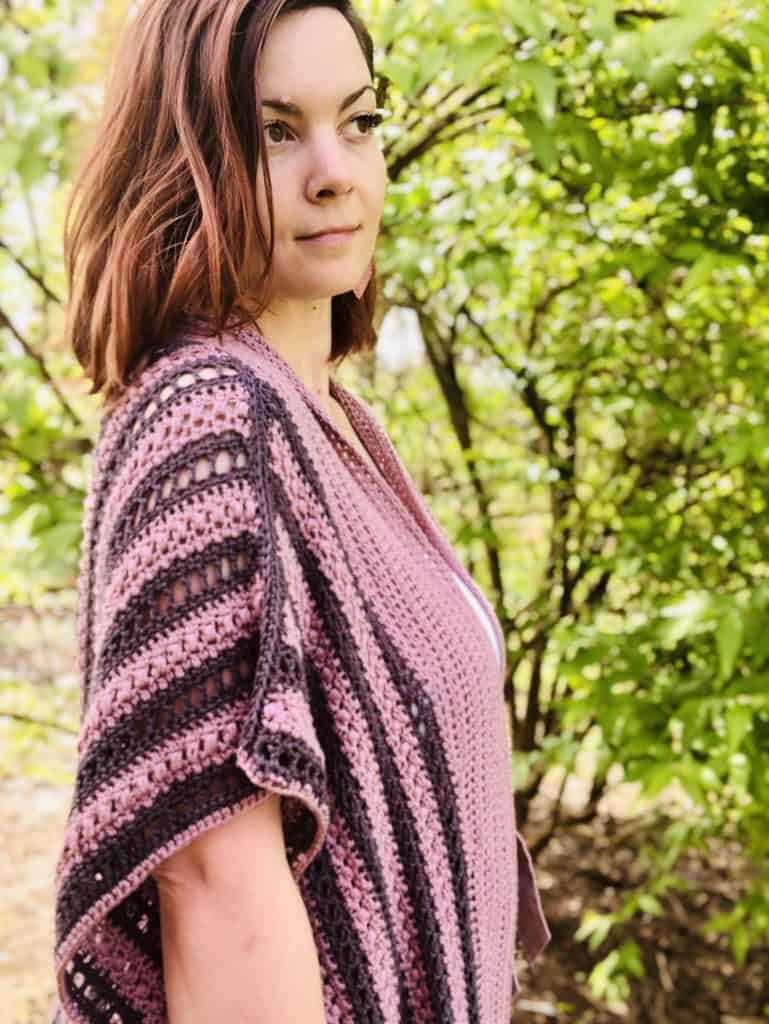
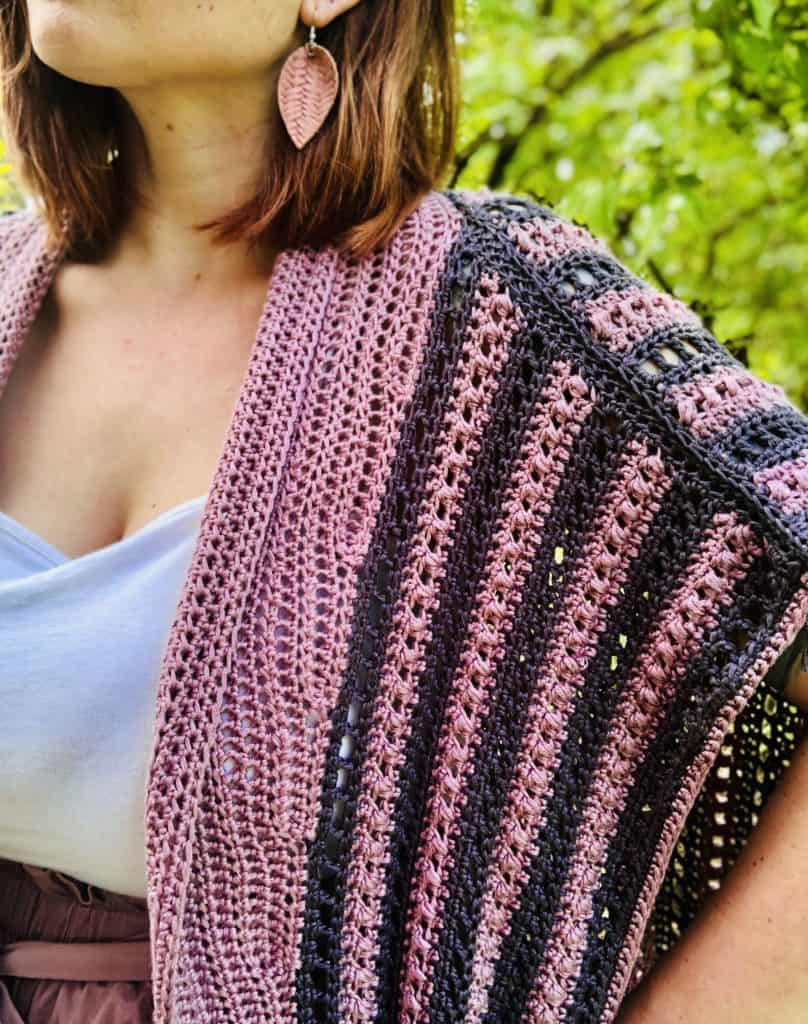
The Persephone Cape is designed to be the perfect piece to throw over spring dresses and tanks. Like a ruana, an open front poncho that originated in the Colombian and Venezuelan Andes region and is distinguished by the large open slit along the front down to the hem, this cape is worn draped over the shoulders and is open on the sides.
The version offered here features a shawl collar for a touch of modern design. Effortlessly pull any outfit together with this lightweight and striking accessory. Made using Lion Brand Yarn Truboo, the drape on this piece is unmatched. The repeating rows offer a making experience that is meditative and satisfying for all skill levels. This pattern features short row shaping and color changes, making it a great skill builder.
Find more: Free Crochet Cardigan Patterns for Women.

Table of Contents

Pattern Overview

Would you like to save this?
We will email this pattern to you, so you can come back to it later.
Free, and you can unsubscribe any time.
If you like this crochet pattern, save it on Pinterest!

Helpful Tools & Tips

Not Ready to Crochet it Yet?!

- Share about this crochet pattern on Instagram & Facebook using #joyofmotioncrochet.
- Save on Pinterest to make it later.
 About the The Persephone Cape
The Persephone cape is an open front ruana style poncho perfect for spring and summer. The pattern is written for sizes XS-5XL and is easily modified to fit larger or smaller sizes.
Project level: Easy
 Materials
Crochet Hook Size
Yarn
- Yarn
- Lion Brand – Truboo in color Mushroom & Mauve
- Weight
- 3 Light Yarn
- Fiber
- 100% bamboo rayon
Yarn amount needed:
| Color | Grams | Meters | Yards |
|---|---|---|---|
| Color A (Mushroom) | 100 | 200 | 241 |
| Color B (Mauve) | 100 | 200 | 241 |
| Total | 200 | 400 | 482 |
One skein is 100 grams · 220 meters · 241 yards.
Other Materials Needed
 Gauge
Measured over pattern crocheted in rows:
18 stitches & 15 rows per 10 cm / 4".

 Crochet Pattern Notes
- This crochet pattern is written in US terms.
- All measurements given are unblocked.
- Note that measurements are given as exact as possible. But crochet tension & technique might give variations in the result, that changes from person to person.
- Read pattern instructions carefully before beginning to make sure you understand everything. It might save you hours frogging your work & crocheting it again!
- Make a swatch that measure at least 10 x 10 cm / 4 x 4 inches using the stitch the gauge is given for. If your swatch matches the gauge, you’re good to go. If the gauge is wrong, you might need to change your hook. Go up in crochet hook size if your stitches are smaller & go down in crochet hook size if your stitches are bigger. Learn more about testing gauge.
- Check yarn info if you want to find an alternative or test your yarn against the gauge. Learn more about substituting yarn.
- This pattern is written for 9 sizes, any questions about sizing adjustments should be directed to melanie@countingcraftysheep.com. Notes on how to adjust are included in the adjustments section.
- At the end of each row, the stitch count is given in parenthesis.
 Sizes and Measurements

Measurements (given in inches) for the total width of the garment and the width of the “sleeve” front panel sections are both given.
Width (total): (26.5, 27, 34) (35, 42, 42.5) (48.5, 49, 49)
Width (front panel): (6, 6, 9) (9, 12, 12) (15, 15, 15)
Height: (18, 18.5, 18.75) (19, 19.25, 19.5) (19.5, 20, 20)
Size Adjustments
- When adding width, always think in color blocks, not rows. You always want to start and end on the same color for your panels. This means you will be adding in increments of at least two inches.
- When adding length always maintain an even number of sts.
- Any increases in the back or front panels will result in changes to the counts on the shawl collar. You can adapt as you go, or make sure that you are adding increments of eight when working additional length. This will result in more of yarn color B required to complete the collar as you will need additional passes. Every eight sts increased is another two rows essentially.

 Abbreviations
- CA = color A
- CB = color B
- ch = chain
- dc = double crochet
- FHDC = foundation half double crochet
- hdc = half double crochet
- puff = puff stitch
- RS = right side
- sc = single crochet
- st = stitch(es)
We try our best to include all crochet abbreviations in the list above for the crochet pattern, but sometimes we may forget one or two.
Learn more about crochet abbreviations & find a complete list on our Crochet Abbreviations & Terms post.
 Stitches You Will Need

Mini Puff
(yarn over + insert hook and pull up a loop 3 times, yarn over and pull through all loops on hook)
 Techniques You Will Need

Short Rows
Mattress Stitch
 Instructions for the The Persephone Cape

Back Panel
Using Color A
Row 1: fhdc (82, 84, 84)(86, 86, 88)(88, 90, 90), ch 3, turn. (82, 84, 84)(86, 86, 88)(88, 90, 90)
ch 3 counts as dc + ch in next row
When repeating Row 1 use a standard hdc, not fhdc
Row 2: Skip the first st, dc in next, *ch 1, dc,** repeat *-** to the end of the row, ch 2, turn(82, 84, 84)(86, 86, 88)(88, 90, 90)
Row 3: hdc in top of each dc and ch space across, finish last st with color B, ch 2, turn. (82, 84, 84)(86, 86, 88)(88, 90, 90)
Using Color B
Row 4: dc in first, sc in next, continue to alternate dc and sc across to the end, ch 3, turn. (82, 84, 84)(86, 86, 88)(88, 90, 90)
ch 3 counts as turning ch + ch 1
Row 5: skip first st (top of the last sc), mini puff, *ch 1, mini puff,** repeat *-** to the end of the row, ch 2, turn. (82, 84, 84)(86, 86, 88)(88, 90, 90)
Row 6: dc in first, sc in next, continue alternating dc and sc to the end of the row. Finish the last st with color A. (82, 84, 84)(86, 86, 88)(88, 90, 90)
Repeat these two sets of rows 15 more times (both color A and color B rows).
Sizes M, L, 3xl, 4xl, 5xl: Repeat just color A rows once more.
On the last row, turn you work on its side and work another hdc in the last st. Continue down the side placing an hdc at the end of each row. Fasten off when you reach the end. Your stitch count for this edging row should be (90, 90, 99)(99, 108, 108)(117, 117, 117)
You should have a total of (30, 30, 33)(33, 36, 36)(39, 39, 39) stripes.
Front Panel (Make 2)
Follow instructions for back panel for a total of (6, 6, 9)(9, 12, 12)(15, 15, 15) stripes. Your stitch counts for the edging rows should be (18, 18, 27)(27, 36, 36)(45, 45, 45) sts.
 Finishing
Using Color A
Lay your panels with the final rows of hdc lined up, making sure the stripe colors are in alignment. Wrong sides of the panels should be touching with the two front panels on top of the back panel.
Use your locking stitch markers or safety pins to fasten the panels so they stay lined up while you sew. Starting at the outer edge, mattress st through the inner loop of each st. Repeat on the opposite side.
This should create a visible but pretty seam along the sewn edge on the rs of the work.
Collar
Using Color B
The collar is worked using short rows to create the wavy tapered look. Place a stitch marker on your front panels 10 sts from the shoulder seam (not including the shoulder seam join.)
Join color B at either stitch marker, depending on your handedness. Ch 1 and hdc in the join st. Hdc across to the other st marker, ch 2, turn.
Hdc back across to starting point. Cut yarn. Count 8 sts from the st marker where you joined your yarn, this would be the st at the base of the one you just finished with and join again. Working back towards the section you just finished placing an hdc in each st until you reach the first short row. Work up the side of the row, place one hdc in the end of each row and then work across. On the last st of the row, instead of working into the top, work into the side, work into the side of the base row then continue placing an hdc in the next 8 sts. Ch 2, turn. Work an hdc in every st back to the start of this section, where you rejoined your yarn. Cut yarn.
Repeat this process until you reach the corners of the front panels.
Border
Join color B at the front inner corner of either panel. Working away from the collar, place an hdc in every st. 2 hdc on the ends of the dc and mini puff sections, 2 in each corner all the way around. Join with a slip st to the opposite collar corner. Do not work around the collar, only on the unfinished edges.
Weave in any remaining ends and steam block.
Share & Worth Noting

Thank you for sharing my FREE patterns & tutorials. When you do, you support me & the blog, which makes it possible to continue sharing free content with you.
Not all content on this blog website is free, but the more you share, the more free content I will be able to share. Note that all premium content are ad free.
My crochet patterns can be used to sell handmade pieces. You are required to credit Joy of Motion/Janne Kleivset as the designer by linking back to My website: https://joyofmotioncrochet.com. You can not use my pictures when selling your handmade items. Finally, you can not resell, reprint or share any parts of my patterns as your own.