

Fall is in full swing and if you live where I do, you know that really means we skipped over that lovely 50-60 degree period and went straight to the 40’s. While some are bemoaning the passing of summer, I am reveling in all the chilliness and the opportunity to trot out all my coziest yarns. All the more so when I get to collaborate with other makers, like Janne at Joy of Motion. I am thrilled to be a guest blogger and to be bringing all of you the latest crochet pattern by Counting Crafty Sheep, The Sabrina Sweater.
Find more: 44+ crochet cardigan pattern collection.
Would you like to save this?
The Yarn
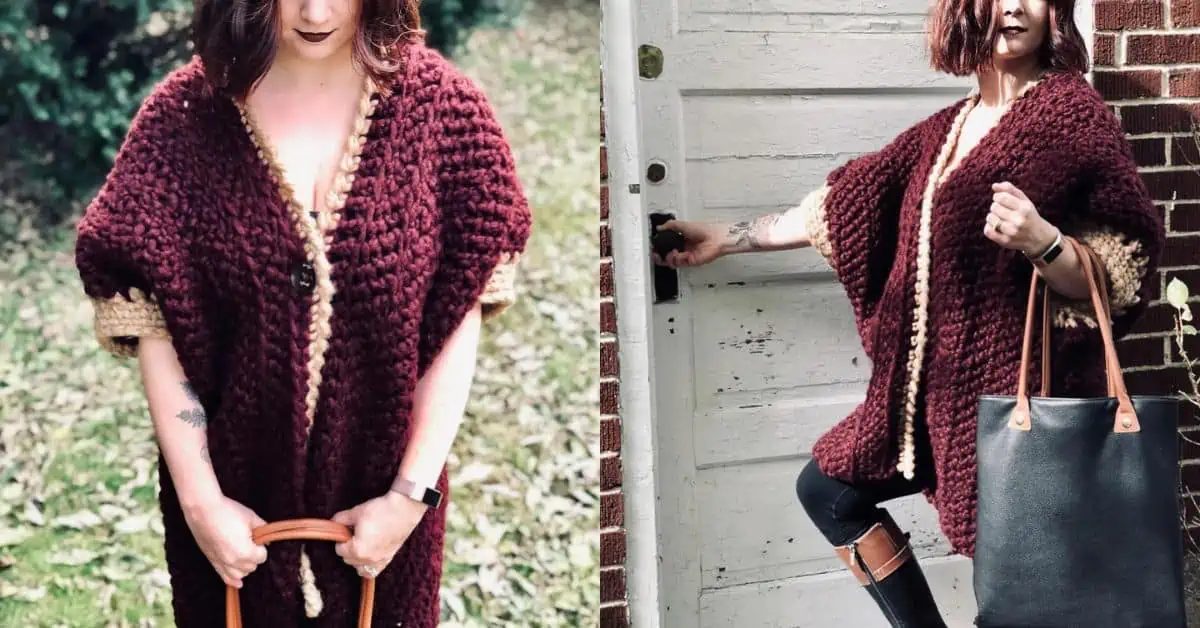
I was originally planning on making this piece in a standard bulky weight yarn, something in the family of a heavy worsted. That is, until I walked into my local JoAnne Fabrics and saw The Gang Collection by Wool and the Gang. Their “Cuddle Me Softly Yarn” called out to me and before I knew it, I had all the Dark Maroon on display in my hands.
As often happens, the design evolved as I was working and a border color became necessary. While I was hoping for something in a charcoal, this Biscotti color turned out perfect as an accent and really amps up those autumn vibes. With eight colors to choose from, you can really take this piece in a lot of different directions.
Each skein has 87 yards/80 meters of fiber. It is an acrylic blended with polyamide and the texture and softness are something I haven’t encountered in any other yarn. It is a plush, super bulky yarn, that almost seems like a cross between a roving and a tubular style. That said, you can find some substitutions on YarnSub.com if you search for Wool and the Gang’s “Crazy Sexy Wool,” which appears to be the closest option. For those looking to compare weight and gauge, this isn’t a traditionally plied fiber, and it measures at 11 rows and seven stitches in a four by four inch square (10cm by 10cm) when using US 19/15mm knitting needles.

FALL FOR FASHION
The two colored crochet pattern, the Sabrina Sweater is an especially exciting piece for me because it is the first garment I have designed myself. To this point, I have focused mainly on shawls, hats, and a few other wearables, but nothing so exciting as a sweater. When I imagined this piece, I pictured making something very cozy I could throw on to duck outside with my dogs, go shopping for groceries, or even wear on cold evenings out on the town when a coat just feels cumbersome (looking at you holiday parties). I also wanted to design a piece that would be approachable to beginners, but satisfying for veteran makers. I really enjoy finding ways to take simple stitches to the next level, and I think this pattern accomplishes that.
Why “The Sabrina Sweater” you say? Well, what can I tell you, I am a bit of a pop-culture junkie and as I was deciding on a name most of my working hours were fueled and inspired by a particularly fall friendly, fashion forward, Netflix series. I hope you guys love this piece as much as I do and feel as fierce as the namesake; whether you are owning it at home, the office, or hitting up those cocktail parties.
How Long Does It Take To Crochet That?
How long it takes to crochet something varies depending on your skill & how fast you crochet. But that isn’t a helpful answer is it?
Well, I’ve developed a yarn calculator to help you get the answer to this question.
It will help you calculate exactly how much time you’ll spend crocheting a project.
All you need to know is how much yarn you will use on the project in either meters, yards or skeins. Then crochet your test square & time it.
Calculate how long it takes to crochet that.
THE SABRINA SWEATER – THE FREE CROCHET PATTERN
Pattern Options
Add this pattern to your Ravelry queue
By clicking this link (pictures above) you will end up on the guest designers Ravelry store, where you can purchase the pattern.
About The Pattern
The Sabrina Sweater is made by crocheting two panels that are joined together at the back and sides. You then add on sleeves and a border to finish. Since the construction is relatively basic, the pattern is written in one size. Model is about 5’5’’ and 150 pounds with a 36 D bust. To adjust the sizing vertically you will add or remove stitches on your initial chain. To adjust horizontally, you will add or subtract additional rows.
A good way to estimate sizing if you aren’t sure is to start your chain and drape it over your should so that both ends hang evenly. If the length in front and back work for you, keep on going. If not, make adjustments. Once you work a few rows drape it over again. The panel should sit a few inches past your shoulder once complete to allow enough extra fabric to sew the back and sides.
The super bulky weight of the yarn means you will be able to whip this baby up in no more than a weekend. It works great over a variety of tops, and since it keeps your core covered, you don’t have to worry about catching a chill with a shorter sleeve. It is also excellent if you are one of those folks who gets cold easily at work, in restaurants, or just lounging around the house.

Project Level
While there is no shaping per-se, the stitch patterns and construction are better suited to someone who isn’t crocheting for the first time.
WHAT’S YOUR CROCHET SKILL LEVEL?
Take the Quiz
Get helpful tips for your next crochet project & increase your skills!
Materials Needed
Crochet Hook
Hook I used: Clover Amour
Yarn
Yarn used:
Wool and the Gang Cuddle Me Softly Yarn, The Gang Collection, in Dark Maroon and Biscotti.
Yarn amount used:
Dark Maroon (Main Color) 6 skeins / 3.53 oz / 100 g / 80 m / 87 yards
Biscotti (Accent Color) 1 skein
Yarn characteristics:
- 6 super bulky yarn, super bulky, roving.
- 89 % acrylic, 11 % polyamide
- *see above for stitch gauge details and possible alternatives
Other Materials Needed
- Needle, find one here (if you don’t already have one)!
- 3-4 stitch markers
- 2 inch button or clasp
Gauge
Measured with the herringbone double crochet stitch crocheted in rows:
Four stitches & four rows per 10 cm / 4”.
Notes
- This crochet pattern is written in US terms.
- All measurements given are unblocked.
- Note that measurements are given as exact as possible. But crochet tension & technique might give variations in the result, that changes from person to person.
- Read pattern instructions carefully before beginning to make sure you understand everything. It might save you hours frogging your work & crocheting it again!
- Make a swatch that measure at least 10 x 10 cm / 4 x 4 inches using the stitch the gauge is given for. If your swatch matches the gauge, you’re good to go. If the gauge is wrong, you might need to change your hook. Go up in crochet hook size if your stitches are smaller & go down in crochet hook size if your stitches are bigger. Learn more about testing gauge.
- Check yarn info if you want to find an alternative or test your yarn against the gauge. Learn more about substituting yarn.
- This pattern is written for 1 size, however size adjustments are suggested under the heading “Size & Measurements”.
- At the end of each row, the stitch count is given in parenthesis.
*You will be making two panels that will be sewn together. You then add the border and the sleeves.
Size & Measurements
The Sabrina Sweater is designed to have an oversized fit with a dropped «V» shape at the back. A good way to estimate sizing if you aren’t sure is to start your chain and drape it over your should so that both ends hang evenly. If the length in front and back work for you, keep on going. If not, make adjustments. Once you work a few rows drape it over again. The panel should sit a few inches past your shoulder once complete to allow enough extra fabric to sew the back and sides.
Model is about 5’5’’ and 150 pounds with a 36 D bust. To adjust the sizing vertically you will add or remove stitches on your initial chain. To adjust horizontally, you will add or subtract additional rows. As written, you will be using all of your yarn. If you intend to make this larger, or if you know you tend to crochet loosely, you may want to purchase one or more extra hanks.

Abbreviations
- HBdc = herringbone double crochet
- HBhdc = herringbone half double crochet
- FLO = front loop only
- sc = single crochet
- Sl st = slip stitch
- Crab Stitch = reverse single crochet
- Waistcoat Stitch = sc knit stitch
- Sc2tog = single crochet two together/single crochet decrease
We try our best to include all crochet abbreviations in the list above for the crochet pattern, but sometimes we may forget one or two.
Learn more about crochet abbreviations & find a complete list on our Crochet Abbreviations & Terms post.
STITCHES YOU WILL NEED:
There are three stitches that you may be unfamiliar with used in this pattern.
HERRINGBONE:
The herringbone stitches create a really interesting angular look when worked in back and forth rows. In order to turn a standard double or half double crochet stitch into a herringbone stitch, you simply need to work as follows:
Step one: Yarn over, insert hook into stitch and pull up a loop.
Step two: As you are pulling up the loop, slip it beneath the yarn over strand (this is the loop on your hook). You should still have two loops on the hook.
Step three: Finish your stitch as normal, either with a yarn over and pull through all loops for the half double or yarn over, pull through first loop, yarn over pull through last loops for double.
CRAB:
The crab stitch is simply a single crochet worked in reverse. Instead of turning your work, you will simply reach your hook back in to the last stitch worked from the front to the back, yarn over, pull up a loop, yarn over and pull through both loops. This creates a really lovely decorative edge.
WAISTCOAT:
This stitch is worked like a standard single with a slight change. Rather than working your sc into the top of the stitch, you will actually be inserting your hook into the center of the “V” and working through the middle of the stitch.
TECHNIQUES YOU WILL NEED:
Once you finish making your panels you will need to sew them together. I used a mattress stitch but a whip stitch would work just as well.
Sabrina Sweater Pattern Instructions
Make two panels. Each panel should use approximately three loose hanks of your yarn. Optional note, since you will be sewing the starting chain rows together, you may want to leave a length of yarn to sew with later. However, if you find this too cumbersome as you work you can alternatively sew with a separate strand and weave in the ends.
Set up: Chain 77 stitches.
Row 1: HBdc in the third chain from the hook and in each of the remaining stitches to the end of your starting chain. Chain two and turn. (75)
Row 2: HBhdc in FLO all the way across. Chain two and turn. (75)
Row 3-4: Repeat rows two and three. (75)
Rows 5-12: HBdc in each stitch across. Chain two and turn at the end of each row, except at the end of the last row.
SEWING:
Once you have two panels, you will want to lay them out so that you can sew them together. I found it easiest to use a mannequin, since I have a couple on hand. You could also use a willing volunteer, lay the pieces on your own shoulders and position them using a mirror, or follow the counts given below and simply lay them out on the floor or a work table.
Position your panels so that the starting chains are facing one another. All of the line work created by the FLO stitches should be on the centerline in the back and along the inner edges of the sweater in the front. If you are laying the pieces on the floor, you will want to fold them in half with the right side facing out.
Use your stitch markers and pin the two panels together 32 stitches from the bottom at the back, 20 stitches from the bottom on each side, and 27 from the bottom in the front. This last pin just helps to visualize the shape of the sweater and will help you place your button later on.

Figure 1 Front and side stitch marker placements.

Figure 2 Back stitch marker placement.
Using either the tail from your work, or a separate strand of yarn, stitch up each side from the bottom up to your stitch marker. Do the same at the back of your work, starting at the bottom and working your way up to the marker that is holding the two panels together. When stitching up the back you will work back and forth underneath the outer loop of each stitch. See image for reference. As I mentioned before, I used a mattress stitch for the sides. I think this technique looks a little cleaner but ultimately, I find it is personal preference.

Figure 3 Stitching up the side.

Figure 4 Completed side seam.

Figure 5 Stitching up the back.
ADDING THE BORDER:
With your accent color, you will join your yarn to the front corner on either side of your sweater, since I am right handed and was sitting in front of the sweater while it was on a mannequin, I joined my yarn to the bottom corner to my left. Work a sc in every stitch up the side of the panel, including in the space where the two panels join, and continue working down and around the opposite panel ending at the bottom front corner on the other side.
Without turning your work, crab stitch all the way back to where you started the border. When you reach the start break your yarn fasten off, and weave in your ends.
Sleeves
You will be working in continuous rounds for this section. Do not join at the end of each round.
Keeping with your accent color, join your yarn in the same space as the stitch marker that held the pieces together at the sides before you did your sewing. You should have about 40 stitches in your arm hole. If it isn’t quite 40, it isn’t a big deal, you will just need to make an adjustment to your stitch count as you work in the round and make sure you are consistent with the number of stitches you use on the second sleeve.
Round 1: Sc2tog in the next two stitches and continue all the way around. If your count was a little off when sewing, your last decrease may need to include the space where you joined the yarn, so really you would be using this space to do two decreases. That is ok, just remember to be consistent. (20)
Round 2: Sc in each stitch around. (20)
Rounds 3-5: Waistcoat stitch in each stitch around. This will give your sleeve a knit like appearance.
Round 6: Slip stitch in each stitch around. Fasten off and weave in ends.
Finishing
Once you have woven in all your ends all that remains is to add your button or clasp. You can use the stitch maker you placed at the front to help you position the button. When it is worn, there should be a bit of a “V” in the back that will bring that marker up a bit on your chest. Feel free to adjust the button position to your preference. Just make sure you don’t have the cardigan pulled all the way up to the back of your neck at the back when you are doing placement.


Share & Worth Noting
Thank you for sharing my FREE patterns & tutorials. When you do, you support me & the blog, which makes it possible to continue sharing free content with you.
Not all content on this blog website is free, but the more you share, the more free content I will be able to share. Note that all premium content are ad free.
My crochet patterns can be used to sell handmade pieces. You are required to credit Joy of Motion/Janne Kleivset as the designer by linking back to My website: https://joyofmotioncrochet.com. You can not use my pictures when selling your handmade items. Finally, you can not resell, reprint or share any parts of my patterns as your own.

