

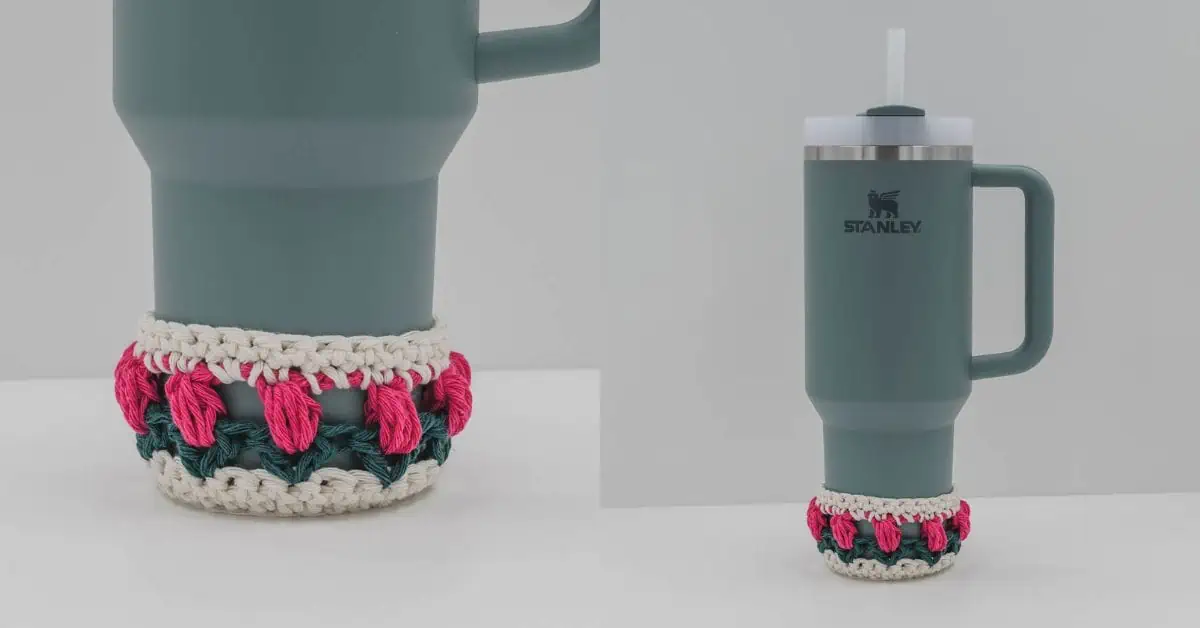
Introducing the Tulip Crochet Stanley Boot Pattern, a charming way to dress up your Stanley Quencher with the beauty of tulips.
This unique design not only provides protection for your tumbler but also serves as a conversation starter.
Embark on this floral crochet journey and let your Quencher bloom.
Find more: 20+ Kitchen Crochet Pattern Collection.
Would you like to save this?
How to get this crochet pattern:
Option 1: Scroll down to see the FREE Crochet Pattern ⬇️
Option 2: Purchase the printable PDF:
Option 3: Get the printable version inside the crochet pattern membership.
Option 4: Most of my crochet patterns can also be found on Ravelry, Love Crafts and Etsy.
How To Crochet The Tulip Crochet Stanley Boot
The Tulip Crochet Stanley Boot is crocheted from the bottom up, starting with a magic circle.
From there you crochet a flat circle, about the same size as the bottom of the Stanley Quencher.
Next, you will work one round of back loop single crochet, before continuing upwards.
The Tulip stitch is the main focus of the sides, before finishing off with the main color using single crochet stitches.

Yarn For The Tulip Crochet Stanley Boot
The Tulip Crochet Stanley Cup Boot is an ideal pattern for utilizing scrap yarn or leftover yarn.
Choosing a 4 medium cotton yarn is essential for achieving the correct gauge for this project.
The showcased sample is made with a limited edition yarn, Drops Loves You 5, which has unfortunately been discontinued.
Look through your collection of yarn and consider this an opportunity for stash busting. Both acrylic and wool yarns are suitable for a project like this.

Stanley Quencher Crochet Patterns Bundle
Like this? Get the ad-free version + 9 other crochet patterns with the “Stanley Tumbler Crochet Patterns Bundle“.
Learn more about the Stanley Quencher Pattern Bundle
Personalize Your Stanley Cup Using Crochet Techniques
The Stanley Tumbler, already a fan favorite, becomes even more special when you add a personal touch with a crocheted cozy, holder, or boot.
What’s great is that these crochet projects are quick to do, with most of them taking less than an hour to complete.
So, why not pick up your crochet hook and create your very own Tulip Crochet Stanley Boot?
Love this crochet pattern? Save on Pinterest!

How Long Does It Take To Crochet That?
How long it takes to crochet something varies depending on your skill & how fast you crochet. But that isn’t a helpful answer is it?
Well, I’ve developed a yarn calculator to help you get the answer to this question.
It will help you calculate exactly how much time you’ll spend crocheting a project.
All you need to know is how much yarn you will use on the project in either meters, yards or skeins. Then crochet your test square & time it.
Calculate how long it takes to crochet that.
Buy the Tulip Crochet Stanley Boot Pattern
Get the downloadable PDF crochet pattern for this crochet pattern below, or join the Crochet Everyday Bliss Membership and get access to ALL crochet patterns and more!
Not ready to crochet it yet?
- Share about this crochet pattern on Facebook & Instagram using #joyofmotioncrochet.
- Save on Pinterest to make it later.
The Free Tulip Stanley Boot Crochet Pattern
The Tulip Stanley Boot Crochet Pattern Summary
The Tulip Crochet Stanley Boot pattern is an excellent way to customize your Stanley Quencher and make it truly your own.
With just some leftover cotton yarn and a little bit of free time, crafting this adorable accessory is a breeze.
Simply pick up your crochet hook and yarn, and prepare to add a personalized flair to your Stanley cup that will definitely make it stand out.

Project Level
WHAT’S YOUR CROCHET SKILL LEVEL?
Take the Quiz
Get helpful tips for your next crochet project & increase your skills!
Materials Needed For The Tulip Crochet Stanley Boot
Crochet Hook
Size 6 mm crochet hook / US: J – 10 / UK: 4
Hook I used: Symphonie Rose Crochet Hooks from Knitpro
Yarn
Yarn used:
How much yarn needed for the Tulip Stanley Boot:
3 yarn colors: <1 skein per color
Yarn characteristics:
- 4 medium yarn
- 100 % cotton
Other Materials Needed
- Needle, find one here
- Scissors
- Tape Measure
Gauge
Measured on single crochet stitches crocheted in turning rounds:
15 stitches & 17 rows per 10 cm / 4”.
Crochet Pattern Notes
- This crochet pattern is written in US terms.
- All measurements given are unblocked.
- Note that measurements are given as exact as possible. But crochet tension & technique might give variations in the result, that changes from person to person.
- Read pattern instructions carefully before beginning to make sure you understand everything. It might save you hours frogging your work & crocheting it again!
- Make a swatch that measure at least 10 x 10 cm / 4 x 4 inches using the stitch the gauge is given for. If your swatch matches the gauge, you’re good to go. If the gauge is wrong, you might need to change your hook. Go up in crochet hook size if your stitches are smaller & go down in crochet hook size if your stitches are bigger. Learn more about testing gauge.
- Check yarn info if you want to find an alternative or test your yarn against the gauge. Learn more about substituting yarn.
- This pattern is written for 1 size.
- At the end of each row/round, the stitch count is given in parenthesis.
Size and Measurements
This is made to fit a Stanley Quencher H2.0 FlowState with negative ease, that means it will stretch to fit.
Abbreviations
- beg – beginning
- BLsc – back loop single crochet
- CA – color A
- CB – color B
- CC – color C
- ch – chain
- ch-1-sp – chain space made by 1 chain
- ch-2-sp – chain space mad by 2 chains
- dc – double crochet
- prev – previous
- sc – single crochet
- sk – skip(ped)
- sl st – slip stitch
- st – stitch(es)
We try our best to include all crochet abbreviations in the list above for the crochet pattern, but sometimes we may forget one or two.
Learn more about crochet abbreviations & find a complete list on our Crochet Abbreviations & Terms post.
Stitches Used In The Crochet Pattern
In this crochet pattern you will use chains, slip stitches, puff stitches, double crochet stitches, back loop single crochet and single crochet stitches.
Puff Stitch
*yo, pull up a loop*, repeat from *to* 3 more times, you have 9 loops on the hook. Yo, pull through all.
Techniques Used In The Crochet Pattern
You will need to know the magic circle and changing colors at the end of a row or round.
Changing color at the end of a row/round
When working with different colors on different rows, you’ll never finish the last stitch on the last row with one color, with the color you where working with.
Do all the steps of the stitch, then leave the last step unworked. Yarn over with the color for the next st & pull yarn through.
Repeat this for every row you change colors to make the color changes look beautiful.
Tulip Crochet Stanley Boot Pattern Instructions
Base
Start with a magic circle.
Round 1 with CA: 6 sc into the magic circle, pull tight, sl st in 1st sc, turn (=6 st).
Round 2 with CA: Ch 1 (doesn’t count as a st), sc 2 in each st, sl st in 1st sc, turn (=12 st).
Round 3 with CA: Ch 1 (doesn’t count as a st), *sc 2 in next st, sc 1 in the next 1 st*, repeat from *to* until end of round, sl st in 1st sc, turn (=18 st).
Round 4 with CA: Ch 1 (doesn’t count as a st), *sc 2 in next st, sc 1 in the next 2 st*, repeat from *to* until end of round, sl st in 1st sc, turn (=24 st).
Round 5 with CA: Ch 1 (doesn’t count as a st), * sc 2 in next st, sc 1 in the next 3 st*, repeat from *to* until end of round, sl st in 1st sc, turn (=30 st).
Side
Round 6 with CA: Ch 1 (doesn’t count as a st), BLsc 1 in each st from prev round, sl st in 1st st, turn (=30 st).
Round 7 with CA: Ch 1 (doesn’t count as a st), sc 1 in each st from prev round, sl st in 1st st, turn (=30 st).
Round 8 with CB (RS): ch 4, *sk 2 st, dc 1 in next st, ch 1, dc 2 in same st*, repeat from *to* until you have 3 st left, sk 2 st, dc 1 in last st, ch 1, sl st in 3 ch from beg of round (=10 tulips made). Fasten off and cut yarn. Do not turn.
Round 9 with CC (RS): Make slip knot, *puff 1 in next ch-1-sp, ch 2*, repeat from *to* until end of round, sl st in first puff (=30 st). Fasten off an cut yarn. Do not turn.
Round 10 with CA (RS): *sc 1 in next puff st, sc 2 in ch-2-sp*, repeat from *to* until end of round, sl st in 1st st, turn (=30 st).
Round 11: Repeat round 7.
Fasten off & cut yarn.

Discover More Crochet Patterns for Your Stanley Quencher
- Simple Crochet Stanley Quencher Boot Pattern
- Striped Crochet Stanley Quencher Cozy Pattern
- Strawberry Crochet Stanley Quencher Cover Pattern
- Striped Crochet Stanley Cup Boot Pattern
- Textured Crochet Stanley Cup Cozy Pattern
- Tulip Crochet Stanley Cozy Pattern
- Daisy Crochet Stanley Tumbler Cozy Pattern
- Lace Crochet Stanley Cup Holder Pattern
- Striped Crochet Stanley Cup Cover Pattern
Share & Worth Noting
Thank you for sharing my FREE patterns & tutorials. When you do, you support me & the blog, which makes it possible to continue sharing free content with you.
Not all content on this blog website is free, but the more you share, the more free content I will be able to share. Note that all premium content are ad free.
My crochet patterns can be used to sell handmade pieces. You are required to credit Joy of Motion/Janne Kleivset as the designer by linking back to My website: https://joyofmotioncrochet.com. You can not use my pictures when selling your handmade items. Finally, you can not resell, reprint or share any parts of my patterns as your own.

