

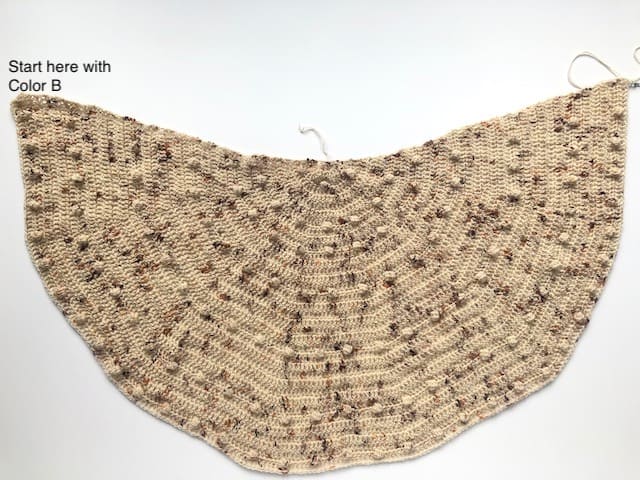
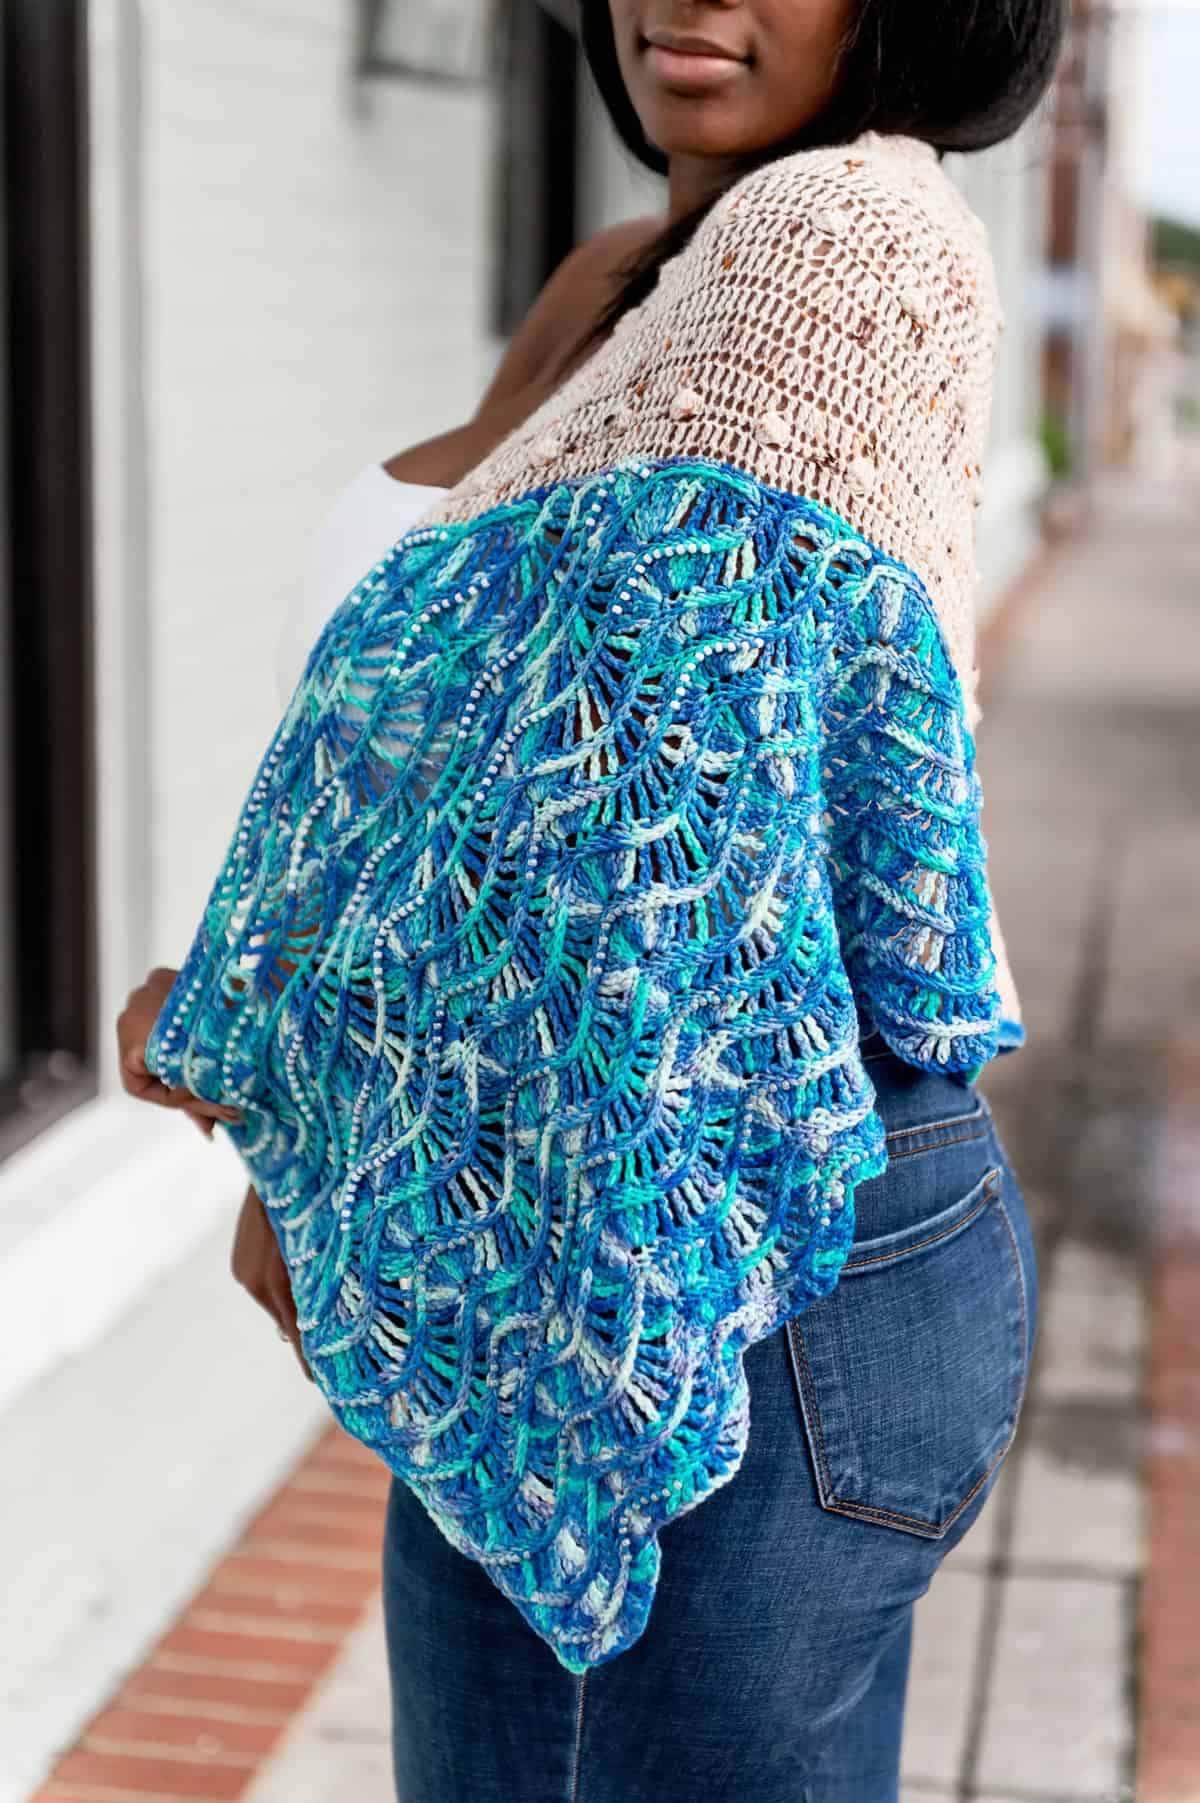
You are now viewing the Sand to Sea Shawl by guest designer Creations By Courtney.
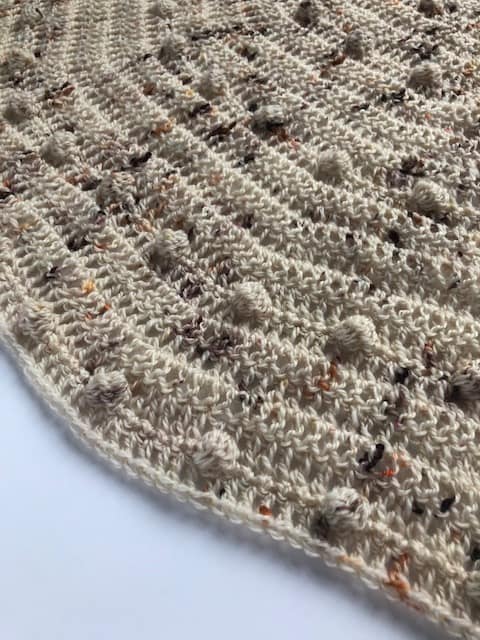
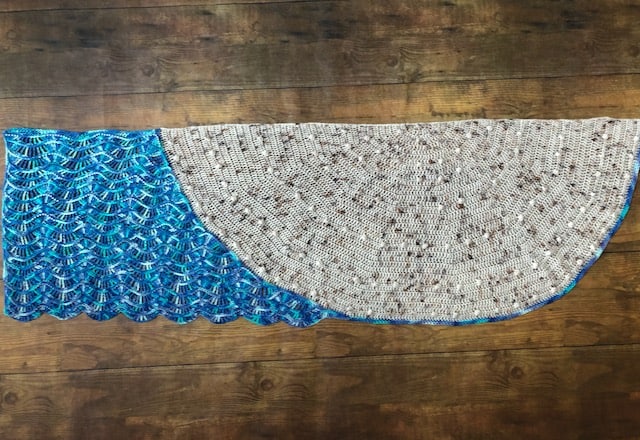
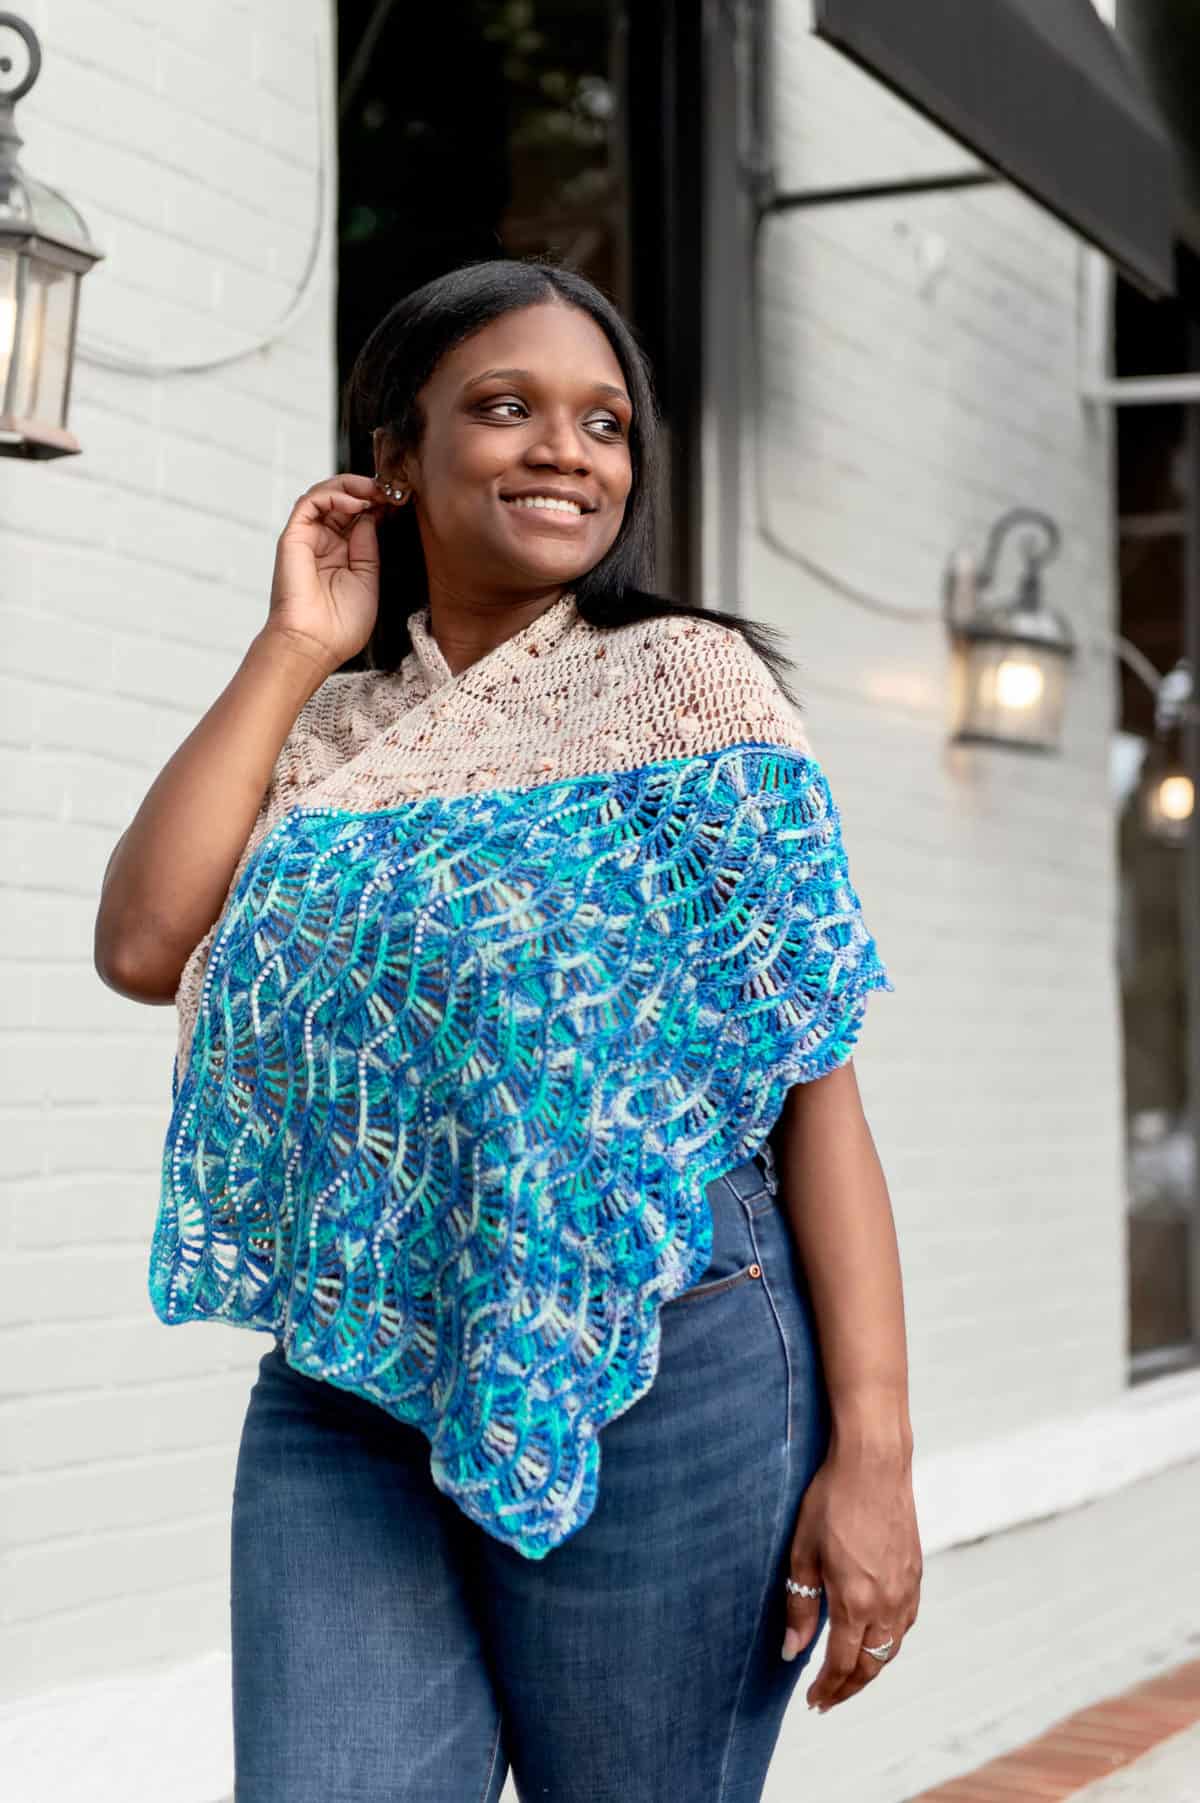
The Sand to Sea Shawl was in idea born October 2019 while sitting in the floor of Georgia’s first yarn bus. I was sitting with a friend during a local festival squeezing the yarn, when a red-haired, stylish older woman stepped on the bus and said “Sand to Sea” when she saw the speckled neutral and shades of blue and turquoise yarns in my head. My eyes grew big as I looked at my friend and we smiled at how awesome of a name she offered us! The fun started with thinking about how to recreate sand meeting the water in crochet. After lots of thinking and a few sketch ideas from my friend, I started with a half circle with bobbles for the sand, and my sister picked a wave stitch pattern for me. I had to bling it up a bit by adding some beads to the waves to mimic the crest of waves. I love how shawls are a classic wardrobe staple to be worn for all occasions and multiple seasons.
Find more: 32+ Shawl Crochet Pattern Collection.

Would you like to save this?
The Yarn
To crochet the Sand to Sea shawl you need 2 yarn colors, and the sample is made with lovely variegated yarn.
I chose to step out of my comfort zone by choosing fingering weight yarn through the encouragement of a friend, and when looking at so many squishy options on Purl, the yarn bus, I let the colors speak to me. Many fingering weight yarns tend to be merino wool or a mix of wool with other fibers for added stretch and sturdiness. The Cozy Color Works is a light fingering weight yarn that is so soft and allows the speckle of colors to really pop out, so I chose Toasted Marshmallow. The Forbidden Fiber Co. yarns have amazing color ways, so I chose Glass Slipper with gorgeous shades of blue and turquoise.
Cozy Color Works offers a wide range of colors, so you can choose a different speckle or solid color the reminds you of your favorite beach. Although Glass Slipper in Gluttony Sock was sold out on their site, Forbidden Fiber Co. has other bases in this awesome color way.
A SOPHISTICATED EVERYDAY SHAWL
The Sand to Sea Shawl can be used anytime to keep your shoulders warm. With the subtle shine of the glass beads, it pairs wonderfully with a strappy dress or a tank, jeans and heels when you’re heading to a dinner date. With the unique shape of the Sand to Sea Shawl, a portion is a half circle and the other half is rectangular, so you get two different looks to drape across each shoulder. The airiness of the sand and the sea adds warmth for chilly spring days, but can also be worn any breezy evening at home or waterside.
Since you like the Sand to Sea Shawl, these might interest you too.

How Long Does It Take To Crochet That?
How long it takes to crochet something varies depending on your skill & how fast you crochet. But that isn’t a helpful answer is it?
Well, I’ve developed a yarn calculator to help you get the answer to this question.
It will help you calculate exactly how much time you’ll spend crocheting a project.
All you need to know is how much yarn you will use on the project in either meters, yards or skeins. Then crochet your test square & time it.
Calculate how long it takes to crochet that.
SAND TO SEA SHAWL – THE FREE CROCHET PATTERN
Pattern Options
GET THE AD-FREE PDF ON ETSY
GET THE AD-FREE PDF ON RAVELRY
About The Pattern
The Sand to Sea Shawl is the perfect layering accessory for chilly days or a night out to dinner. You can add beads to the wave stitches for a touch of bling, or you can choose a sparkly yarn for your bling. Be prepared to be stopped and asked, “Where did you get that fabulous shawl?”
With a large grin, you can reply, “I made it!”
You’ll learn how to do short rows, attach two pieces of crochet while you work, and add beads without having to sew them on afterwards! Don’t let it intimidate you. Just remember to read the pattern before beginning, and to take your time.
Project Level
WHAT’S YOUR CROCHET SKILL LEVEL?
Take the Quiz
Get helpful tips for your next crochet project & increase your skills!
Materials Needed
Crochet Hook
Size 1.00 mm steel / US: 12/6 / UK: 6 1/2
Yarn
Yarn used:
Cosy Color Works – Light Fingering Weight in color Toasted Marshmallow.
Forbidden Fiber Co. – Gluttony Sock. in color Glass Slipper.
Yarn amount used:
1 skein / 4 oz / 114 g / 503 m / 550 yards
1 skein / 4 oz / 113 g / 389 m / 425 yards
Yarn characteristics:
- 1 super fine yarn, fingering yarn.
- 100 % superwash merino
- 1 super fine yarn, sock yarn.
- 80 % merino, 20% nylon
Other Materials Needed
- Stitch Marker, 1
- Needle, find one here (if you don’t already have one)!
- Toho Japanese 6/0 E Beads, 9g – 4
- Blocking boards and pins or blocking wires
Gauge
Measured with double crochet and single crochet stitches crocheted in rows for the Sand section:
12 pattern rows per 10 cm / 4”.
Measured with treble stitches and front post single crochet stitches crocheted in rows for the Sea section:
1.33 pattern repeat of & approx. 9 rows per 10 cm / 4”.
Notes
- This crochet pattern is written in US terms.
- Measurements are given unblocked and blocked.
- Note that measurements are given as exact as possible. But crochet tension & technique might give variations in the result, that changes from person to person.
- Picture tutorials are provided for Add Bead and Attaching sl st. The other attached stitches are created in a similar manner of inserting the hook through the BL first, and then creating the stitch as normal in the indicated stitch.
- Pattern is worked in 3 sections: Sand, Sea, Edging.
- Beginning ch 1 does not count as first st.
- CSDC can be replaced with ch 3, but may create a noticeable gap.
- Bobbles are worked on WS rows to make them pop.
- The Sand section will not be a true half circle shape until it is blocked.
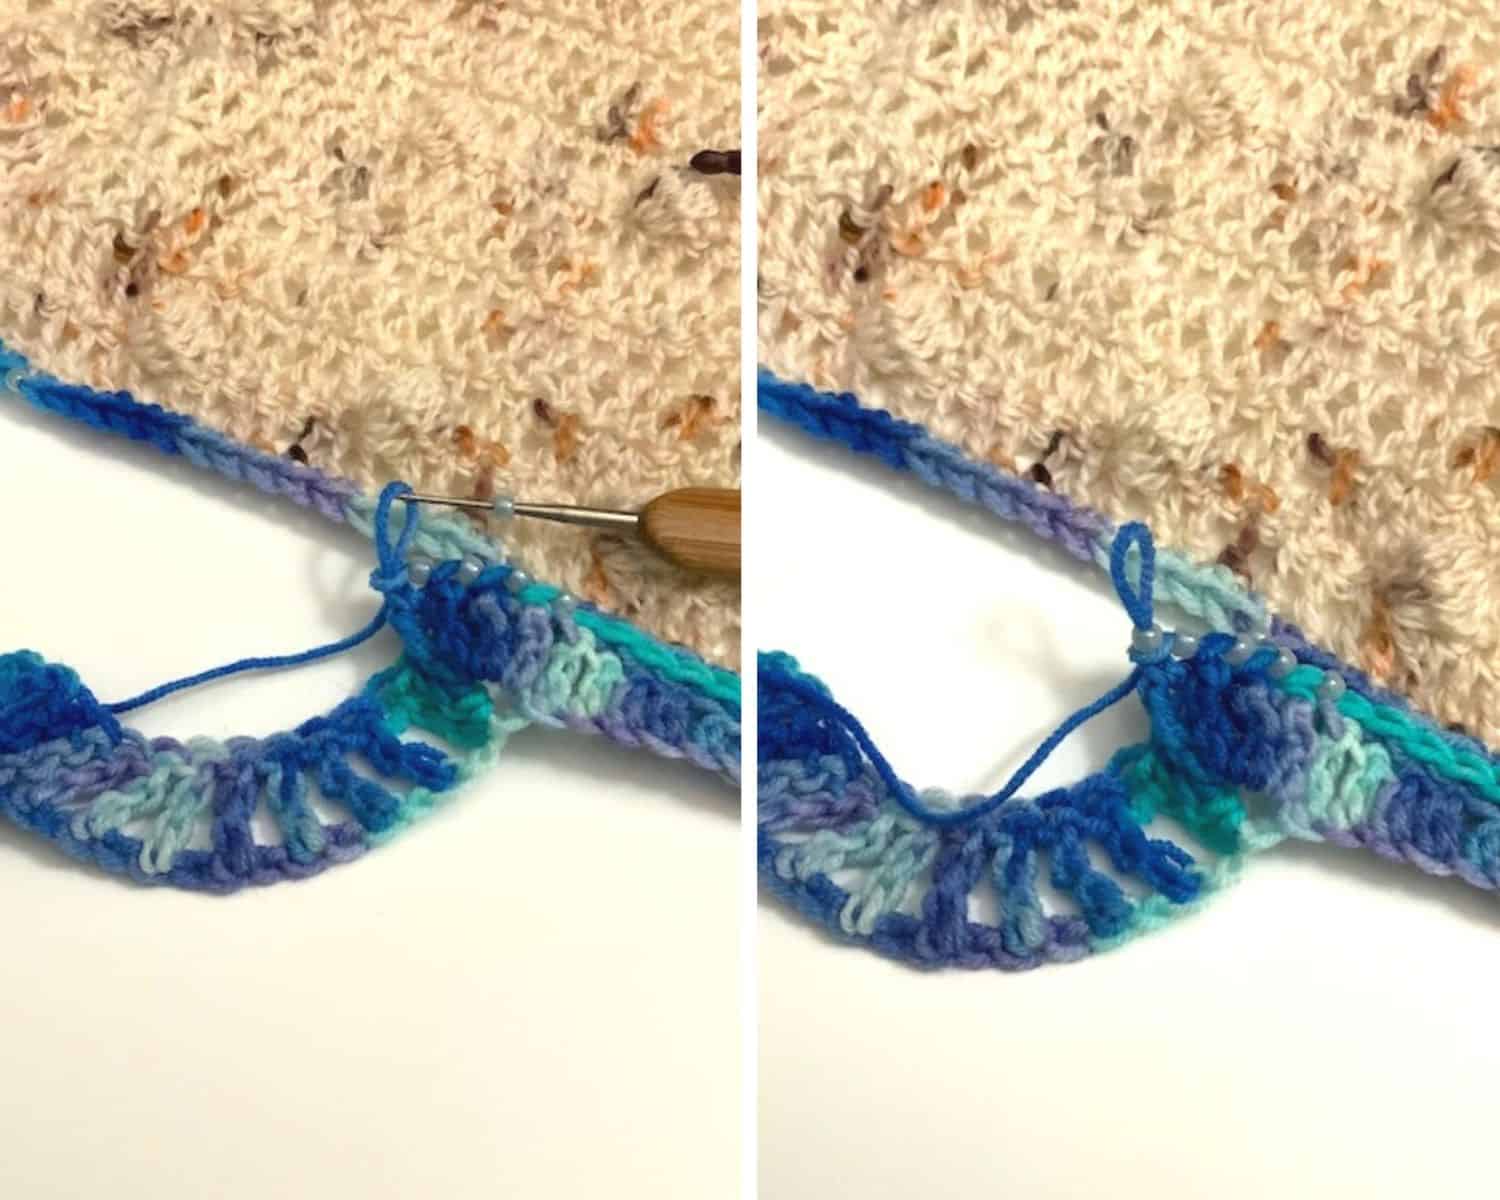
- When adding beads, it may help to pour them in a small container with a lid.
- Beads can be pre-strung, but can be added within a row as it is worked, per the instructions in Special Stitches & Techniques.
- A version of short rows are used to attach the Sea to Sand as it is worked.
- Be sure to count the st totals regularly. This will matter when attaching all of the pieces.
- Keep the yarn on the WS of the work when attaching the rows.
- The italicized instructions before a semicolon (;) indicate which stitches are used to attach the Sea to Sand. The rest of the instructions are not italicized and are worked as normal in the row below.
- Within the Sea instructions, { } are used to indicate the total number of attached sts prior to beginning the row.
- Keep the yarn on the WS of the work when attaching the rows.
- Due to the nature of attaching the pieces and variable gauge, additional rows may be required to attach the Sand to the Sea.
- If additional rows are needed, continue in pattern as written and end on a RS row of FPsc, and then follow instructions for Row 37 and Edging.
- Read pattern instructions carefully before beginning to make sure you understand everything. It might save you hours frogging your work & crocheting it again!
- Make a swatch that measure at least 10 x 10 cm / 4 x 4 inches using the stitch the gauge is given for. If your swatch matches the gauge, you’re good to go. If the gauge is wrong, you might need to change your hook. Go up in crochet hook size if your stitches are smaller & go down in crochet hook size if your stitches are bigger. Learn more about testing gauge.
- Check yarn info if you want to find an alternative or test your yarn against the gauge. Learn more about substituting yarn.
- At the end of each row, the stitch count is bolded.
Size & Measurements
SAND PART:
Width: 39.5″ [100.33 cm], before blocking
Height: 17.5″ [ 44.45 cm], measured in the center
SEA PART:
Width: 13.5″ [33 cm] along top, 30″ [76.2 cm] along bottom
Height: 17″ [43.2 cm]
Size Adjustments
- Note: A thicker yarn can be used, but it will affect yardage required and hook size. Also the suggested beads are not likely to fit on a thicker yarn, unless all beads are pre-strung on a sport weight yarn. The finished size will also be larger, if a thicker yarn is used.
Abbreviations
- A = color A
- B = color B
- BL = back loop
- ch = chain(s)
- CSDC = chinless starting double crochet
- dc = double crochet
- dc3tog = double crochet 3 together
- Dtr = double treble crochet
- FPsc = front post single crochet
- hdc = half double crochet
- M = stitch marker
- RS = right side
- sc = single crochet
- shell =shell
- sl st = slip stitch
- st = stitch(es)
- tr = treble crochet
- T-shell = tall shell
- WS = wrong side
- YO = yarn over
We try our best to include all crochet abbreviations in the list above for the crochet pattern, but sometimes we may forget one or two.
Learn more about crochet abbreviations & find a complete list on our Crochet Abbreviations & Terms post.
Stitches You Will Need
You will need to use the bobble, chain, double crochet stitch, double crochet 3 together, double treble crochet stitch, front post single crochet stitch, half double crochet stitch, single crochet stitch, treble crochet stitch, and slip stitch.
Techniques You Will Need
CSDC: pull up a loop, wrap around hook (YO made), insert hook in first st, YO, [pull through 2 loops] twice
Bobble: [Yarn over, insert hook into next st, yarn over pull through st, yarn over pull through 2 loops on hook] 5 times, yarn over, pull through all 6 loops on hook
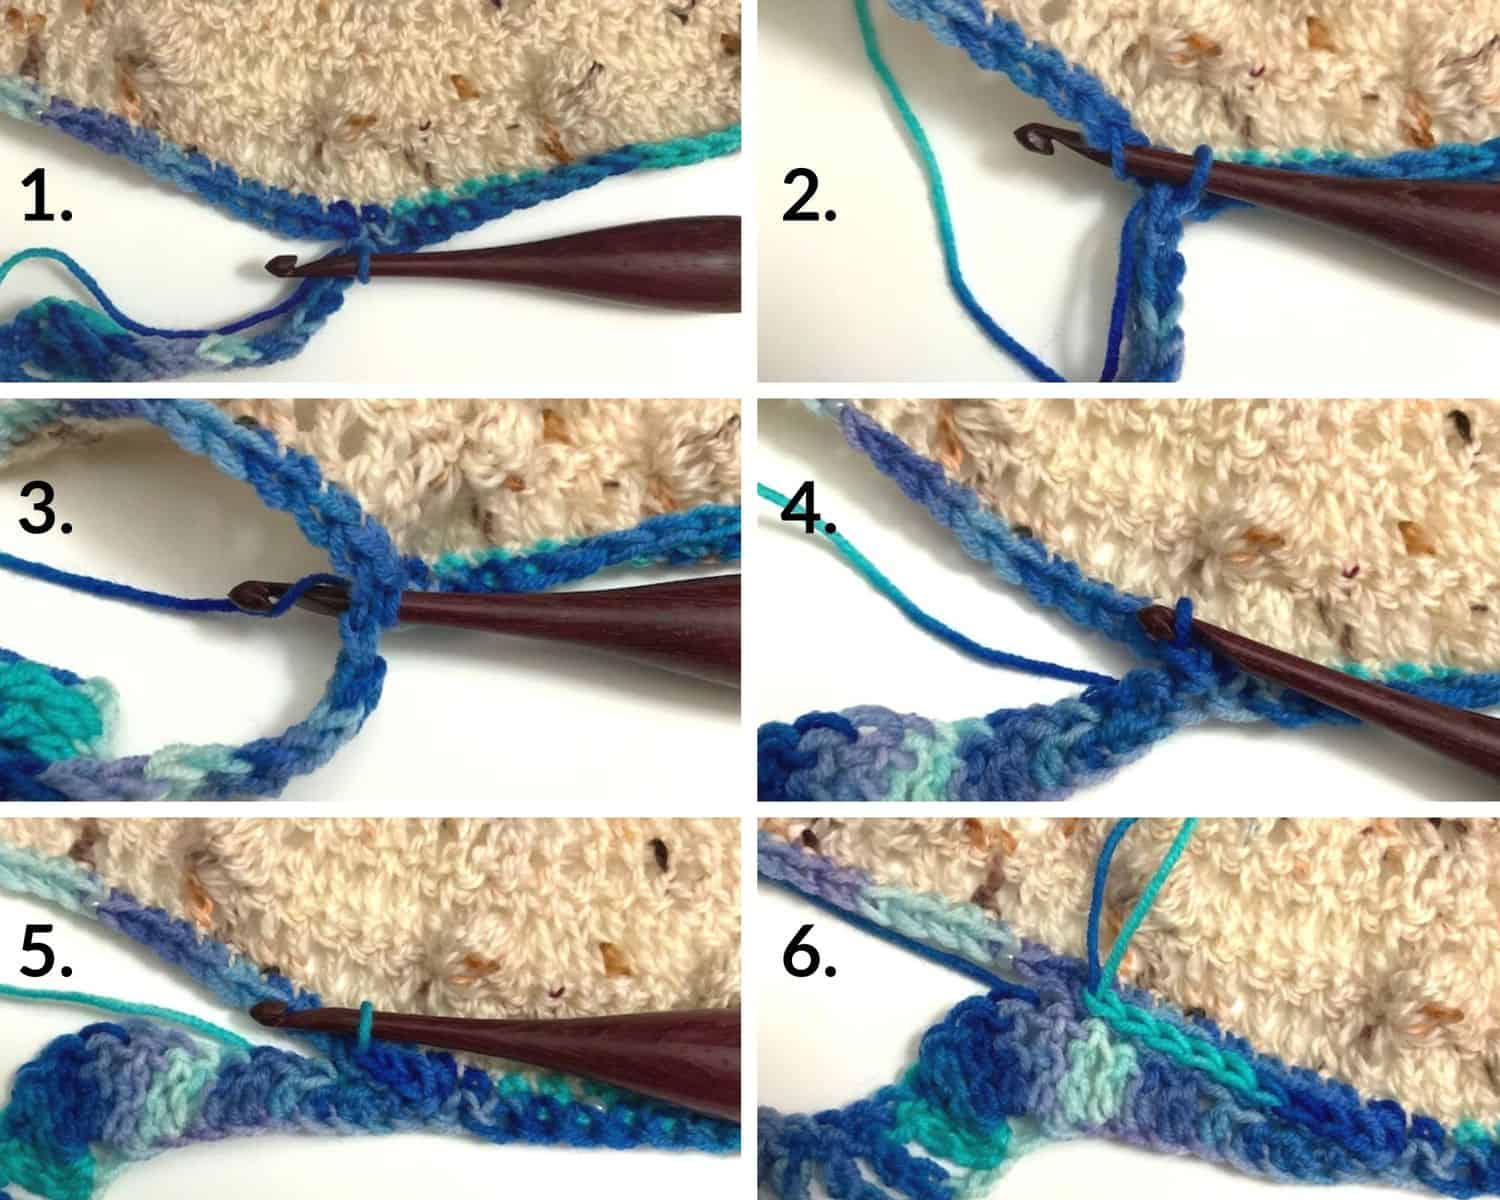
Add bead: Remove larger hook from loop; using smaller hook, pick up a bead, place hook with bead through the loop, slide bead down onto loop, remove smaller hook from loop, place larger hook in loop, tighten loop on hook and bead, complete next st as instructed. [see Pic. 1]
Attaching sl st: insert hook through BL of st above and next st of current working row, YO, pull through all loops [see Pic. 2]
Attaching dc: insert hook through BL of st above, YO, insert hook in next st of current working row, [YO, pull through 2 loops] twice
Attaching hdc: insert hook through BL of st above, YO, insert hook in next st of current working row, YO, pull up a loop, YO, pull through all loops
Attaching sc: insert hook through BL of st above and next st of current working row, YO, pull up a loop, YO, pull through all loops
Magic Circle: Going from left to right, place the tail of the yarn across the top of your index finger, then loop the yarn around your finger one time. Place the working yarn (from the skein) behind the tail, then insert the hook under the loops to pull up a loop from the working yarn. Begin crocheting.
Shell: 5 tr in next st
T- Shell: 5 dtr in next st

Sand To Sea Shawl Pattern Instructions
SAND:
With Color A, Magic Circle
Row 1: Ch 3 (counts as dc), 6 dc in Magic Circle, tighten Magic Circle, turn – 7 dc
Row 2: CSDC in first st, dc in same st, 2 dc in next 6 sts, turn – 14 dc
Row 3: CSDC in first st, 2 dc in next st, *dc in next st, 2 dc in next st, repeat from * to end, turn – 21 dc
Row 4 (WS): Ch 1, sc in first st, sc in next 2 sts, bobble in next st, *sc in next 6 sts, bobble in next st; repeat from * 1 more time, sc in last 3 sts, turn – 21 sts; 3 bobbles, 18 sc
Row 5 (RS): CSDC in first st, dc in same st, dc in next 2 sts, *2 dc in next st, dc in next 2 sts, repeat from * to end, turn – 28 dc
Row 6: CSDC in first st, dc in same st, dc in next 3 sts, *2 dc in next st, dc in next 3 sts, repeat from * to end, turn – 35 dc
Row 7: CSDC in first st, dc in same st, dc in next 4 sts, *2 dc in next st, dc in next 4 sts, repeat from * to end, turn – 42 dc
Row 8: CSDC in first st, dc in same st, dc in next 5 sts, *2 dc in next st, dc in next 5 sts, repeat from * to end, turn – 49 dc
Row 9: CSDC in first st, dc in same st, dc in next 6 sts, *2 dc in next st, dc in next 6 sts, repeat from * to end, turn – 56 dc
Row 10 (WS): Ch 1, *sc in next 6 sts, bobble in next st; repeat from * 6 more times, sc in last 7 sts, turn – 56 sts; 7 bobbles, 49 sc
Row 11: CSDC in first st, dc in next 6 sts, *2 dc in next st, dc in next 7 sts, repeat from * to last st, 2 dc in last st, turn – 63 dc
Row 12: CSDC in first st, dc in same st, dc in next 8 sts, *2 dc in next st, dc in next 8 sts, repeat from * to end, turn – 70 dc
Row 13: CSDC in first st, dc in same st, dc in next 9 sts, *2 dc in next st, dc in next 9 sts, repeat from * to end, turn – 77 dc
Row 14 (WS): Ch 1, sc in next 3 sts, bobble in next st, *sc in next 6 sts, bobble in next st; repeat from * 9 more times, sc in last 3 sts, turn – 77 sts; 11 bobbles, 66 sc
Row 15: CSDC in first st, dc in same st, dc in next 10 sts, *2 dc in next st, dc in next 10 sts, repeat from * to end, turn – 84 dc
Row 16: CSDC in first st, dc in same st, dc in next 11 sts, *2 dc in next st, dc in next 11 sts, repeat from * to end, turn – 91 dc
Row 17: CSDC in first st, dc in same st, dc in next 12 sts, *2 dc in next st, dc in next 12 sts, repeat from * to end, turn – 98 dc
Row 18: CSDC in first st, dc in same st, dc in next 13 sts, *2 dc in next st, dc in next 13 sts, repeat from * to end, turn – 105 dc
Row 19: CSDC in first st, dc in same st, dc in next 14 sts, *2 dc in next st, dc in next 14 sts, repeat from * to end, turn – 112 dc
Row 20 (WS): Ch 1, *sc in next 6 sts, bobble in next st; repeat from * 14 more times, sc in last 7 sts, turn – 112 sts; 15 bobbles, 97 sc
Row 21: CSDC in first st, dc in same st, dc in next 15 sts, *2 dc in next st, dc in next 15 sts, repeat from * to end, turn – 119 dc
Row 22: CSDC in first st, dc in same st, dc in next 16 sts, *2 dc in next st, dc in next 16 sts, repeat from * to end, turn – 126 dc
Row 23: CSDC in first st, dc in same st, dc in next 17 sts, *2 dc in next st, dc in next 17 sts, repeat from * to end, turn – 133 dc
Row 24: CSDC in first st, dc in same st, dc in next 18 sts, *2 dc in next st, dc in next 18 sts, repeat from * to end, turn – 140 dc
Row 25: CSDC in first st, dc in same st, dc in next 19 sts, *2 dc in next st, dc in next 19 sts, repeat from * to end, turn – 147 dc
Row 26: CSDC in first st, dc in same st, dc in next 20 sts, *2 dc in next st, dc in next 20 sts, repeat from * to end, turn – 154 dc
Row 27: CSDC in first st, dc in same st, dc in next 21 sts, *2 dc in next st, dc in next 21 sts, repeat from * to end, turn – 161 dc
Row 28 (WS): Ch 1, *sc in next 6 sts, bobble in next st; repeat from * 21 more times, sc in last 7 sts, turn – 161 sts; 22 bobbles, 139 sc
Row 29: CSDC in first st, dc in same st, dc in next 22 sts, *2 dc in next st, dc in next 22 sts, repeat from * to end, turn – 168 dc
Row 30: CSDC in first st, dc in same st, dc in next 23 sts, *2 dc in next st, dc in next 23 sts, repeat from * to end, turn – 175 dc
Row 31: CSDC in first st, dc in same st, dc in next 24 sts, *2 dc in next st, dc in next 24 sts, repeat from * to end, turn – 182 dc
Row 32: CSDC in first st, dc in same st, dc in next 25 sts, *2 dc in next st, dc in next 25 sts, repeat from * to end, turn – 189 dc
Row 33: CSDC in first st, dc in same st, dc in next 26 sts, *2 dc in next st, dc in next 26 sts, repeat from * to end, turn – 196 dc
Row 34: CSDC in first st, dc in same st, dc in next 13 sts, *2 dc in next st, dc in next 13 sts, repeat from * to end, turn – 210 dc
Row 35: CSDC in first st, dc in same st, dc in next 29 sts, *2 dc in next st, dc in next 29 sts, repeat from * to end, turn – 217 dc
Row 36 (WS): Ch 1, sc in next 7 sts, bobble in next st; *sc in next 6 sts, bobble in next st; repeat from * 28 more times, sc in last 6 sts, turn – 217 sts; 30 bobbles, 187 sc
Row 37: CSDC in first st, dc in same st, dc in next 30 sts, *2 dc in next st, dc in next 30 sts, repeat from * to end, turn – 224 dc
Row 38: CSDC in first st, dc in same st, dc in next 31 sts, *2 dc in next st, dc in next 31 sts, repeat from * to end, turn – 231dc
Row 39: CSDC in first st, dc in each st, turn – 231 dc
Row 40: CSDC in first st, dc in same st, dc in next 32 sts, *2 dc in next st, dc in next 32 sts, repeat from * to end, turn – 238 dc
Row 41: CSDC in first st, dc in same st, dc in next 33 sts, *2 dc in next st, dc in next 33 sts, repeat from * to end, turn – 245 dc
Row 42 (WS): Ch 1, sc in next 7 sts, bobble in next st; *sc in next 6 sts, bobble in next st; repeat from * 32 more times, sc in last 6 sts, turn – 245 sts; 34 bobbles, 211 sc
Row 43: CSDC in first st, dc in same st, dc in next 34 sts, *2 dc in next st, dc in next 34 sts, repeat from * to end, turn – 252 dc
Row 44: Rotate to work along top of shawl, ch 1, evenly sc across top by working in the side of each st, fasten off.
SEA:
Row 1: With Color B, attach yarn to RS of Sand with ch 1, *sc in next 13 sts, add bead, sc in next st of Row 42; repeat from * 16 more times, sc in last 14 sts, turn – 252 sc
Row 2: Place M in 144th st of Row 1, ch 1, sc in each st until M, remove M, ch 161, turn – 304 sts

Row 3 (WS): Ch 4 (counts as tr here and throughout), 4 tr in the 5th st from hook, *tr in next st, [sk next st, tr in next st] 8 times, Shell in next 2 sts; repeat from * 6 more times, tr in next st, [sk next st, tr in next st] 8 times, Shell in next st, tr in next st, dc in next 3 sts, hdc in next 3 sts, sc in next 2 sts, turn – 161 sts
Row 4 (RS): {9 total attached sts} Following instructions for Attaching sl st, sl st in next 9 sts; [add bead, FPsc around next st] 5 times, FPsc around next 9 sts, *[add bead, FPsc around next st] 10 times, FPsc around next 9 sts; repeat from * 6 more times, [add bead, FPsc around next st] 4 times, add bead, sc in last st, turn – 161 sts
Row 5 (WS): {1 total attached st} Ch 4, 4 tr in first st, *working in unworked sts of 2 rows below, tr in next st, [sk next st, tr in next st] 8 times, Shell in next 2 sts; repeat from * 6 more times, tr in next st, [sk next st, tr in next st] 8 times, tr in next st, working in the side of last tr made, 3 sc, sl st to join to Row 1, turn – 148 tr, 3 sc
Row 6: {3 total attached sts} Following instructions for Attaching sl st, sl st in first 2 sts, following instructions for Attaching hdc, hdc in next st; FPsc around each st until one st remains, sc in last st, turn – 148 FPsc
Row 7 (WS): {1 total attached st} Ch 5 (counts as dtr here and throughout), 4 dtr in first st, *working in unworked sts of 2 rows below, dtr in next st, [sk next st, dtr in next st] 8 times, T-Shell in next 2 sts; repeat from * 6 more times, dtr in next st, [sk next st, dtr in next st] 4 times, sk next st, tr in next st, sk next st, dc in next st, sc in last st, sl st to join to Row 1, turn – 146 sts
Row 8: {13 total attached sts} Attaching each st, sc in first st, hdc in next 2 sts, dc in next 2 sts, hdc in next st, sc in next st, sl st in next 5 sts, add bead and attach, FPsc in next st; [add bead, FPsc around next st] 4 times, FPsc around next 9 sts, *[add bead, FPsc around next st] 10 times, FPsc around next 9 sts; repeat from * 6 more times, [add bead, FPsc around next st] 4 times, add bead, sc in last st, turn – 144 sts
Row 9 (WS): {1 total attached st} Ch 5, 4 dtr in first st, *working in unworked sts of 2 rows below, dtr in next st, [sk next st, dtr in next st] 8 times, T-Shell in next 2 sts; repeat from * 5 more times, dtr in next st, [sk next st, dtr in next st] 6 times, sk next st, tr in next st, sk next st, dc in next st, sc in last st, sl st to join to Row 1, turn – 129 sts
Row 10: {5 total attached sts} Following instructions for Attaching sl st, sl st in next 3 sts, attach and sc in next 2 sts; FPsc in each st until one st remains, sc in last st, turn – 129 sts
Row 11 (WS): Ch 4 (counts as tr here and throughout), 4 tr in first st, *working in unworked sts of 2 rows below, tr in next st, [sk next st, tr in next st] 8 times, Shell in next 2 sts; repeat from * 5 more times, tr in next st, sk next st, tr in next st, sk next st, dc in next st, sk next st, hdc in next st, sk next st, sc in last st, turn – 123 sts
Row 12: {10 total attached sts} Following instructions for Attaching sl st, sl st in next 5 sts, [add bead, sl st in next st] 5 times; [add bead, FPsc around next st] 5 times, FPsc around next 9 sts, *[add bead, FPsc around next st] 10 times, FPsc around next 9 sts; repeat from * 4 more times, [add bead, FPsc around next st] 4 times, add bead, sc in last st, turn – 124 sts
Row 13 (WS): Ch 4, 4 tr in first st, *working in unworked sts of 2 rows below, tr in next st, [sk next st, tr in next st] 8 times, Shell in next 2 sts; repeat from * 4 more times, tr in next st, [sk next st, tr in next st] 8 times, 2 tr in next st, working in the side of last tr made, 3 sc, turn – 125 tr, 3 sc
Row 14: {3 total attached sts} Following instructions for Attaching sl st, sl st in next 3 sts (the sc worked in the side of last tr made); sc in next st, FPsc in each st until 1 st remains, sc in last st, turn – 114 sts
Row 15 (WS): Ch 5, 4 dtr in first st, *working in unworked sts of 2 rows below, dtr in next st, [sk next st, dtr in next st] 8 times, T-Shell in next 2 sts; repeat from * 4 more times, dtr in next st, [sk next st, dtr in next st] 7 times, working in side of last dtr made, 4 sc, turn – 108 dtr, 4 sc
Row 16: {4 total attached sts} Following instructions for Attaching sl st, sl st in next 4 sts (the sc worked in the side of last dtr made); sc in next st, FPsc around next 7 sts, [add bead, FPsc around next st] 10 times, FPsc around next 9 sts, *[add bead, FPsc around next st] 10 times, FPsc around next 9 sts; repeat from * 4 more times, [add bead, FPsc around next st] 4 times, add bead, sc in last st, turn – 114 sts
Row 17 (WS): {1 total attached st} Ch 5, 4 dtr in first st, *working in unworked sts of 2 rows below, dtr in next st, [sk next st, dtr in next st] 8 times, T-Shell in next 2 sts; repeat from * 4 more times, dtr in next st, sk next st, dtr in next st, sk next st, tr in next st, sk next st, dc in next st, sk next st, hdc in next st, sk next st, sc in last st, working through Row 16 and Row 1 (this closes a gap and attached the pieces), sl st, turn – 107 sts
Row 18: {11 total attached sts} Following instructions for Attaching sl st, sl st in next 11 sts; FPsc in each st until one st remains, sc in last st, turn – 106 sts
Row 19 (WS): Ch 4, 4 tr in first st, *working in unworked sts of 2 rows below, tr in next st, [sk next st, tr in next st] 8 times, Shell in next 2 sts; repeat from * 3 more times, tr in next st, [sk next st, tr in next st] 8 times, tr in next st, working in the side of last tr made, 3 sc, turn – 91 tr, 3 sc
Row 20: {3 total attached sts} Following instructions for Attaching sl st, [add bead, sl st in next st] 3 times (the sc worked in the side of last tr made); add bead, sc in next st, FPsc around next 9 sts, *[add bead, FPsc around next st] 10 times, FPsc around next 9 sts; repeat from * 3 more times, [add bead, FPsc around next st] 4 times, add bead, sc in last st, turn – 94 sts
Row 21 (WS): Ch 4, 4 tr in first st, *working in unworked sts of 2 rows below, tr in next st, [sk next st, tr in next st] 8 times, Shell in next 2 sts; repeat from * 3 more times, tr in next st, [sk next st, tr in next st] 7 times, working in the side of last tr made and last st, 4 sc, turn – 89 tr, 4 sc
Row 22: {5 total attached sts} Following instructions for Attaching sl st, sl st in next 5 sts; sc in first st, FPsc in each st until 1 st remains, sc in last st, turn – 95 sts
Row 23 (WS): Ch 5, 4 dtr in first st, *working in unworked sts of 2 rows below, dtr in next st, [sk next st, dtr in next st] 8 times, T-Shell in next 2 sts; repeat from * 3 more times, dtr in next st, [sk next st, dtr in next st] 3 times, sk next st, tr in next st, sk next st, dc in next st, hdc in last st, turn – 87 sts
Row 24: {1 total attached st} Following instructions for Attaching sl st, sl st in first st; FPsc around next 6 sts, *[add bead, FPsc around next st] 10 times, FPsc around next 9 sts; repeat from * 3 more times, [add bead, FPsc around next st] 4 times, add bead, sc in last st, turn – 88 sts
Row 25 (WS): Ch 5, 4 dtr in first st, *working in unworked sts of 2 rows below, dtr in next st, [sk next st, dtr in next st] 8 times, T-Shell in next 2 sts; repeat from * 3 more times, dtr in next st, sk next st, dtr in next st, sk next st, tr in next st, sk next st, dc in next st, sk next st, hdc in next st, sc in last st, turn – 87 sts
Row 26: {9 total attached sts} Following instructions for Attaching sl st, sl st in next 9 sts; sc in first st, FPsc in each st until one st remains, sc in last st, turn – 87 sts
Row 27 (WS): Ch 4, 4 tr in first st, *working in unworked sts of 2 rows below, tr in next st, [sk next st, tr in next st] 8 times, Shell in next 2 sts; repeat from * 2 more times, tr in next st, [sk next st, tr in next st] 8 times, Shell in next st, (dc, hdc) in next st, sc in last st, turn – 79 sts
Row 28: {5 total attached sts} Following instructions for Attaching sl st, [add bead, sl st in next st] 4 times, add bead and attach, FPsc around next st; [add bead, FPsc around next st] 3 times, *FPsc around next 9 sts, [add bead, FPsc around next st] 10 times, FPsc around next 9 sts; repeat from * 2 more times, [add bead, FPsc around next st] 4 times, add bead, sc in last st, turn – 79 sts
Row 29 (WS): Ch 4, 4 tr in first st, *working in unworked sts of 2 rows below, tr in next st, [sk next st, tr in next st] 8 times, Shell in next 2 sts; repeat from * 2 more times, tr in next st, [sk next st, tr in next st] 8 times, sk next st, 2tr in next st, working in the side of last tr made and last st, 4 sc, turn – 72 tr, 4 sc
Row 30: {4 total attached sts} Following instructions for Attaching sl st, sl st in next 4 sts; sc in first st, FPsc in each st until one st remains, sc in last st, turn – 76 sts
Row 31 (WS): Ch 5, 4 dtr in first st, *working in unworked sts of 2 rows below, dtr in next st, [sk next st, dtr in next st] 8 times, T-Shell in next 2 sts; repeat from * 2 more times, dtr in next st, [sk next st, dtr in next st] 5 times, sk next st, tr in next st, dc in next st, working in the side of last dc made, 2 sc, turn – 72 sts
Row 32: {3 total attached sts} Following instructions for Attaching sl st, [add bead, sl st in next st] 2 times, attach and sc in next st; FPsc around next 7 sts, *[add bead, FPsc around next st] 10 times, FPsc around next 9 sts; repeat from * 2 more times, [add bead, FPsc around next st] 4 times, add bead, sc in last st, turn – 72 sts
Row 33 (WS): Ch 5, 4 dtr in first st, *working in unworked sts of 2 rows below, dtr in next st, [sk next st, dtr in next st] 8 times, T-Shell in next 2 sts; repeat from * 2 more times, dtr in next st, [sk next st, dtr in next st] 2 times, [sk next st, dc in next st] 2 times, sk next st, sc in next st, turn – 68 sts
Row 34: {8 total attached sts} Following instructions for Attaching sl st, sl st in next 8 sts, attach and FPsc in next st; FPsc in each st until 1 st remains, sc in last st, turn – 68 sts
Row 35 (WS): {1 total attached st} Ch 4, 4 tr in first st, *working in unworked sts of 2 rows below, tr in next st, [sk next st, tr in next st] 8 times, Shell in next 2 sts; repeat from * 1 more time, tr in next st, [sk next st, tr in next st] 8 times, Shell, (tr, 2 dc) in next st, hdc in next st, sk next st, sc in next st, sl st in last st, turn – 63 sts
Row 36: {6 total attached st} Following instructions for Attaching sl st, sk sl st of previous row, [add bead, sl st in next st] 5 times, add bead and attach, sc in next st; [add bead, FPsc around next st] 4 times, *FPsc around next 9 sts, [add bead, FPsc around next st] 10 times; repeat from * 1 more time, FPsc around next 9 sts, [add bead, FPsc around next st] 4 times, add bead, sc in last st, turn – 62 sts
NOTE: IF NEEDED, continue in pattern until 2 sts remain of Row 1 to attach the last 2 rows (instructions for Row 37 and Edging). Be sure to end of a RS row of FPsc.
Row 37 (WS): {1 total attached st} Working in unworked sts of 2 rows below, ch 1, sc in first st, sc in next 2 sts, hdc in next 3 sts, dc in next 2 sts, dc3tog, dc in next 2 sts, hdc in next 2 sts, sc in next 7 sts, hdc in next 3 sts, dc in next 2 sts, dc3tog, dc in next 2 sts, hdc in next 3 sts, sc in next 6 sts, hdc in next 3 sts, dc in next 2 sts, dc3tog, dc in next 2 sts, hdc in next 4 sts, attach and hdc in last st, turn – 50 sts
EDGING
{1 total attached st} Sl st in last st of Row 1, sc in each st to end, ch 1, rotate clockwise, sc evenly along each row end until Row 2 is reached, sl st to join to bottom of Row 2, fasten off.
FINISHING
- Sew in all ends, trim excess.
- If using natural fibers, wet block to straighten the top edge and make the piece lay flat. If using acrylic, use heat to block.
Share & Worth Noting
Thank you for sharing my FREE patterns & tutorials. When you do, you support me & the blog, which makes it possible to continue sharing free content with you.
Not all content on this blog website is free, but the more you share, the more free content I will be able to share. Note that all premium content are ad free.
My crochet patterns can be used to sell handmade pieces. You are required to credit Joy of Motion/Janne Kleivset as the designer by linking back to My website: https://joyofmotioncrochet.com. You can not use my pictures when selling your handmade items. Finally, you can not resell, reprint or share any parts of my patterns as your own.

