

You’re going to love the Crochet Dickie Pattern, a great quick crochet pattern.
For me crochet dickeys reminds me of being younger, wearing these as a kid.
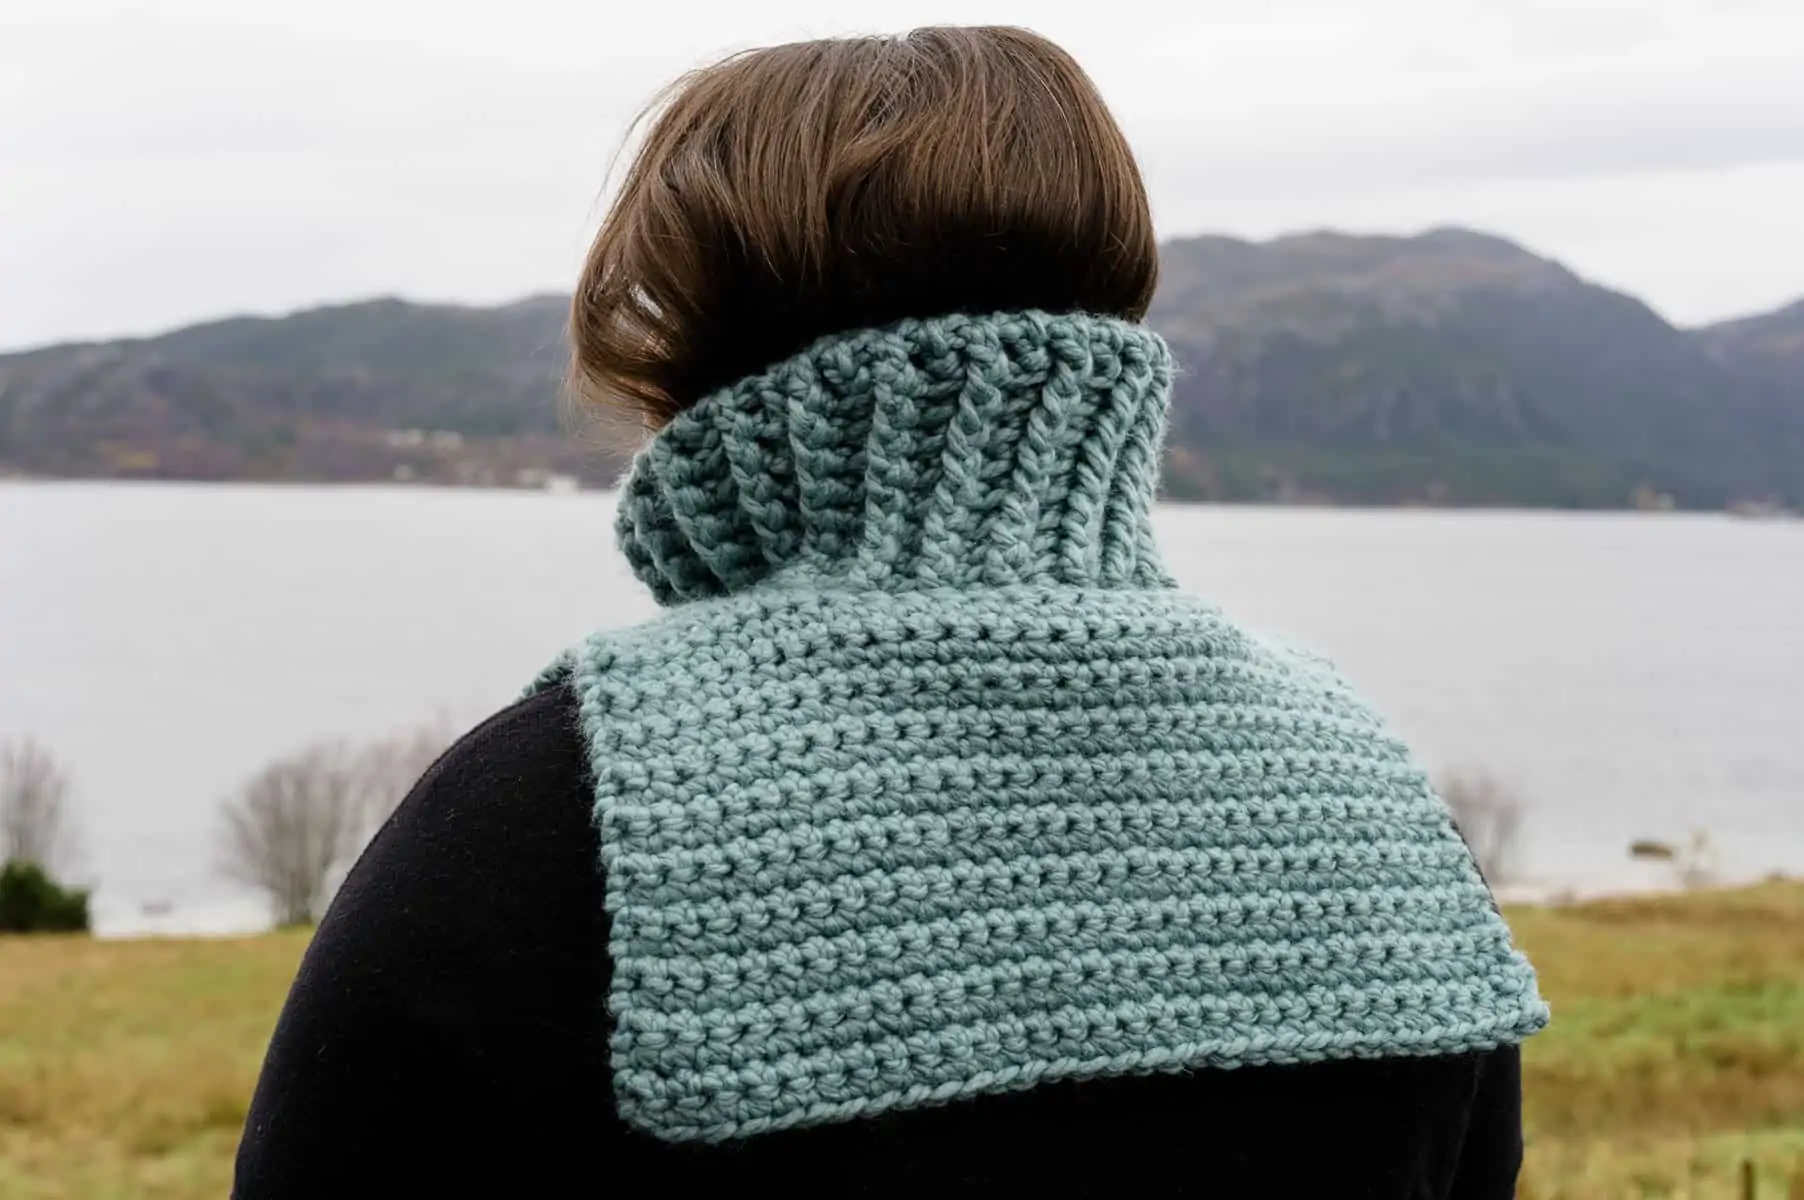
But this turtleneck dickey is just perfect inside a winter coat, so great to when you don’t want to wear a bulky sweater, but still stay warm.
Find more: 17+ Cowl crochet pattern collection.

Would you like to save this?
How to get this crochet pattern:
Option 1: Scroll down to see the FREE Crochet Pattern ⬇️
Option 2: Purchase the printable PDF:
Option 3: Get the printable version inside the crochet pattern membership.
Option 4: Most of my crochet patterns can also be found on Ravelry, Love Crafts and Etsy.
The Yarn
For the Crochet Dickie Pattern the suggested yarn is from Lion Brand Yarn. This amazing yarn is called Wool-Ease Thick & Quick & comes in a lot of beautiful colors.
The shade of color used for the crochet turtleneck cowl pictured is called Succulent.
Fall/Winter Accessories Crochet Pattern Bundle
Like this? Get the ad-free version + 19 other crochet patterns with the “Fall/Winter Accessories Crochet Pattern Bundle”.
Learn more about the Fall/Winter Accessories Pattern Bundle
THE PRACTICAL DICKEY
If you like wearing a crochet scarf or neck warmers, but you do want something more practical, this crochet dickie pattern is just perfect for that.
Just pull it over your head & wear effortlessly under your jacket. Perfect for your cold weather outdoor outfit.
Since you like the crochet dickie pattern, these might interest you too?

Love this pattern? Save on Pinterest!

How Long Does It Take To Crochet That?
How long it takes to crochet something varies depending on your skill & how fast you crochet. But that isn’t a helpful answer is it?
Well, I’ve developed a yarn calculator to help you get the answer to this question.
It will help you calculate exactly how much time you’ll spend crocheting a project.
All you need to know is how much yarn you will use on the project in either meters, yards or skeins. Then crochet your test square & time it.
Calculate how long it takes to crochet that.
Buy the Crochet Dickie Pattern
Get the downloadable PDF crochet pattern for this crochet pattern, or join the Crochet Everyday Bliss Membership and get access to download ALL crochet patterns and more
CROCHET DICKIE PATTERN – THE FREE CROCHET PATTERN
About The Pattern
The Crochet Dickie Pattern is the perfect neck warmer pattern for winter. Wear it under your coat or jacket for perfect warmth. With the great turtleneck, that looks like knitting, fitting closely to your neck.
Easy crochet dickey pattern, using super bulky yarn.

Project Level
WHAT’S YOUR CROCHET SKILL LEVEL?
Take the Quiz
Get helpful tips for your next crochet project & increase your skills!
Materials Needed
Crochet Hook
Yarn
Yarn used:
Lion Brand Yarn – Thick & Quick in color Succulent.
Yarn amount used:
2 skeins / 332 g / 194 m / 212 yards
Yarn characteristics:
- 6 Super Bulky Yarn
- 80 % Acrylic, 20 & Wool
Other Materials Needed
- Needle, find one here (if you don’t already have one)!
- Scissors
Gauge
Measured with over single crochet, crocheted in rows:
9 stitches & 10 rows per 10 cm / 4”.
Notes
- This crochet pattern is written in US terminology.
- All measurements given are unblocked.
- Note that measurements are given as exact as possible. But crochet tension & technique might give variations in the result, that changes from person to person.
- Read pattern instructions carefully before beginning to make sure you understand everything. It might save you hours frogging your work & crocheting it again!
- Make a swatch that measure at least 10 x 10 cm / 4 x 4 inches using the stitch the gauge is given for. If your swatch matches the gauge, you’re good to go. If the gauge is wrong, you might need to change your hook. Go up in crochet hook size if your stitches are smaller & go down in crochet hook size if your stitches are bigger. Learn more about testing gauge.
- Check yarn info if you want to find an alternative or test your yarn against the gauge. Learn more about substituting yarn.
- This pattern is written for 1 size, however size adjustments are suggested under the heading “Size & Measurements”.
- At the end of each row, the stitch count is given in parenthesis.
Size & Measurements
Turtleneck height: 15 cm / 5.9 inches
Turtleneck width: 24 cm / 9.5 inches
Width main part: 37 cm / 14.6 inches
Height main part: 21 cm / 8.3 inches
Size Adjustments
- Want to make the right size for you, adjust like this:
- Start with more/less stitches on first round to adjust size, 2 stitches at a time.
- Work more/less rows on front and back to adjust size.
Abbreviations
- beg = beginning
- BPdc = back post double crochet
- ch = chain (s)
- dc = double crochet
- FPdc = front post double crochet
- FSC = foundation single crochet
- sc = single crochet
- sl st = slip stitch
- St = stitch (es)
We try our best to include all crochet abbreviations in the list above for the crochet pattern, but sometimes we may forget one or two.
Learn more about crochet abbreviations & find a complete list on our Crochet Abbreviations & Terms post.
Stitches You Will Need
Foundation Single Crochet (FSC)
Written description:
Step 1: Ch 2 st.
Step 2: Insert hook into 2nd ch from hook, pull up a loop. Yo and pull through first loop (making “chain”). Yo and pull through both loops on hook.
Step 3: Insert hook into prev “chain” you made (It should look like you go through a resemblance of a “normal” st, with 2 strands of yarn), pull up a loop, yo and pull through first loop (making “chain”). Yo and pull through both loops on hook. Repeat step 3 until you’ve made enough stitches.
*2nd ch in step 1 makes 1 st, step 2 makes 1 st & every time step 3 is repeated you make 1 st.
Front Post Double Crochet (FPdc)
Yo, insert your hook from front to back between the prev st & the st you’re working, & bring it to the front again between the st you’re working & the next st, yo & pull up a loop, you have 3 loops on the hook, yo & pull through 2 loops, yo and pull through the 2 last loops.
Back Post Double Crochet (BPdc)
Yo, insert your hook from back to front between the previous stitch & the stitch you’re working, & bring it to the back again between the stitch you’re working & the next stitch, yo & pull up a loop, you have 3 loops on the hook, yo & pull through 2 loops, yarn over and pull through the 2 last loops.
Tutorial: Front & back post double crochet stitch.

Crochet Dickie Pattern Instructions
NECK RIBBING:
FSC 38 st, sl st in 1st FSC made to form ring.
Round 1: Ch 2 (counts as 1st st), dc 1 in each st, sl st in top ch from beg of round (=38 st).
Round 2: Ch 2 (counts as 1st st), FPdc in next st, *BPdc 1 around next st, FPdc 1 around next st*, repeat from *to* until end of round, sl st in top ch from beg of round (=38 st).
Round 3-9: Repeat round 2.
Front
Continue directly from where you left of on neck ribbing, without fastening off.
Row 1-2 / Setup row(s): Ch 7, turn, sc in 2nd ch from hook, sc 1 in the next 5 ch, sc 1 in 19 st along neck ribbing, ch 7, turn, sc 1 in 2nd ch from hook, sc 1 in the next 5 ch, sc 1 in the 25 st until end of row (=you will now have 1 row of 31 stitches to work back & forth on front).
Row 3: Sc directly in 1st st (no ch), sc 1 in each st across, turn (=31 st).
Row 4- 21: Repeat row 3.
Fasten off & cut yarn.
Back:
Worked on back of chains from setup row(s) on front and along the remaining 19 stitches from neck ribbing.
Row 1: Make slipknot, sc 1 in 6 ch from setup row(s), sc 1 in 19 remaining st along neck ribbing, sc 1 in 6 ch from setup row(s), turn (=31 st).
Row 2: Sc directly in 1st st (no ch), sc 1 in each st across, turn (=31 st).
Row 3- 21: Repeat row 2.
Fasten off & cut yarn.
Finishing
Fasten threads & weave in ends.

