

I have always been inspired by crochets ability to use such simple shapes and lines to create something that looks much more complex looking.
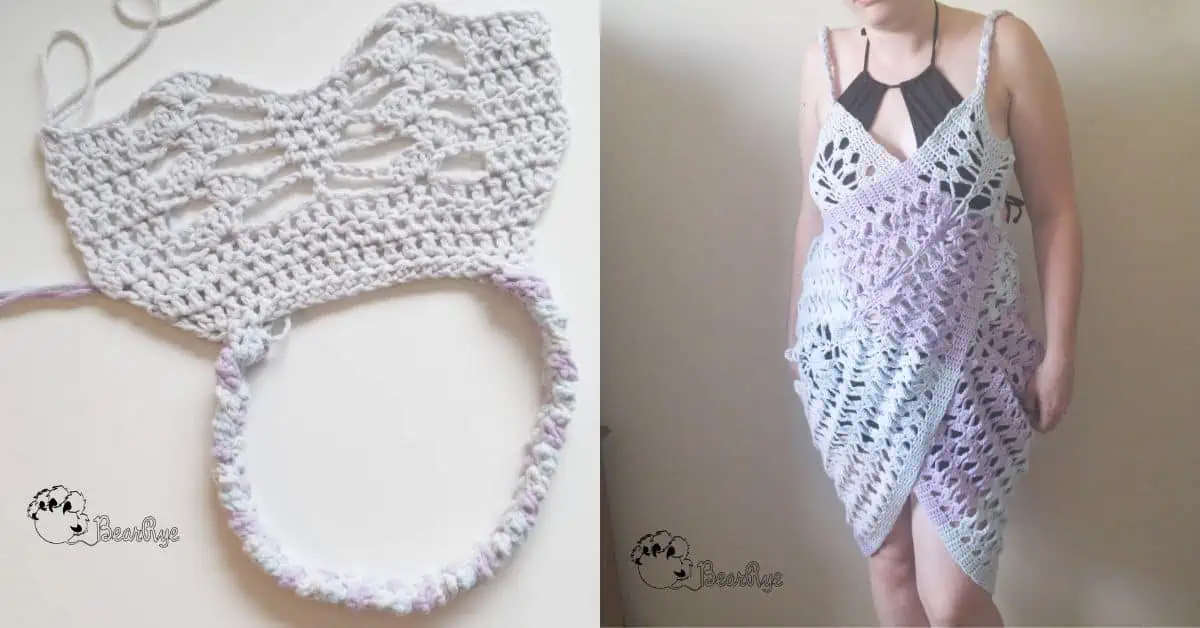
This simple shape still took much longer to reach the image I had in my own head, and it just needed to be perfect. With that in mind I would like you all to welcome the ‘It’s a Wrap!’ Summer Wrap Dress.
Find more: 8+ Women’s Dress Crochet Pattern Collection.
Would you like to save this?
The Yarn
When I saw Lion Brands Feels Like Butta in Michael’s as part of their baby collection I could not resist the feel of it! The colours just spoke to me and I knew I needed to make something more than a baby blanket from this unbelievably soft fibre.
The colours I chose for this pattern were Ice, Pale Grey and Lilac.

THE PERFECT BEACH COVERUP
I love the shape of this garment because it is so easy to wear. It works perfectly as a swimsuit coverup as there is none of that hassle of trying to pull something over top of your wet swim suit. This dress is not only practical but gorgeous in its complex looking lacework.
Don’t want to wear it at the beach? It can also be worn with a spaghetti strap tank and shorts for a simple summer evening look. The open work allows the dress to breathe and be the perfect alternative for a cardigan on those breezy spring/ summer nights. The use of the straps also allow you to wear the wrap in multiple ways.
Since you like the It’s a Wrap! Summer Wrap Dress, these might interest you too?

Find even more Summer Crochet Dresses and Tunics here.

How Long Does It Take To Crochet That?
How long it takes to crochet something varies depending on your skill & how fast you crochet. But that isn’t a helpful answer is it?
Well, I’ve developed a yarn calculator to help you get the answer to this question.
It will help you calculate exactly how much time you’ll spend crocheting a project.
All you need to know is how much yarn you will use on the project in either meters, yards or skeins. Then crochet your test square & time it.
Calculate how long it takes to crochet that.
IT’S A WRAP – SUMMER WRAP DRESS – THE FREE CROCHET PATTERN
Pattern Options
GRAB THE PDF ON RAVELRY!
About The Pattern
The It’s a Wrap crochet dress is written as a one size fits all pattern with directions to adjust to fit to your personal sizing. If you want more sizing do not hesitate to contact me and I will work with you personally to fix that! Although the design may look a little complex once you understand the pattern repeat it is very easy to replicate and is a very fast moving project. You will have your wrap made in no time!

Project Level
WHAT’S YOUR CROCHET SKILL LEVEL?
Take the Quiz
Get helpful tips for your next crochet project & increase your skills!
Materials Needed
Crochet Hook
Yarn
Yarn used:
Lion Brand – Feels Like Butta Bonus Bundle in Ice.
Lion Brand – Feels Like Butta Bonus Bundle in Pale Grey
Lion Brand – Feels Like Butta Bonus Bundle in Lilac
Yarn amount used:
3 skeins if using 3 colours / 16 oz / 462 g / 908 m / 993 yards
Yarn characteristics:
- 4 medium yarn.
- 100% polyester
Other Materials Needed
- Needle, find one here (if you don’t already have one)!
Gauge
Measured with dc 5, shell stitch ch4, shell stitch crocheted in rows:
15 stitches & 7 rows per 10 cm / 4”.
Notes
- This crochet pattern is written in US terms.
- All measurements given are unblocked.
- Note that measurements are given as exact as possible. But crochet tension & technique might give variations in the result, that changes from person to person.
- Read pattern instructions carefully before beginning to make sure you understand everything. It might save you hours frogging your work & crocheting it again!
- Make a swatch that measure at least 10 x 10 cm / 4 x 4 inches using the stitch the gauge is given for. If your swatch matches the gauge, you’re good to go. If the gauge is wrong, you might need to change your hook. Go up in crochet hook size if your stitches are smaller & go down in crochet hook size if your stitches are bigger. Learn more about testing gauge.
- Check yarn info if you want to find an alternative or test your yarn against the gauge. Learn more about substituting yarn.
- This pattern is written for 1 size, however size adjustments are suggested and personal help can be given.
- At the end of each row, the stitch count is given in parenthesis.
Size & Measurements
One-size.
Abbreviations
- ch = chain(s)
- dc = Double Crochet
- hdc = half double crochet
- sc = single crochet
- sl st = slip stitch
- st = stitch (es)
We try our best to include all crochet abbreviations in the list above for the crochet pattern, but sometimes we may forget one or two.
Learn more about crochet abbreviations & find a complete list on our Crochet Abbreviations & Terms post.
Stitches You Will Need
Shell stitch= 5dc in same space.

Summer Wrap Dress Pattern Instructions
- Ch spaces: All chains apart from turning chain will coincide with skipping the equivalent number of stitches underneath (unless otherwise noted).
- Row Stitch count: does not include chain space count.
- [ ] : Denotes start of center triangle motif
- Colour changes: To get the same effect I did you will want to change your colours every 2 triangle motifs (every 14 rows).
- Sizing: This pattern is written as a one size fits all, but can be easily formatted for larger sizes. Instead of starting with a ch 21 you will want to start with a chain length of your underarm to get a snug fit (take a look at any tank top or spaghetti strap, this will be the length between the front and back of the strap).
- Pattern help: I am available to help with patterns on either Instagram @bearrye, or via email: claire@bearrye.com
Straps
To make your straps you will need to make 2 strips in each of your chosen colours (this will give you 6 strips in total) in the following manner;
Ch 61, turn, sc in each st across. Cast off leaving long tail.
Put these aside, you will not be needing them until the end.
Main Body
Ch 21 using colour A, turn, dc in each st along. Ch 2, turn (20sts).
Row 2: Dc in every stitch along, dc 2 in both the first and last st of the row. Ch2, turn (22sts).
Row 3: Repeat row 2. (24sts).
Row 4: 2Dc in first st, dc in next 3 sts. Sk next 2 sts, shell st, [ch 4, dc in next st. Ch 4], shell st, ch 2, dc to end, finishing with 2dc in final stitch. Ch2. Turn. (21 sts).
Row 5: Dc in first 5 sts. Sk ch2 space, shell st, [ch4, dc once in each of the ch 4 spaces’, ch4], shell st, ch 2, dc in last 5 sts. Ch2, Turn. (22sts).
Row 6: Dc in first 5 sts. Sk ch2 space, shell st, [ch4, dc in ch4 space, dc between 2 dc in previous row, dc in ch 4 space, ch4], shell st, ch 2, dc in last 5 sts. Ch2, Turn. (23sts).
Row 7: Dc in first 5 sts. Sk ch2 space, shell st, [ch4, dc in ch4 space, dc between each of the dc in previous row, dc in ch 4 space, ch4], shell st, ch 2, dc in last 5 sts. Ch2, Turn. (24sts).
Row 8: Dc in first 5 sts. Sk ch2 space, shell st, [ch4, dc in ch4 space, dc between each of the dc in previous row, dc in ch 4 space, ch4], shell st, ch 2, dc in last 5 sts. Ch2, Turn. (25sts).
Row 9: Dc in first 5 sts. Sk ch2 space, shell st, [ch4, dc in ch4 space, dc between each of the dc in previous row, dc in ch 4 space, ch4], shell st, ch 2, dc in last 5 sts. Ch2, Turn. (26sts).
Row 10: Dc in first 5 sts. Sk ch2 space, shell st, [ch4, dc in ch4 space, dc between each of the dc in previous row, dc in ch 4 space, ch4], shell st, ch 2, dc in last 5 sts. Ch2, Turn. (27sts).
Row 11: Dc in first 5 sts. Sk ch2 space, *shell st, ch4* Repeat until triangle motif, shell st (this will be in the first st of the last row of our triangle motif), [ch 4, sk 2 sts, dc, ch4 sk 2 sts], shell st in last st of triangle motif *shell, ch4* Repeat until last 5 dc, ch 2, dc in last 5 sts. Ch2, Turn. (31sts).
Row 12: Dc in first 5 sts. Sk ch2 space, *shell st, ch4* Repeat until triangle motif, [ch4, dc once in each of the ch 4 spaces’, ch4], *shell, ch4* Repeat until last 5 dc, ch 2, dc in last 5 sts. Ch2, Turn. (32sts).
Row 13: Dc in first 5 sts. Sk ch2 space, shell st, ch4* Repeat until triangle motif, [ch4, dc in ch4 space, dc between each of the dc in previous row, dc in ch 4 space, ch4], *shell, ch4* Repeat until last 5 dc, ch 2, dc in last 5 sts. Ch2, Turn. (33sts).
Row 14: Dc in first 5 sts. Sk ch2 space, shell st, ch4* Repeat until triangle motif [ch4, dc in ch4 space, dc between each of the dc in previous row, dc in ch 4 space, ch4], *shell, ch4* Repeat until last 5 dc, ch 2, dc in last 5 sts. Ch2, Turn. (34sts).
Row 15: Dc in first 5 sts. Sk ch2 space, shell st, ch4* Repeat until triangle motif [ch4, dc in ch4 space, dc between each of the dc in previous row, dc in ch 4 space, ch4], *shell, ch4* Repeat until last 5 dc, ch 2, dc in last 5 sts. Ch2, Turn. (35sts).
Row 16: Dc in first 5 sts. Sk ch2 space, shell st, ch4* Repeat until triangle motif [ch4, dc in ch4 space, dc between each of the dc in previous row, dc in ch 4 space, ch4], *shell, ch4* Repeat until last 5 dc, ch 2, dc in last 5 sts. Ch2, Turn. (36sts).
Row 17: Dc in first 5 sts. Sk ch2 space, shell st, ch4* Repeat until triangle motif [ch4, dc in ch4 space, dc between each of the dc in previous row, dc in ch 4 space, ch4], *shell, ch4* Repeat until last 5 dc, ch 2, dc in last 5 sts. Ch2, Turn. (37sts).
Row 18: Dc in first 5 sts. Sk ch2 space, shell st, ch4* Repeat until triangle motif [ch4, dc in ch4 space, dc between each of the dc in previous row, dc in ch 4 space, ch4], *shell, ch4* Repeat until last 5 dc, ch 2, dc in last 5 sts. Ch2, Turn. (38sts).
Cast off, Join Colour B.
To make increase rows shell stitch in every shell st from the previous row.
Row 19: Repeat Row 11.
Row 20-32: Repeat rows 12-18.
Cast off, Join Colour C.
Row 33-46: Repeat rows 11-18.
STOP INCREASING.
To build the length of the piece to ensure wrap you will need to repeat the following rows for as many times necessary until the wrap reaches your hip (when wrapping from the back).
Row 47-75 (or as many times needed for length): Repeat rows 11-18. Leaving out increases. To do this in row 11 repeat do not shell stitch in first and last st of center triangle. Instead replace the two ch4 of center motif with ch7.
START DECREASE.
Row 76: Dc in first 5 sts. Sk ch2 space, shell st, *ch4, shell st*. Repeat, leaving last shell before triangle motif. Ch4, slst in first dc of shell. [ch 4, sk 2 sts, dc, ch4 sk 2 sts], ch 4, slst in first dc of shell, *ch4, shell st*, Repeat to last 5sts. Ch 2, dc across. Ch2, Turn.
Row 77: Dc in first 5 sts. Sk ch2 space, shell st, *ch4, shell st*. Repeat to triangle motif [ch4, dc in ch4 space, dc between each of the dc in previous row, dc in ch 4 space, ch4], *ch4, shell st*, Repeat to last 5sts. Ch 2, dc across. Ch2, Turn.
Row 78-89: Repeat row 77.
Row 90: Repeat rows 76-89 for a total of 5 times. (Until only 1 shell stitch remains on the sides of the triangle motif).
Finishing
Row 1: Dc2tog, dc 22 across, leaving the last 2 sts, dc2tog. Ch2, turn. (24sts)
Row 2: Dc2tog, dc until last 2 sts, dc2tog. Ch2, turn. (22sts).
Row 3: Dc2tog, dc until last 2sts, dc2tog. Ch2, turn. (20sts). Cast off.
Fasten off & cut yarn.
Finishing
Now to add your straps grab the 6 strips you made at the beginning of the project. Using one of each colour attach to final row. Attach by slip stitching to join one of each colour in the first 3 sts on the final row. Once attached braid your three strands (just as you would braid your hair).
When you reach the end, slip stitch to join the other end of your braid in each of the last stitches of the final row.
Repeat this procedure on the other end of your project to add the second strap.
Share & Worth Noting
Thank you for sharing my FREE patterns & tutorials. When you do, you support me & the blog, which makes it possible to continue sharing free content with you.
Not all content on this blog website is free, but the more you share, the more free content I will be able to share. Note that all premium content are ad free.
My crochet patterns can be used to sell handmade pieces. You are required to credit Joy of Motion/Janne Kleivset as the designer by linking back to My website: https://joyofmotioncrochet.com. You can not use my pictures when selling your handmade items. Finally, you can not resell, reprint or share any parts of my patterns as your own.

