
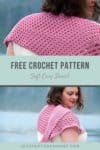
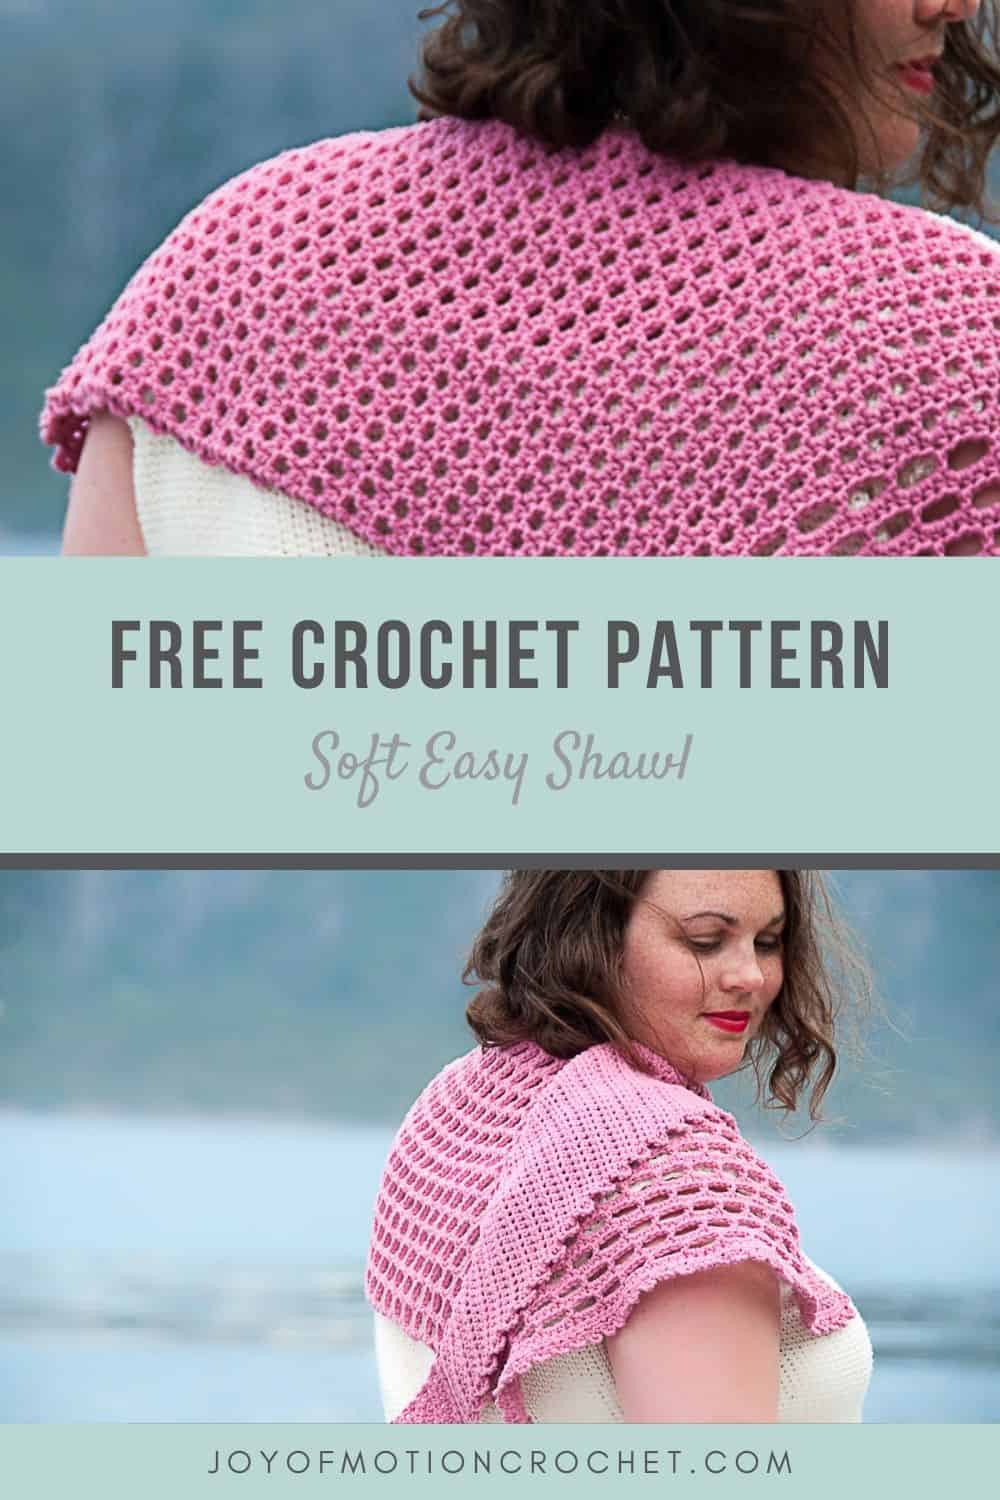
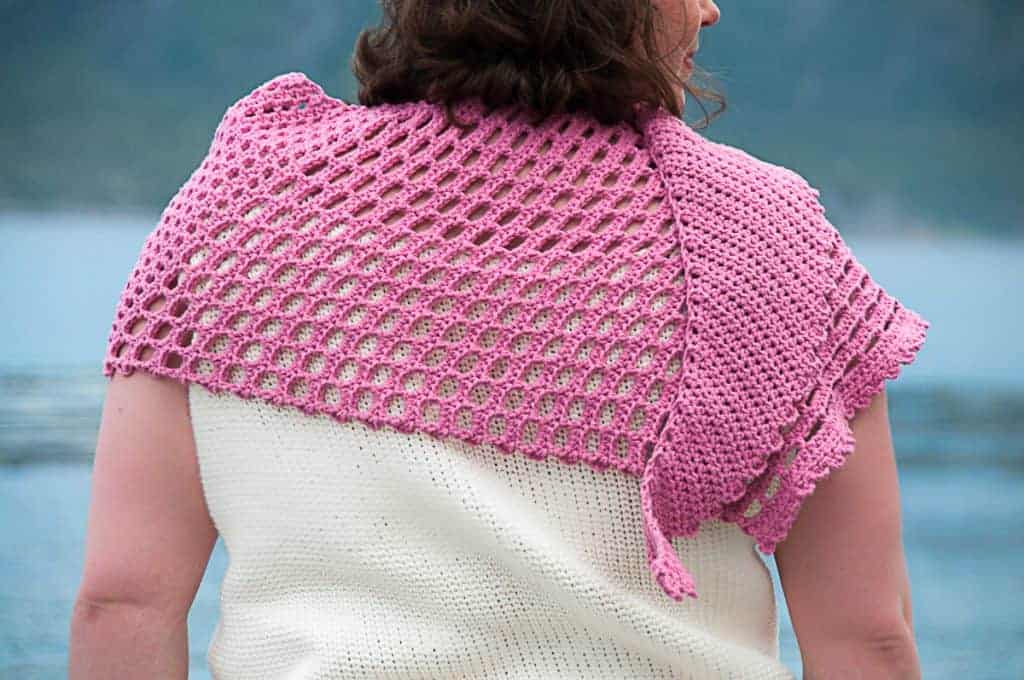
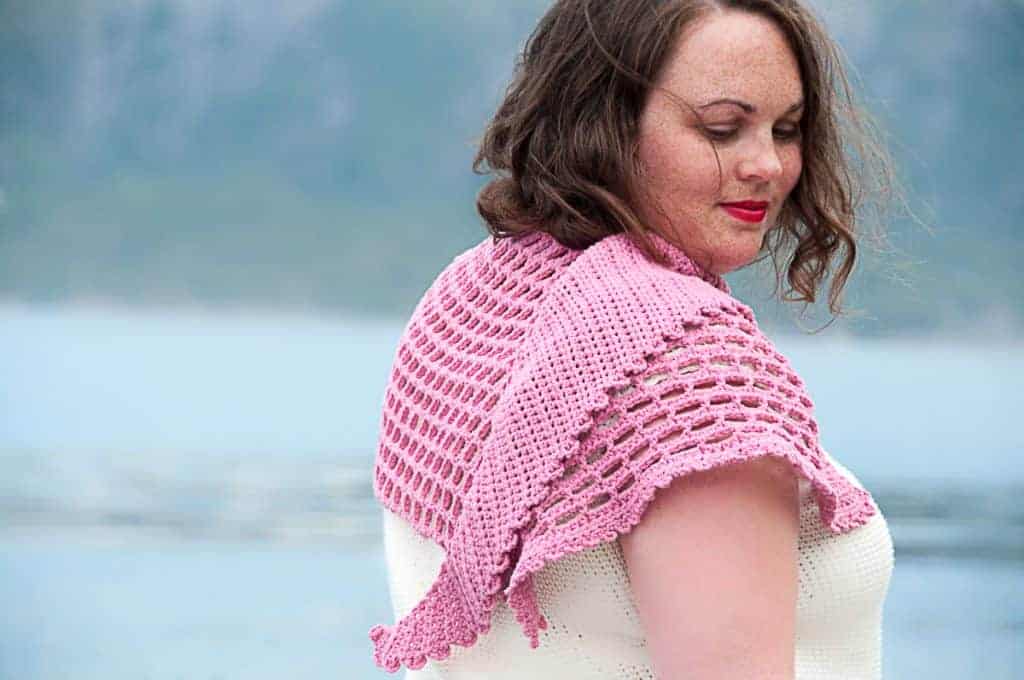
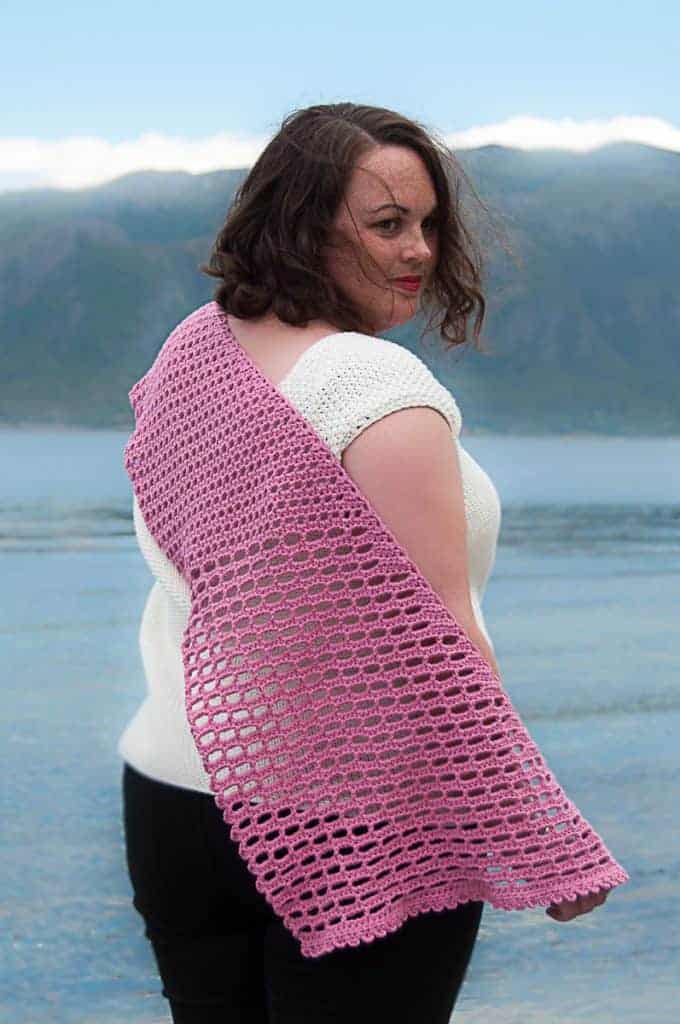
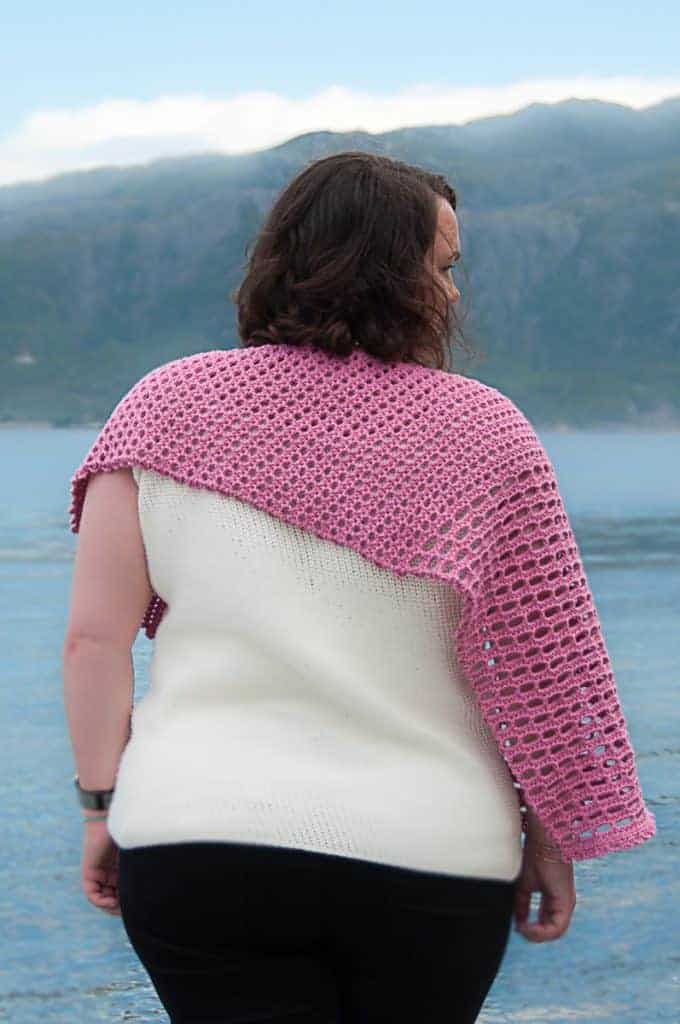
You’re going to love this crochet pattern for the Lace Crochet Shawl. It’s a great summer crochet pattern that works up quickly.
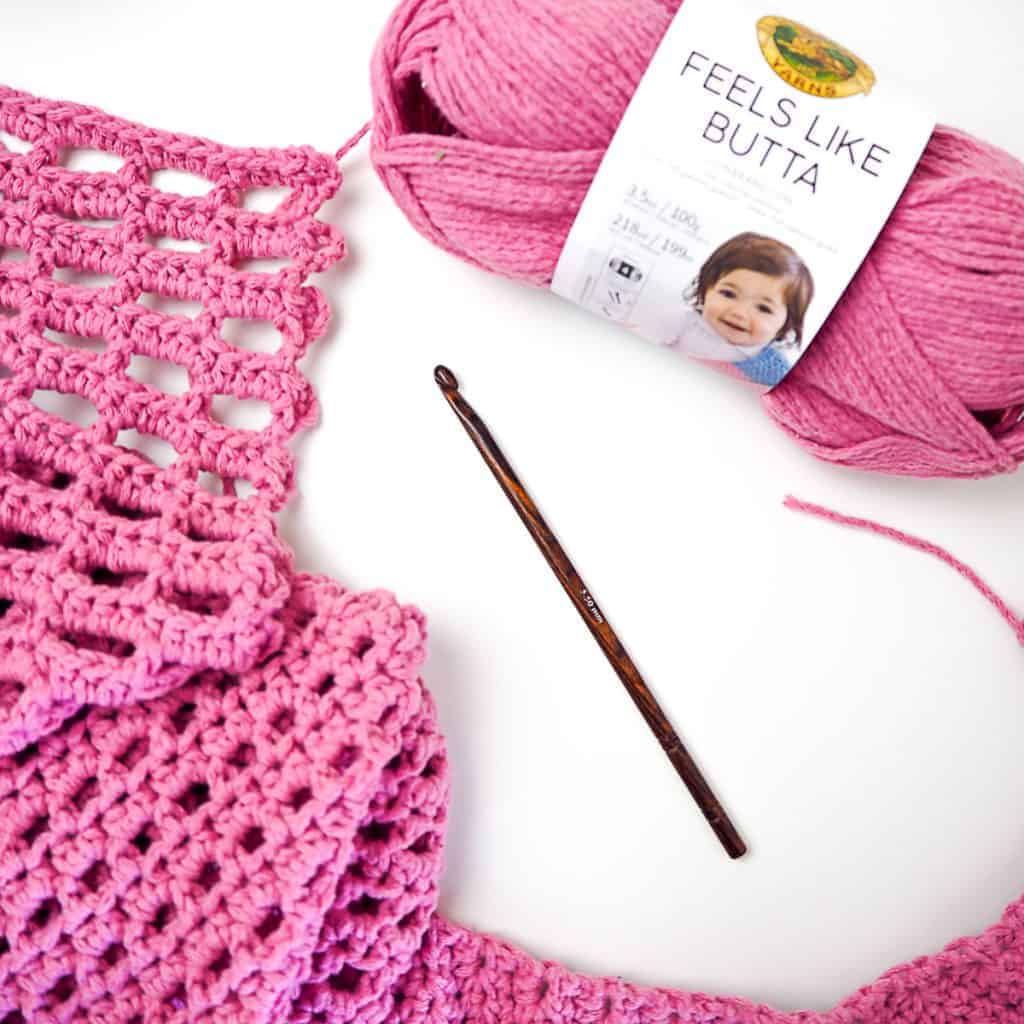
You’re going to need a couple of skeins of Lion Brand Yarns amazing yarn called Feels Like Butta & that’s the secret behind how soft this shawl is going to turn out.
The Lace Crochet Shawl isn’t going to take long to crochet & the final result is going to be amazing!
When to wear it? During summer when you’re a bit cold or during early fall to keep your neck warm.
Enjoy this free crochet pattern.
Find more: 32+ Shawl Crochet Pattern Collection.

Would you like to save this?
How to get this crochet pattern:
Option 1: Scroll down to see the FREE Crochet Pattern ⬇️
Option 2: Purchase the printable PDF:
Option 3: Get the printable version inside the crochet pattern membership.
Option 4: Most of my crochet patterns can also be found on Ravelry, Love Crafts and Etsy.
The Yarn
For the this lace crochet shawl the suggested yarn is Feels Like Butta from Lion Brand Yarn. It’s absolutely the softest yarn I’ve ever tried & will definitely use again.
It comes in 18 amazing colors & for the crochet shawl pictured the color Dusty Pink was used!
The yarn is 100 % polyester & that’s where the softness comes from.
I promise you, you’re going to LOVE it!
Spring/Summer Accessories Crochet Pattern Bundle
Like this? Get the ad-free version + 19 other crochet patterns with the “Spring/Summer Accessories Crochet Pattern Bundle“.
Learn more about the Spring/Summer Accessories Pattern Bundle
THE PERFECT SUMMER & FALL CROCHET PROJECT
YES, this soft & easy lace crochet shawl is perfect for summer, but as I mentioned, it’s also great piece when you transition into or from the warm weather season.
The yarn feels super soft against your skin & isn’t warm the same way as wool often feels.
That’s why I would prefer using this for projects for summer & early fall.
Another reason why you’re going to love this lace crochet shawl is because it’s a light piece to bring with you. If you get a bit cold, it’s easy to grab it from your bag & it doesn’t take much space.
The shawl is also great because of the pretty crochet stitches. You’re going to love the look & feel pretty while you wear it.
Since you like the Lace Crochet Shawl, these might interest you too?
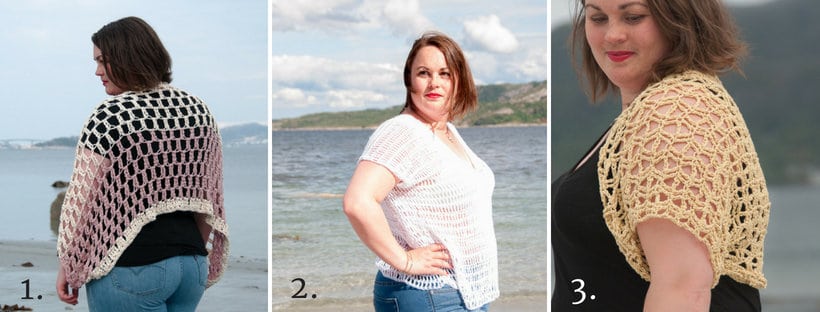
1. Airy Shrug
// 2. Caeli top
// 3. Sunny Bolero
Love this pattern? Save on Pinterest!
Buy the Lace Crochet Shawl Pattern
Get the downloadable PDF crochet pattern for this crochet pattern, or join the Crochet Everyday Bliss Membership and get access to download ALL crochet patterns and more
LACE CROCHET SHAWL – THE FREE CROCHET PATTERN
About the pattern:
The Lace Crochet Shawl is such a fun & easy crochet shawl. It’s a biased shaped shawl & it’s super fun to see how the shawl takes form as you crochet.
For this crochet pattern there’s no fancy stitches, just a combination of half double crochet stitches, chain stitches & a few slip stitches. That’s it.
Project Level
WHAT’S YOUR CROCHET SKILL LEVEL?
Take the Quiz
Get helpful tips for your next crochet project & increase your skills!
Materials Needed
- Crochet hook size 5.5 mm / US: I-9 / UK: 5
- Hook I used: Lykke Crochet Hook
- 4 Medium Yarn:
- Yarn I used: Feels Like Butta – Lion Brand Yarn
- Amount needed:
- 2 skeins / 200 g / 398 m / 436 yards
- Note: I’ve had feedback that other crocheters using the same yarn have used just a little bit more than 2 skeins.
- Needle:
- Find one here (if you don’t already have one)!
- Stitch Marker (learn more about stitch markers here)
Gauge
Measured with half double crochet stitches crocheted in rows:
14 stitches & 12 rows per 10 cm / 4 inch.
Size & Measurements:
MEASUREMENTS:
- 155 cm / 61 inches measured along the outer edge
- 55 cm / 21.6 inches measured along the final row
Size Adjustments
- Note: Any size adjustments affects yarn usage & you might need more/less yarn than suggested.
- Make shawl smaller by reducing the number of rows you make.*
- Make shawl bigger by adding extra rows in the same manner.*
*Make these adjustments at the end or between row 51 & 52 or 97 & 98.
Abbreviations
- ch = chain(s)
- ch-1-sp = refers to chain or space previously made, with 1 ch
- ch-3-sp = refers to chain or space previously made with 3 ch
- hdc = half double crochet
- PM = place stitch marker
- prev = previous
- rep = repeat
- sl st = slip stitch
- st = stitch (es)
We try our best to include all crochet abbreviations in the list above for the crochet pattern, but sometimes we may forget one or two.
Learn more about crochet abbreviations & find a complete list on our Crochet Abbreviations & Terms post.
Notes
- This crochet pattern is written in US terms.
- All measurements given are unblocked.
- Note that measurements are given as exact as possible. But crochet tension & technique might give variations in the result, that changes from person to person.
- Check yarn info if you want to find an alternative or test your yarn against the gauge (more details).
- Make a swatch that measure at least 10 x 10 cm / 4 x 4 inches using the stitch the gauge is given for. If your swatch matches the gauge, you’re good to go. If the gauge is wrong, you might need to change your hook. Go up in crochet hook size if your stitches are smaller & go down in crochet hook size if your stitches are bigger (more details).
- This pattern is written for 1 size.
- At the end of each row, the stitch count is given in parenthesis. On odd rows it includes 4 edging chains counting as 1 stitch each.
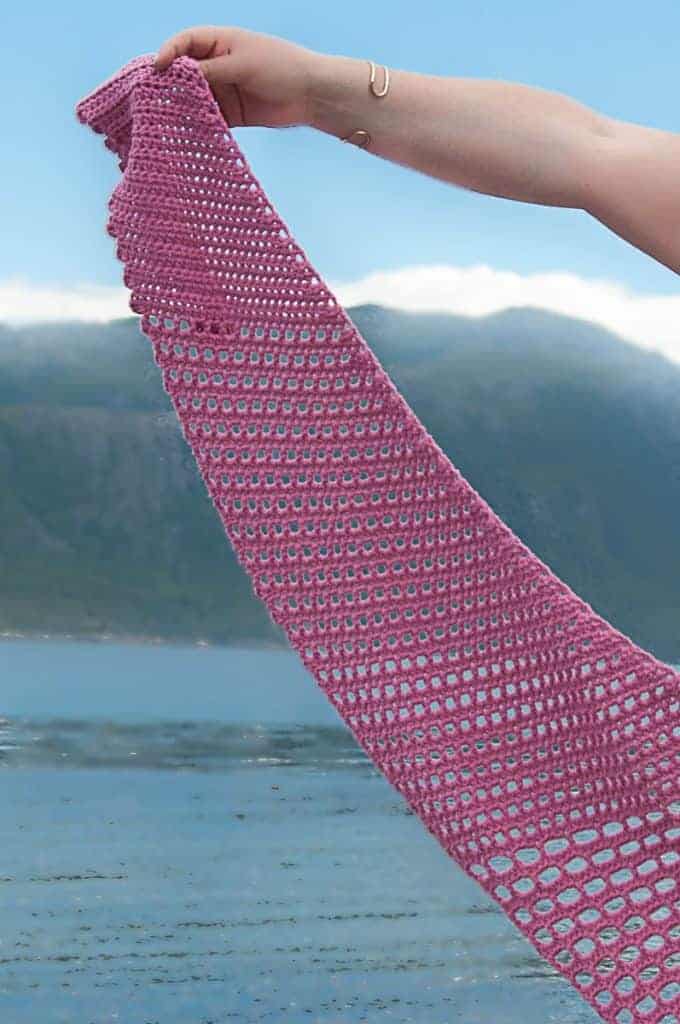
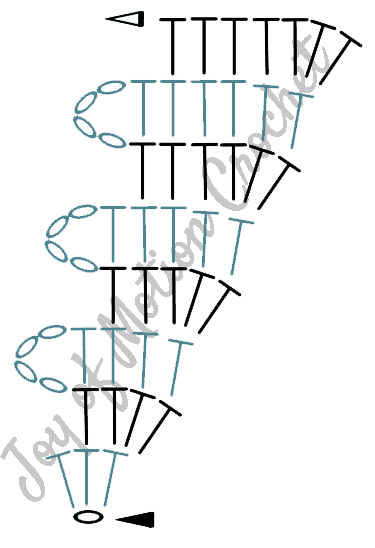
Diagram:

Lace Crochet Shawl Pattern Instructions
Crocheted from the small tip with increasing width for each row.
The stitch marker on even rows is placed to help localize the first stitch when working odd rows & can be skipped. If used, move it each time you start even rows.
Tip: A stitch marker can also be used to identify the final stitch that you will not crochet in on even rows. This can be done by placing the stitch marker in the first hdc made on each odd row.
*See video tutorial below, chart & picture tutorial further down for more details about the first few rows.
Ch 1.
Row 1: Hdc 3 in 1st ch, turn (=3 st).
Row 2: Hdc 3 directly in 1st st (no ch), PM 1 in 1st st made, hdc 1 in next st, do not crochet in last st, turn (= 4 st).
Row 3: Ch 4 (making edging), hdc 1 in each st from prev row until end of row, turn (= 8 st, 4 ch + 4 hdc).
Row 4: Hdc 3 directly in 1st st (no ch), PM 1 in 1st st made, hdc 1 in each hdc st from prev row until you have 1 hdc left, do not crochet in last hdc, turn (= 5 st).
Row 5-51: Repeat rows 3 & 4. Row 3, 24 more times. Row 4, 23 more times.
Stitch count will increase with 1 for each even row, starting with 6 stitches on row 6 & increasing to 28 stitches on row 50.
Stitch count will also increase with 1 for each odd row, starting with 9 stitches on row 5 & increasing to 32 stitches on row 51.
Row 52: Hdc 3 directly in 1st st (no ch), PM 1 in 1st st made, *ch 1 & sk 1 st, hdc 1 in next st*, repeat from *to* until you have 1 hdc left, do not crochet in last hdc, turn (=29 st).
Row 53: Ch 4 (making edging), hdc 2 in each ch-1-sp from prev row until you have 3 st left, hdc 1 in the last 3 st, turn (= 33 st, 4 ch + 29 hdc).
Row 54: Hdc 3 directly in 1st st (no ch). PM in 1st st made, hdc 1 in next st, *ch 1 & sk 1 st, hdc 1 in next st*, repeat from *to* until you have 1 hdc left, do not crochet in last hdc, turn (=30 st).
Row 55: Ch 4 (making edging), hdc 2 in each ch-1-sp from prev row until you have 4 st left, hdc 1 in the last 4 st, turn (= 34 st, 4 ch + 30 hdc).
Row 56-97: Repeat rows 52-55. Row 52, 11 more times. Row 53, 11 more times, row 54, 10 more times. Row 55, 10 more times.
Stitch count will continue increasing by 1 for each even row, starting with 31 stitches on row 56 & increasing to 51 stitches on row 96.
Stitch count will also increase by 1 for each odd row, starting with 35 stitches on row 57 & increasing to 55 stitches on row 97.
Row 98: Hdc 3 directly in 1st st (no ch). PM in 1st st made, hdc 1 in next st, *ch 3 & sk 3 st, hdc 1 in next st*, repeat from *to* until you have 1 hdc left, do not crochet in last hdc, turn (=52 st).
Row 99: Ch 4 (making edging), hdc 4 in each ch-3-sp from prev row until you have 4 st left, hdc 1 in the last 4 st, turn (= 56 st, 4 ch + 52 hdc).
Row 100: Hdc 3 directly in 1st st (no ch). PM in 1st st made, hdc 1 in next st, *ch 3 & sk 3 st, hdc 1 in next st*, repeat from *to* until you have 1 hdc left, do not crochet in last hdc, turn (=53 st).
Row 101: Ch 4 (making edging), hdc 4 in each ch-3-sp from prev row until you have 5 st left, hdc 1 in the last 5 st, turn (= 57 st, 4 ch + 53 hdc).
Row 102: Hdc 3 directly in 1st st (no ch). PM in 1st st made, hdc 1 in next 3 st, *ch 3 & sk 3 st, hdc 1 in next st*, repeat from *to* until you have 1 hdc left, do not crochet in last hdc, turn (=54 st).
Row 103: Ch 4 (making edging), hdc 4 in each ch-3-sp from prev row until you have 6 st left, hdc 1 in the last 6 st, turn (= 58 st, 4 ch + 54 hdc).
Row 104: Hdc 3 directly in 1st st (no ch). PM in 1st st made, hdc 1 in next st, *ch 3 & sk 3 st, hdc 1 in next st*, repeat from *to* until you have 1 hdc left, do not crochet in last hdc, turn (=55 st).
Row 105: Ch 4 (making edging), hdc 4 in each ch-3-sp from prev row until you have 3 st left, hdc 1 in the last 3 st, turn (= 59 st, 4 ch + 55 hdc).
Row 106-143: Repeat row 98-105 in the same order until you reach row 143. Row 98, 5 more times. Row 99, 5 more times. Row 100, 5 more times. Row 101, 5 more times. Row 102, 5 more times. Row 103, 5 more times. Row 104, 4 more times. Row 105, 4 more times.
Stitch count will also continue increasing by 1 for each even row, starting with 56 stitches on row 106 & increasing to 74 stitches on row 142.
Stitch count will continue increasing by 1 for each odd row, starting with 60 stitches on row 107 & increasing to 78 stitches on row 143.
EDGING:
Row 144: Hdc 3 directly in 1st st (no ch), PM 1 in 1st st made, hdc 1 in each hdc st from prev row until you have 1 hdc left, do not crochet in last hdc, turn (=75 st).
Row 145: Ch 4 st (making edging), sl st in 1st st, *ch 4 st, sl st in next 2 st*, repeat from *to* until you have 1 st left, ch 4 st, sl st in last st (= 227 st, 38 ch loops).
Fasten off & cut yarn.
Chart:
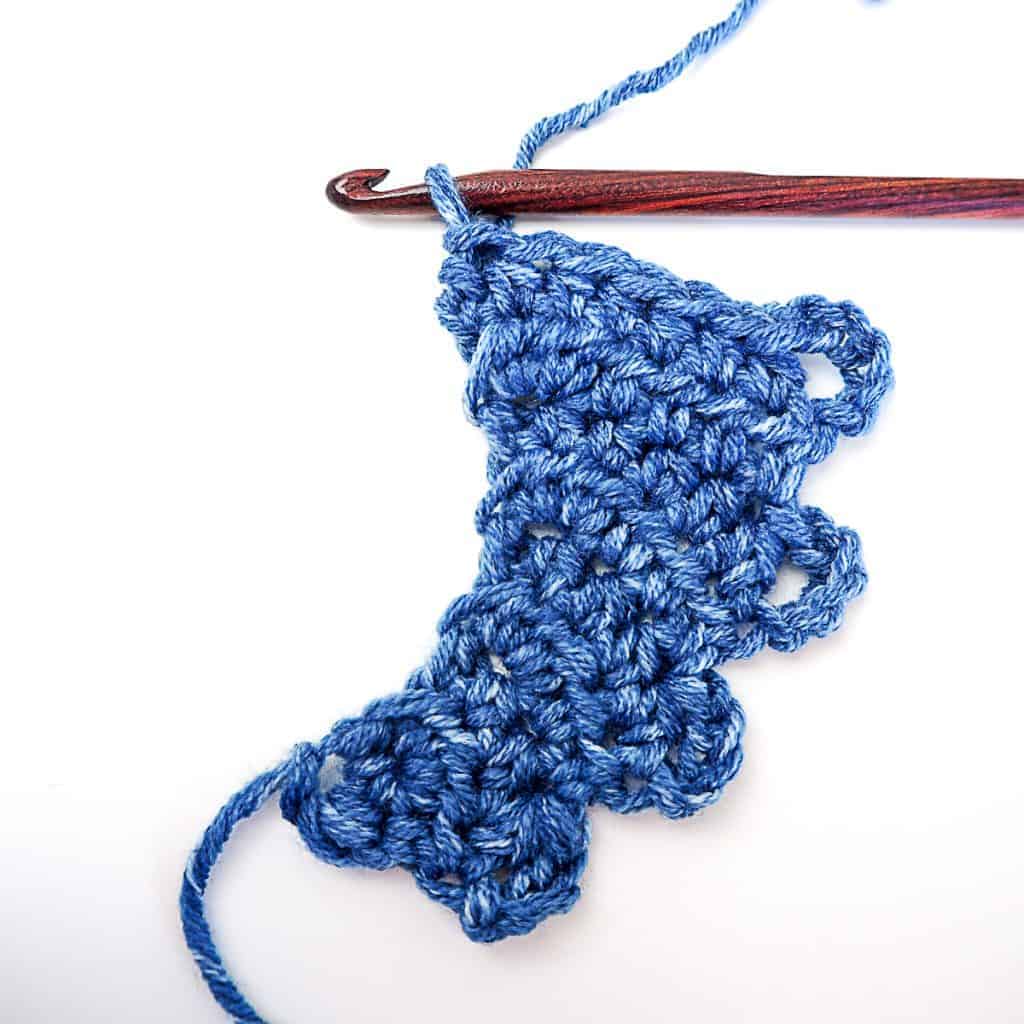
Picture Tutorial:
1. After crocheting 1 ch + 3 hdc on row 1.
2. After finishing row 2. Pink stitch marker placed in 1st st.
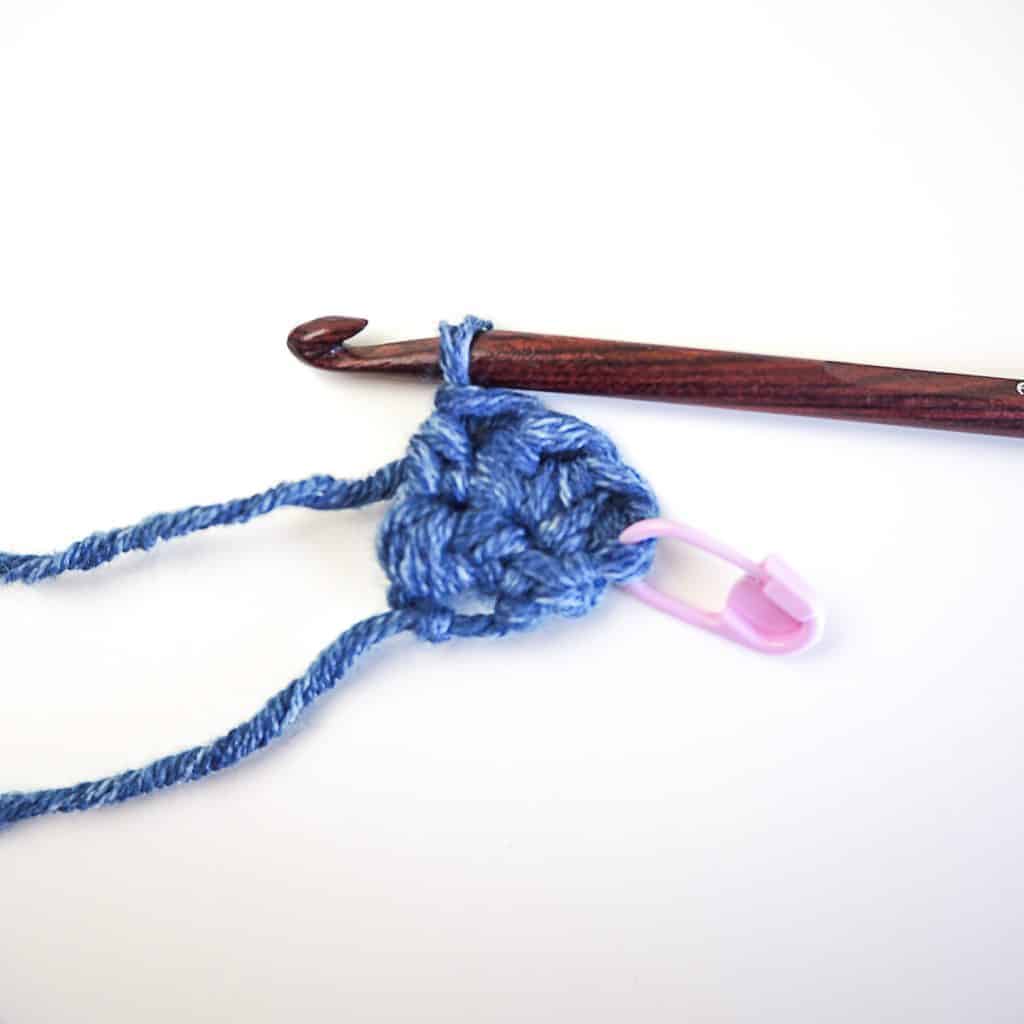
3. After finishing row 3.
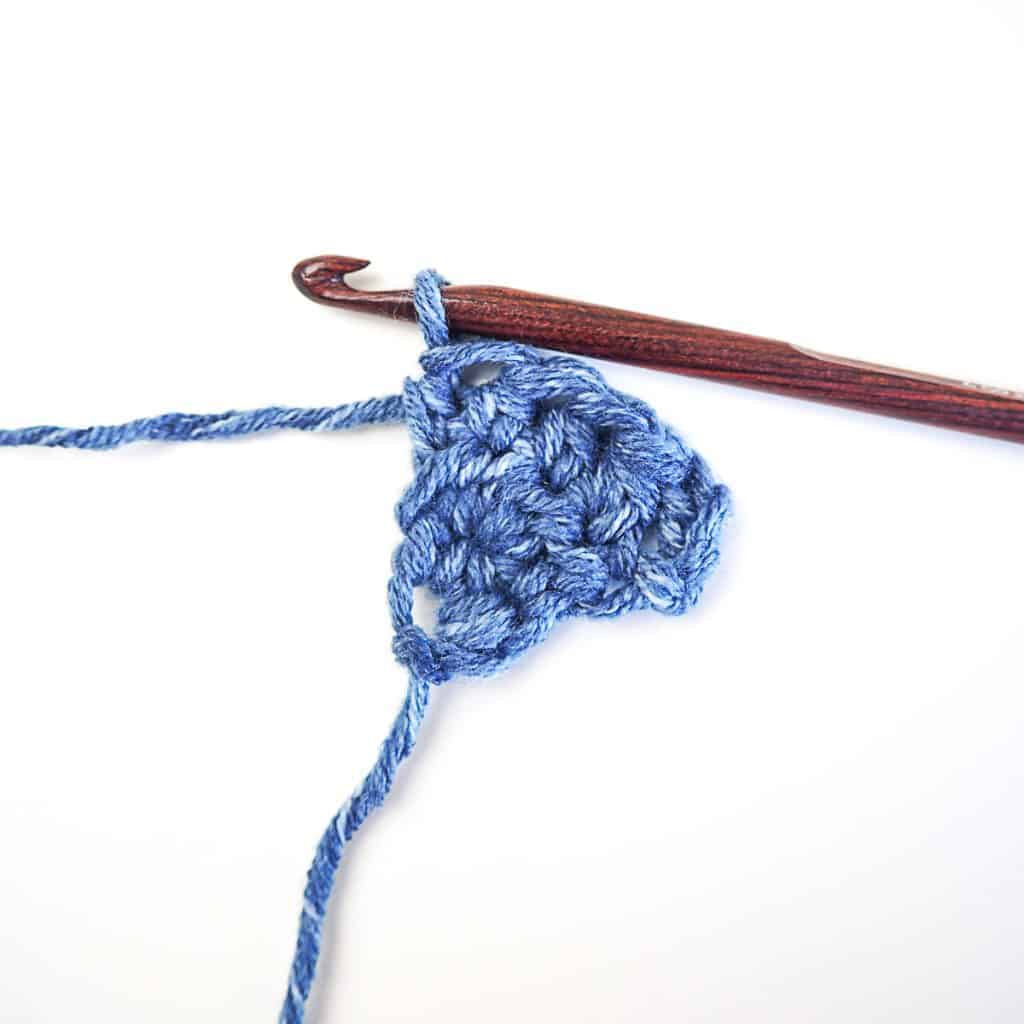
4. After finishing row 4. Pink stitch marker moved to 1st st on this row.
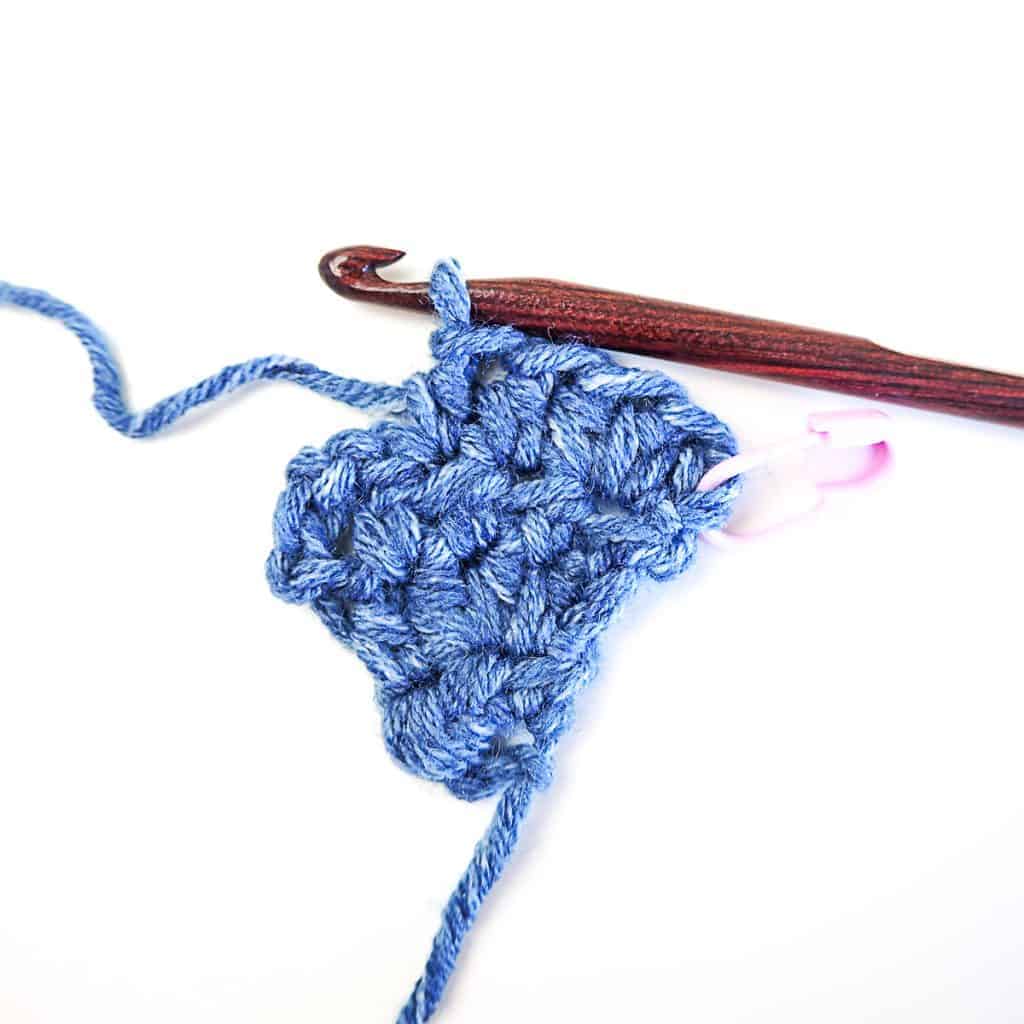
5. After finishing row 5.

6. After finishing row 6. Pink stitch marker moved to 1st st on this row.
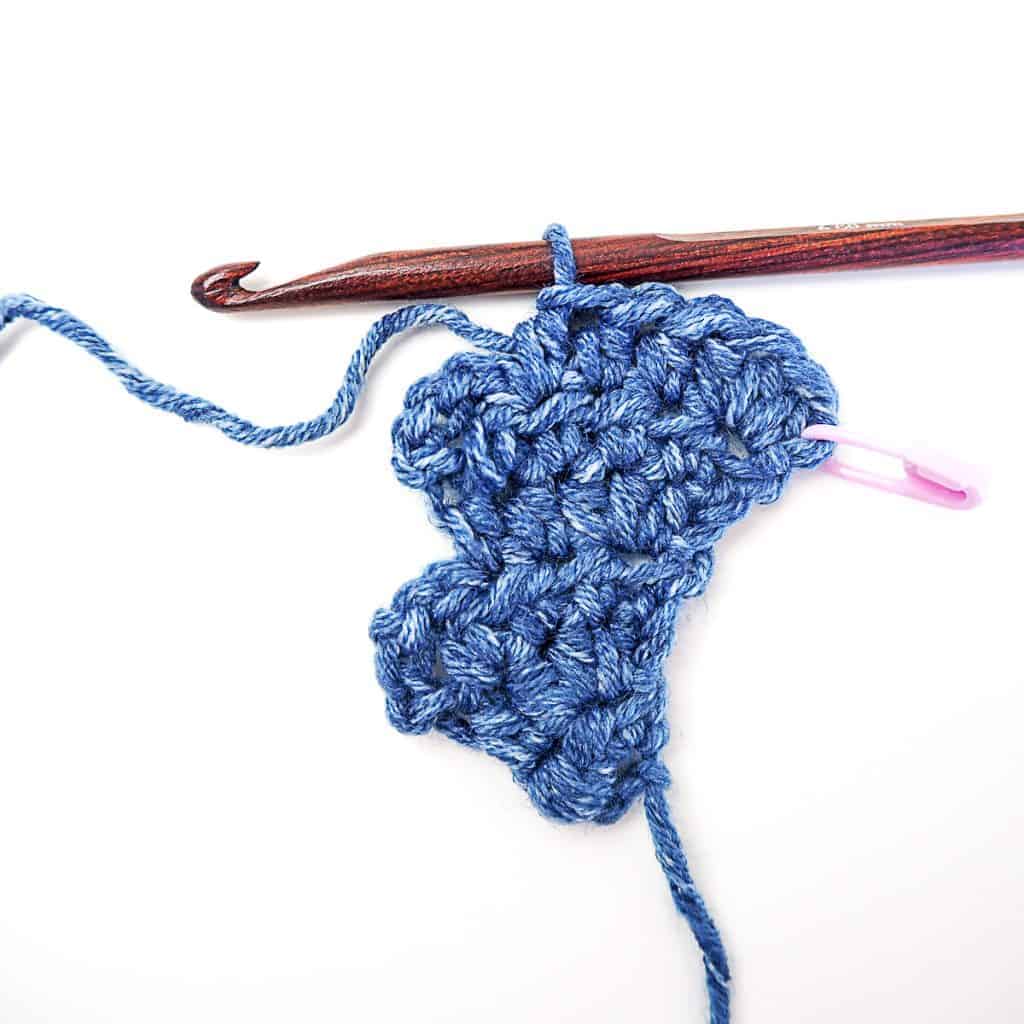
After finishing a few rows you can see how the tail shapes:
Finishing
Fasten threads & weave in ends.
Block shawl to specified size.
Share & Worth Noting
Thank you for sharing my FREE patterns & tutorials. When you do, you support me & the blog, which makes it possible to continue sharing free content with you.
Not all content on this blog website is free, but the more you share, the more free content I will be able to share. Note that all premium content are ad free.
My crochet patterns can be used to sell handmade pieces. You are required to credit Joy of Motion/Janne Kleivset as the designer by linking back to My website: https://joyofmotioncrochet.com. You can not use my pictures when selling your handmade items. Finally, you can not resell, reprint or share any parts of my patterns as your own.
10 OTHER CROCHET PATTERNS YOU MIGHT ENJOY!
- Crochet Mollis Wrap Cardigan – FREE Crochet Pattern
- Crochet Citus Doormat – FREE Crochet Pattern
- Crochet Easy Plant Hanger – FREE Crochet Pattern
- Nautical Knots Pullover – FREE Crochet Pattern
- Crochet Beachcomber Halter Top – FREE Crochet Pattern
- The Sun-Ray Summer Tee – FREE Crochet Pattern
- Filet Cabled Cardigan – FREE Crochet Pattern
- Aprilis Lace Shrug – FREE Crochet Pattern
- Crochet Flavus Cardigan – FREE Crochet Pattern
- Crochet Spring Tulip Basket – FREE Crochet Pattern

