

When I think warm-weather crochet, lacy white projects are typically the first things that breeze through the mental open window in my “summer brain”. While they tend to take a little while to complete, these daintier patterns are worth it. As it happens though, the project and pattern I am bringing to you today does provide a little bit of a break from being too time-intensive.
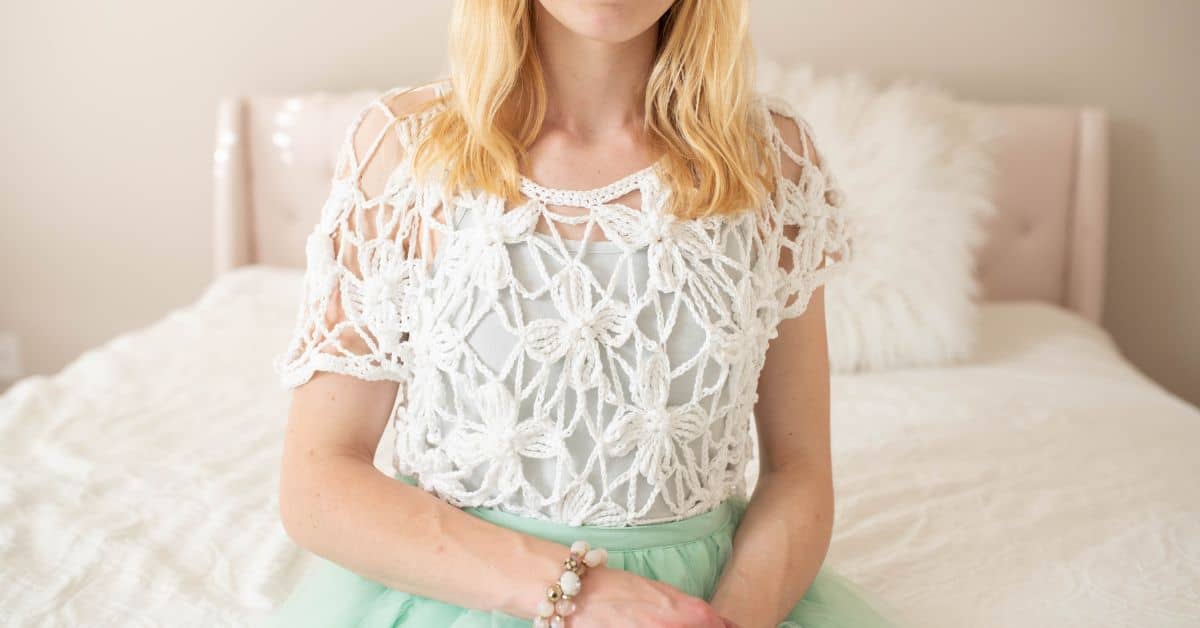
The Dogwood Flower Top is inspired by one of my favorite local spring blooms-the Dogwood Tree! Just like these bright, classic trees add so much beauty to our landscape in spring, this lacy outer layer has been created to be a very pretty, feminine spring or summer top. It is also based on a pattern I previously wrote for the standalone flower design, so this could be a very portable project while you make the flowers individually. The only part that will require the space and concentration of a larger project will be putting the flowers together.
Find more: 31+ Women’s Top Crochet Pattern Collection.
Would you like to save this?
The Yarn
To be perfectly honest, I did not spend too much time trying to find the absolutely perfect yarn for the Dogwood Top. While white, finer weight yarn was an obvious choice, using a specialty yarn was not. So, I counted it as a quick win to find this Cotton Fair yarn (by Premier Yarns) at Michaels. This yarn has been very easy to work with, feels nice and soft, and provides the vibrant, bright white that I wanted for this project.
The picture below shows my snowy-looking pile of crocheted Dogwood flowers, the layout of the flowers before I started to connect them, and finally the look that the top began to take on as the flowers were brought into the connected piece one by one.

A Multipurpose Piece
The Dogwood Flower Top is really made to be styled in multiple different ways. Obviously it is a very summery and warm-weather article, but depending on the outfit it is a part of it can really take on several different looks. I made mine a good length for wearing with high waisted skirts or bottoms, and as you can see the results really range from classy to very bohemian. The almost free-form way that the flowers are joined also makes it just a little bit abstract.

How Long Does It Take To Crochet That?
How long it takes to crochet something varies depending on your skill & how fast you crochet. But that isn’t a helpful answer is it?
Well, I’ve developed a yarn calculator to help you get the answer to this question.
It will help you calculate exactly how much time you’ll spend crocheting a project.
All you need to know is how much yarn you will use on the project in either meters, yards or skeins. Then crochet your test square & time it.
Calculate how long it takes to crochet that.
The Dogwood Flower Top – THE FREE CROCHET PATTERN
Pattern Options
GRAB THE PDF ON ameliamakes.com!
About The Pattern
The Dogwood Flower Top runs in a size small to medium in the way I made it. However, you can really follow these instructions to make any size by either using more/fewer flowers or by changing the number of chains that you use to connect between the flowers. If you study the pattern, you will see how easily it can be adapted.

Project Level
While the concept of joining the flowers together is not at all complicated, I am labeling this project as intermediate because of how the flowers are placed and connected in a rather free-handed way.
WHAT’S YOUR CROCHET SKILL LEVEL?
Take the Quiz
Get helpful tips for your next crochet project & increase your skills!
Materials Needed
Crochet Hook
Size 3.5 mm / US: E – 4 / UK: –
Yarn
Yarn used: Cotton Fair (color white)
Yarn Brand – Premier Yarn
Yarn amount used:
2 skeins / 7 oz / 200 g / 550 m / 600 yards
Yarn characteristics:
- 2 fine yarn, fingering weight.
- 52 % cotton, 48 % polyester
Other Materials Needed
- Needle, find one here (if you don’t already have one)!
Gauge
Each flower measures about 3.75″ from end to end(or from one petal end to the end of the opposite petal).
Notes
- This crochet pattern is written in US terms.
- All measurements given are unblocked.
- Note that measurements are given as exact as possible. But crochet tension & technique might give variations in the result, that changes from person to person.
- Read pattern instructions carefully before beginning to make sure you understand everything. It might save you hours frogging your work & crocheting it again!
- Make a couple of flowers to see if you can get the size t0 turn out pretty consistent. you might need to change your hook. Go up in crochet hook size if your stitches are smaller & go down in crochet hook size if your stitches are bigger (more details).
- Check yarn info if you want to find an alternative or test your yarn against the gauge. Learn more about substituting yarn.
- This pattern is written for 1 size. However, suggestions for adapting the size are included under the heading “Size & Measurements”.
Size & Measurements
Width: About 22 inches on the end(s), with an extra 5-6″ in the middle of the piece for sleeves.
Height: About 30 inches.
Note that these measurements are when the flowers are laid out and stitched together. In the middle of the work there is a neck opening as well as some extra flowers on the edges to help create the sleeves.
As I mentioned above, the Dogwood Flower top is a size small to medium. It uses 45 flowers total and joins that are 7 chains long each. So, once you take a look at how I put the project together, you can decide to change those details (the number of flowers you use and how many chains you use to connect them) to suit your sizing needs and preferences.
Abbreviations
- ch = chain(s)
- sl st = slip stitch
- st = stitch (es)
- qtr = quadruple treble crochet
We try our best to include all crochet abbreviations in the list above for the crochet pattern, but sometimes we may forget one or two.
Learn more about crochet abbreviations & find a complete list on our Crochet Abbreviations & Terms post.
Stitches You Will Need
Quadruple Treble Crochet
The Quadruple Treble stitch is the only less common stitch used in this top. It is merely a tall post stitch, being one “step” taller than a treble crochet. Basically, you start the stitch in the same way as a treble crochet, with one extra yarn over, and then the stitch is completed in the same way.
Techniques You Will Need
Magic Circle
I utilize the magic circle to start every one of the Dogwood Flowers. If you don’t yet know how to use the magic circle confidently (or if you’ve never tried it before) you can practice using my magic circle tutorial. Alternatively, you could also make a small chain-perhaps four stitches or so- and slip stitch the ends together to get each flower started.

Dogwood Flower Top Pattern Instructions
Flower Pattern (make 45):
Note: This part of the pattern is based on my original Dogwood Flower pattern.
Round 1: *ch 6, ss into magic loop. Ch 4, ss into magic loop* repeat 3x for a total of 8 loops. Ss into the bottom of first loop and cinch magic loop tightly closed.
Round 2: going behind first ch 6 space, ss into the first ch 4 loop. Ch 6. Qtr 5 into the same ch 4 loop. Ch 6 and ss into the same ch 4 loop to finish the first petal.
Go behind the next ch6 space, and ss into next ch 4 space.
Repeat three more times so that you are left with four petals total.
Fasten off & cut yarn.
After I finished all of my flowers, I went back and tied the two ends tightly together(since you end each flower close to where it began). This allowed me to snip off my ends rather close and not weave them in. Plus, the knot gave me some assurance that my magic circles would not loosen up with wear.
Assembling the top
After completing all your flowers, stitching them together with lacy chains actually doesn’t take that long. However, it is best if you can lay out all of the flowers in their places and leave everything out until you have all of the flowers incorporated into the main piece.
As you may have seen in the progress pictures, setting up the flowers to stitch them together means putting them in rows, with the rows alternating so that the petals from one row of flowers fits into the “dip” between flowers in the row(s) beside them. With the length of the connecting chains, the flowers are about 1″ to 1.5″ in every direction.
Here’s how to lay out the flowers for the original design. Starting with what will become the front bottom edge of the top, put this many flowers in each row(staggering them):
Row 1: four flowers
Row 2: three flowers
Row 3: four flowers
Row 4: three flowers
Row 5: four flowers
Row 6: This is where the neckline opening starts. There are four flowers total but over a longer row. Two flowers go on one side, then a space for one flower is skipped in the middle, and then two flowers finish the row.
Row 7: Continuing with the neck opening, we have another row with four flowers total but over an even longer row. Two flowers go on one side, then a space for three flowers is skipped in the middle, and then two flowers finish the row.
Row 8: five flowers
Row 9: four flowers
Row 10: three flowers
Row 11: four flowers
Row 12: three flowers
Once you have your flowers arranged, you can start chaining to connect them. I recommend starting at one of the corners of the shirt so that you can work up and down each row and only cut and re-attach your yarn a minimal amount of times. I was able to only cut it once, after chaining all the way around the neckline and attaching the flowers there.
As mentioned before, each chain to connect these flowers is seven stitches long. Starting with two flowers and then incorporating a new one, here, is how my pattern went for connecting the petals with chains(these notes are for each time I was ending a chain with a slip stitch, or wherever I was chaining to)
Top of one petal one on flower one, top of petal one on a second flower, middle of petal one on the first flower again, then on to the middle of petal one on the second flower. Then, top of the closest petal on a third flower, which would be followed by probably going to the middle of a petal, and so on.
This is how I typically went about creating and connecting the chains, but at many different times there were slight variations.
After all the rows are done, it is easiest to hang the top on a hanger through the neck opening, and use chains of seven to go back and forth connecting the sides (up about three rows of flowers).
At the arm openings I did several more chains and connected them to each other until I was satisfied with the shaping of the sleeves.
To give the top a cleaner finish, the last thing to do is single crochet two rounds of stitches around the neckline and sleeves. I chose to leave the hem of the top “raw” to show off the shape of the flowers but you could also chain and then single crochet around the bottom as well for a straight edge.
Finishing
When you’re finished crocheting you have Just the one main part, which is all of the dogwood flowers put together in the right layout. At this point, simply fasten off threads & cut off/weave in the ends!

Share & Worth Noting
Thank you for sharing my FREE patterns & tutorials. When you do, you support me & the blog, which makes it possible to continue sharing free content with you.
Not all content on this blog website is free, but the more you share, the more free content I will be able to share. Note that all premium content are ad free.
My crochet patterns can be used to sell handmade pieces. You are required to credit Joy of Motion/Janne Kleivset as the designer by linking back to My website: https://joyofmotioncrochet.com. You can not use my pictures when selling your handmade items. Finally, you can not resell, reprint or share any parts of my patterns as your own.

