
Are you ready to learn how to crochet the bubblepattern? It’s for sure my favorite crochet stitch. The bubblepattern is a beautiful crochet stitch, & I love the texture it makes in any crochet Project. I can’t really remember the first time I came across this stitch, however it was one of the first crochet stitch pattern I learned. The stitch might have other names, but it’s really one of my favorite crochet stitches!
If you have bought one of my crochet patterns, you might want to learn how it is crocheted. The crochet patterns offers written text in addition to charts, however here I will share a step by step picture tutorial with you.
Today I suggest that you learn the stitch & then you should use it in a crochet project! You can make you own, but in the bottom of this post I have also included all crochet patterns that are using the bubblepattern!

Crochet Stitch Pattern Bundle
Like this? Get the ad-free version + 19 other crochet stitch patterns with the “Crochet Stitch Pattern Bundle“.
Learn more about the Stitch Pattern Bundle
OTHER CROCHET STITCHES YOU MIGHT WANT TO LEARN:
Before you start learning the crochet stitch for this post, I want to share other crochet stitch tutorials from Joy of Motion. Just click the link & open them in new tabs to learn them later.
Pin on Pinterest!

MATERIALS YOU’LL NEED TO LEARN THE BUBBLEPATTERN:
Crochet Hook:
To follow this crochet tutorial you’ll need a crochet hook. When I crochet I usually use 2 types of crochet hooks. I’ve listed them below:
- Knitpro – Symphonie Rose Crochet Hooks – My first choice as of now is the Symphonie Rose Crochet Hooks from KnitPro. They opened my world to wood hooks & impressed me with their amazing lightness & how they feel in my hand. Even though they’re not padded, they never give me any strain while using them. I’ve only come across them in sets They are available here:
- KnitPro – Waves Crochet Hooks – Are the crochet hooks I use almost as my favorite. They are padded hooks & are comfortable to crochet with. They are a little heavier than wooden hooks, but the padded comfort is truly amazing. You can purchase these both in sets & alone. They are available here:
- Love Crochet
- Wool Warehouse
- Wool Warehouse (set)
- Amazon
- Amazon (set)
- Etsy
Yarn:
You’re going to need some yarn to follow this crochet tutorial to learn a new crochet stitch. I really do love purchasing my yarn online. Here’s my top yarn resources:
Crochet a blanket!
Use this crochet stitch pattern to crochet a blanket! Learn more about crochet blanket sizes & making one with any size crochet hook & yarn:
HOW TO CROCHET THE BUBBLEPATTERN – PHOTO TUTORIAL
Step 1: Setup

How to start: Since the purpose of this post is to learn the stitch I suggest that you start by making a small test square:
- Chain 10 stitches, turn.
- Single Crochet along chain row, turn.
- Then you are ready to start learning how to crochet the bubblepattern!
- If you are uncertain about “Chains” and for “Single Crochet”, view the Beginners Guide To Crochet.
Step 2: Chain 1

Start every row of bubblepattern with Chain 1.
Step 3: Insert Crochet Hook In Next Stitch/Indicated Stitch

Insert hook in next stitch from front to back, or in indicated stitch.
Step 4: Yarn over

Yarn over from back to front, ready to pull yarn through the stitch.
Step 5: Pull up a loop

Pull up a loop, you now have 2 loops on your crochet hook.
Step 6: Yarn over from back to front

Yarn over from back to front, you are now ready to insert hook in same stitch.
Step 7: Insert crochet hook in same stitch

Insert crochet hook in same stitch to be able to pull up another loop.
Step 8: Yarn over and pull up a loop

Yarn over and pull up another loop. You now have 4 loops on your crochet hook.
Step 9: Yarn over

Yarn over from back to front. Ready to finalize the first cluster/mini bubble.
Step 10: Pull yarn through all 4 loops on the crochet hook

Pull the yarn though all the loops on the crochet hook.
Step 11: All loops pulled through, 1 loop on hook

This is how it looks after you pulled through the 4 loops that was on the crochet hook. Ready for the final steps of the bubblepattern.
Step 12: Chain 1 and skip 1 stitch

Crochet one chain and skip 1 stitch before you start back on step 3.
Repeat steps 3 – 12 until you reach the end of the row. Single crochet in last stitch.
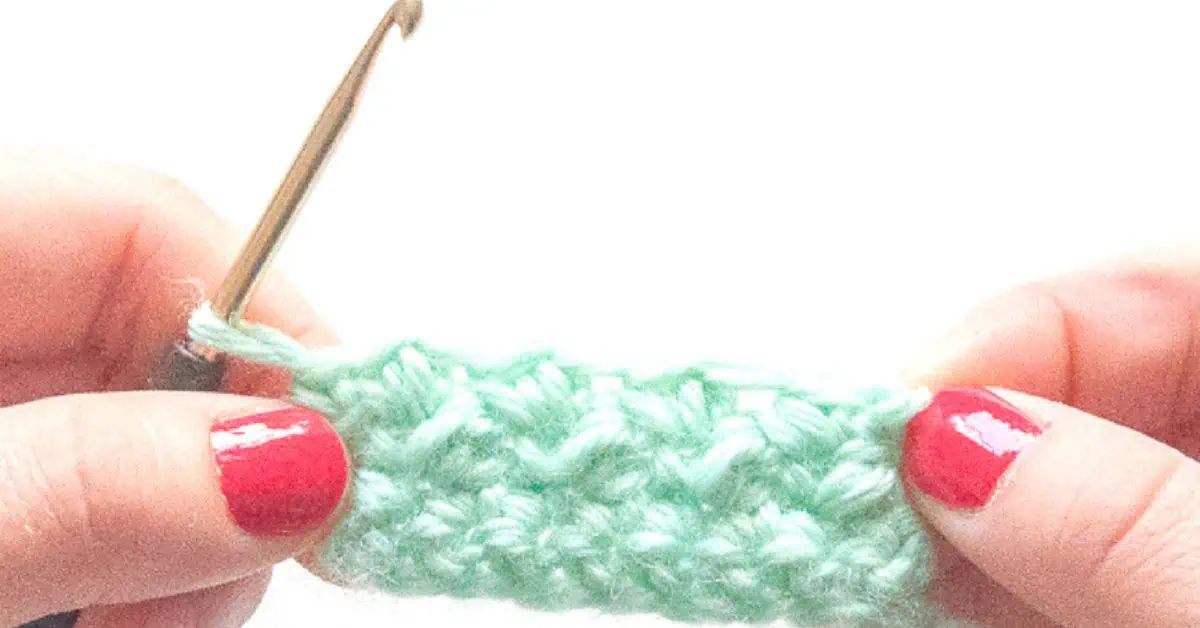
Row 2 of the Bubblepattern
When you turn & crochet the second row you should put your hook through the bubble from last row, not the chain. However if you are working in rounds or spirals you will put the hook in the chain from last round to make your bubble. After two rows it should look like this:

Notes
The video shows you how to crochet the bubblepattern.
Compare this with the written instructions & you should have a feel about how it’s done.
HOW TO CROCHET THE BUBBLEPATTERN – WRITTEN GUIDE:
*draw up a loop, yarn over, draw up a loop from same stitch, yarn over, pull through all, chain one – skip the next stitch* repeat. Start rows with chain (ch) 1 & end rows with single crochet(sc) 1.
Crochet Abbreviations
- ch – chain
- sc – single crochet
We try our best to include all crochet abbreviations in the list above for the crochet stitch pattern, but sometimes we may forget one or two.
Learn more about crochet abbreviations & find a complete list on our Crochet Abbreviations & Terms post.

CROCHET PATTERN DESIGNS USING THE BUBBLEPATTERN:
I hope you enjoyed learning how to crochet the Bubblepattern. Comment below to let me know what you used the crochet stitch for, I’d love to see what you’ve made!

